One of the main drivers you should consider when choosing an eCommerce platform is the checkout flow. The checkout flow refers to the series of steps a buyer follows to place their order and is a crucial factor in a store’s conversion rate!
According to Baymard’s research on checkout UX, the average site has an incredible 31 preventable usability issues in the checkout flow. So on most stores there is huge scope for improvements.
Ideally, you want a highly conversion-optimized checkout flow. Increasing the percentage of people completing the checkout process rather than abandoning their shopping cart can make or break a store in such a competitive market.
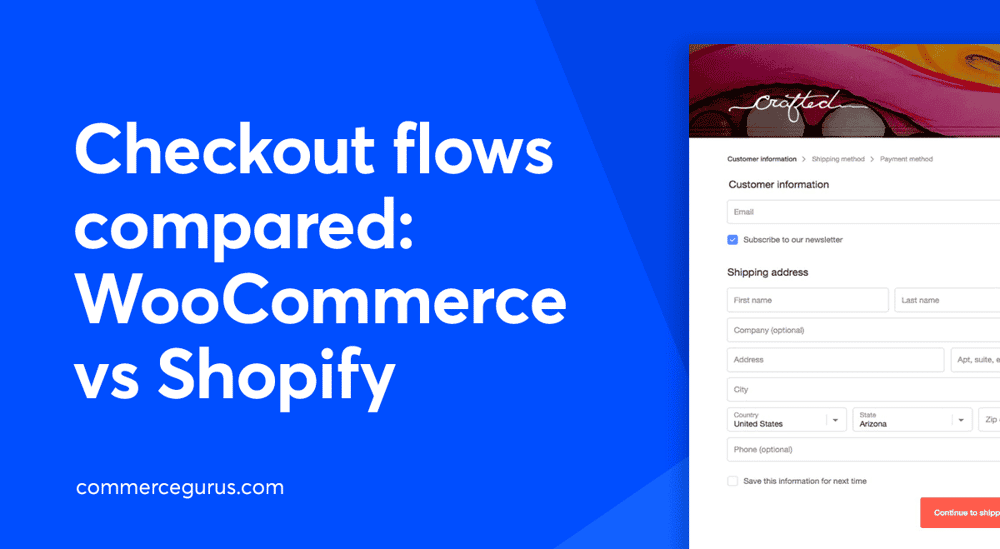
In this article, we’ll compare the checkout flows of the two most popular eCommerce platforms: WooCommerce and Shopify. We’ll also share some actionable tips on how to enhance the WooCommerce checkout flow. Let’s get started!
WooCommerce checkout flow
WooCommerce by default offers a streamlined checkout experience. It goes like this:
- Customers add products to their cart.
- They review their items on the Cart page.
- Fill out the checkout form and pay for their order.
It’s a simple, three-step process that gives customers a chance to review their shopping cart before checking out from your online store.
Let’s take a closer look at the WooCommerce checkout flow by examining the Sodashi website.
Sodashi is an Australian skincare brand, and the site’s checkout process uses pretty much core WooCommerce. So, it’s an ideal store to analyze.
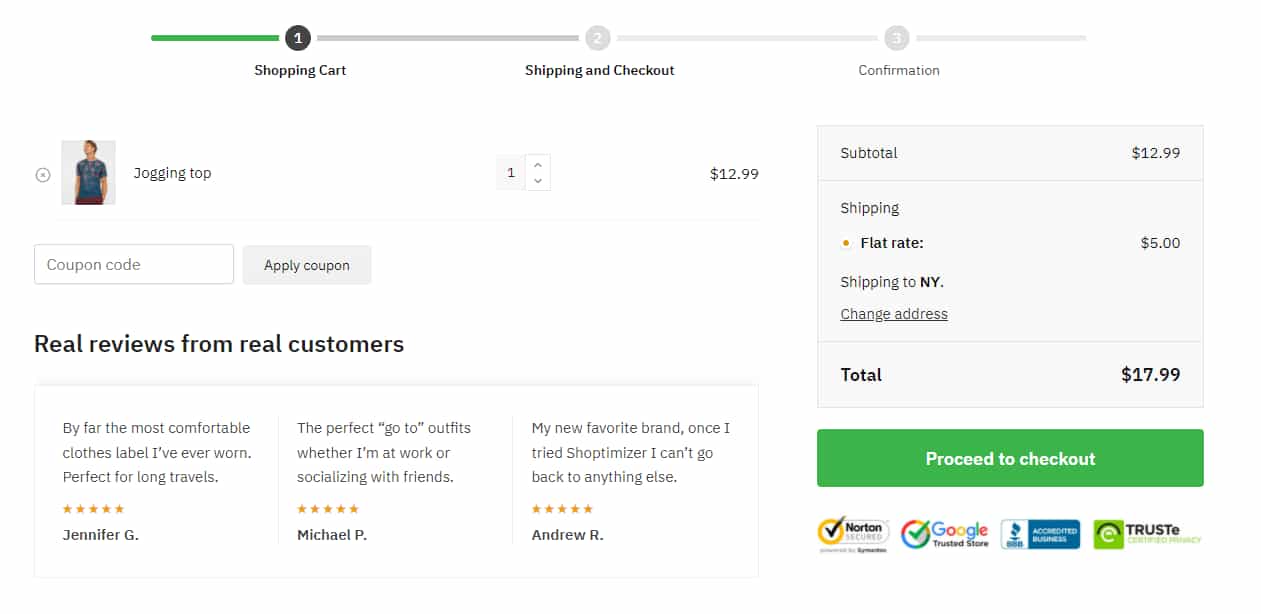
Cart page
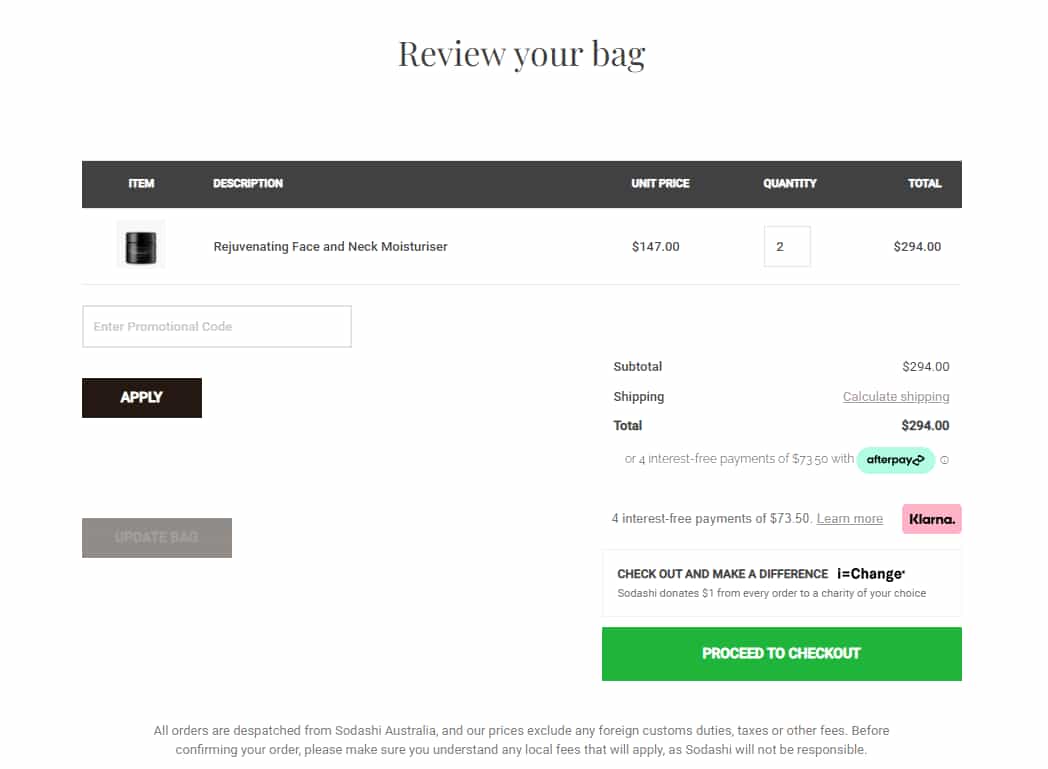
The WooCommerce cart page lets customers review the products they’ve added to their shopping cart before they proceed to the checkout.
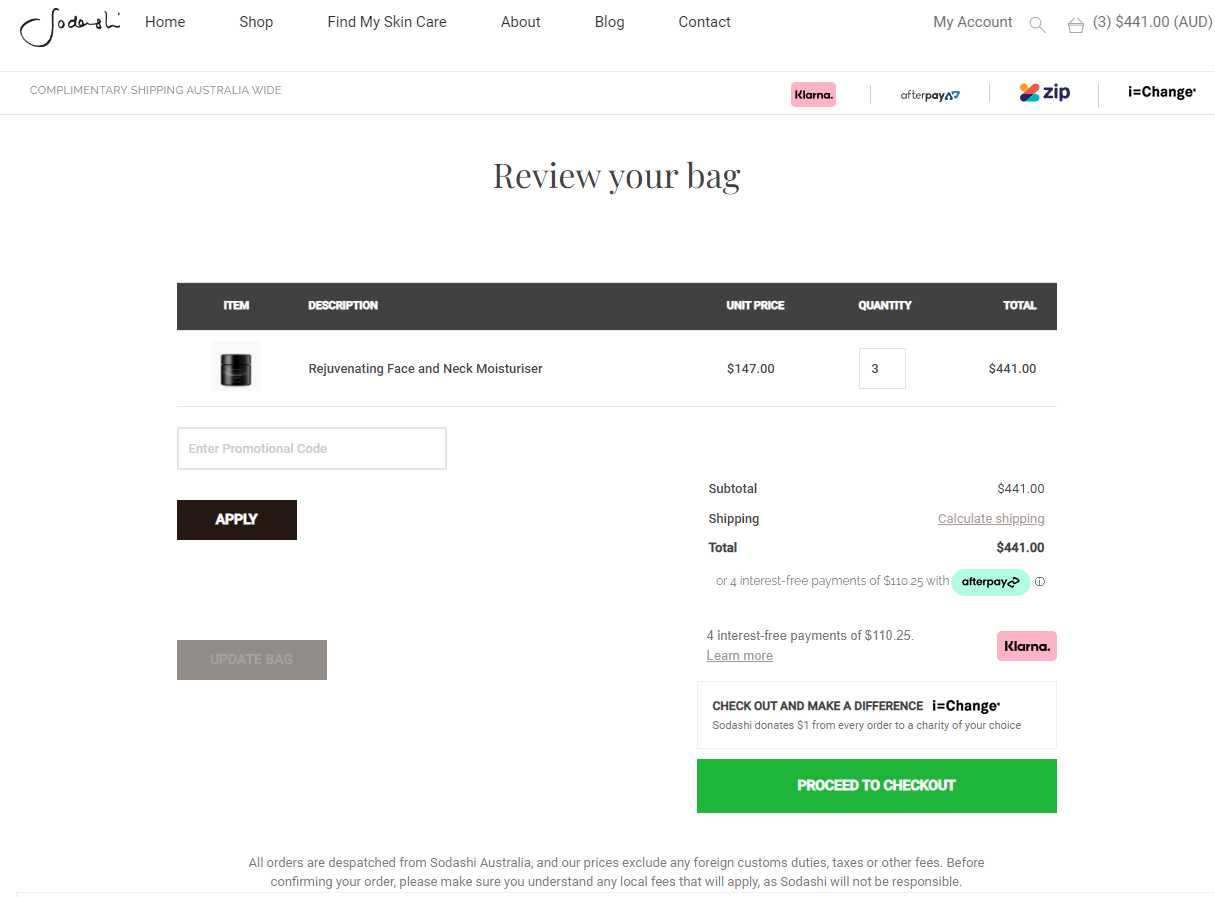
Customers can apply promotional codes, calculate their order’s shipping cost, and change the quantity of the items in their cart before moving on to the checkout form.
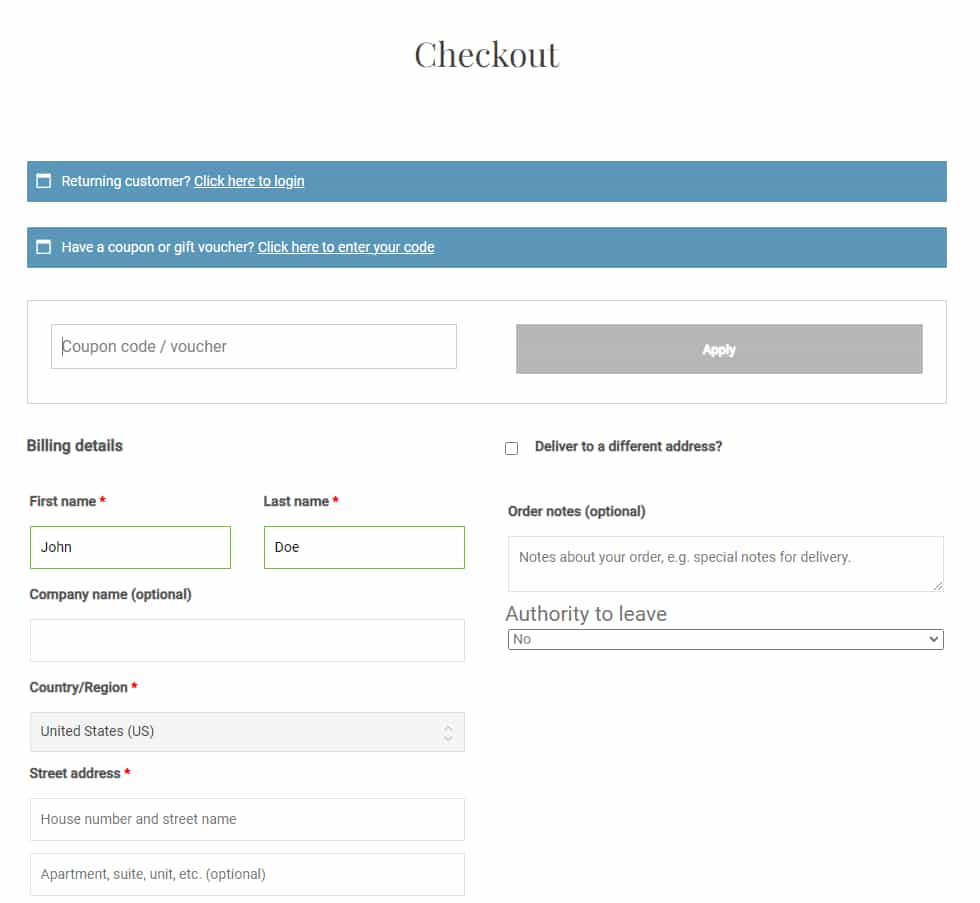
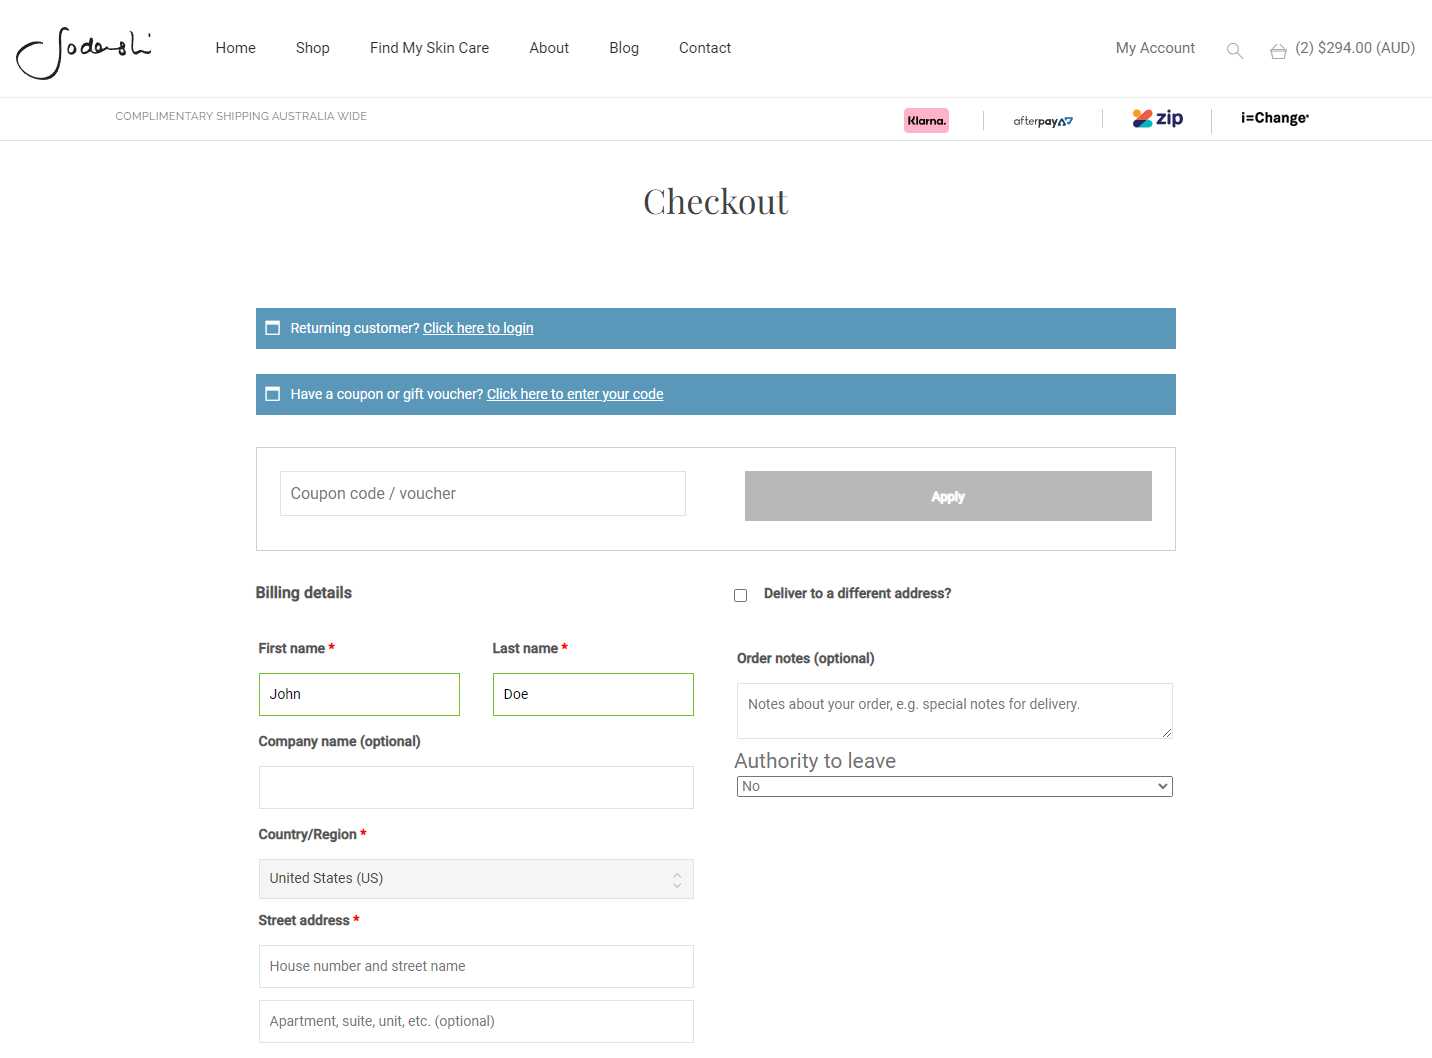
Checkout page
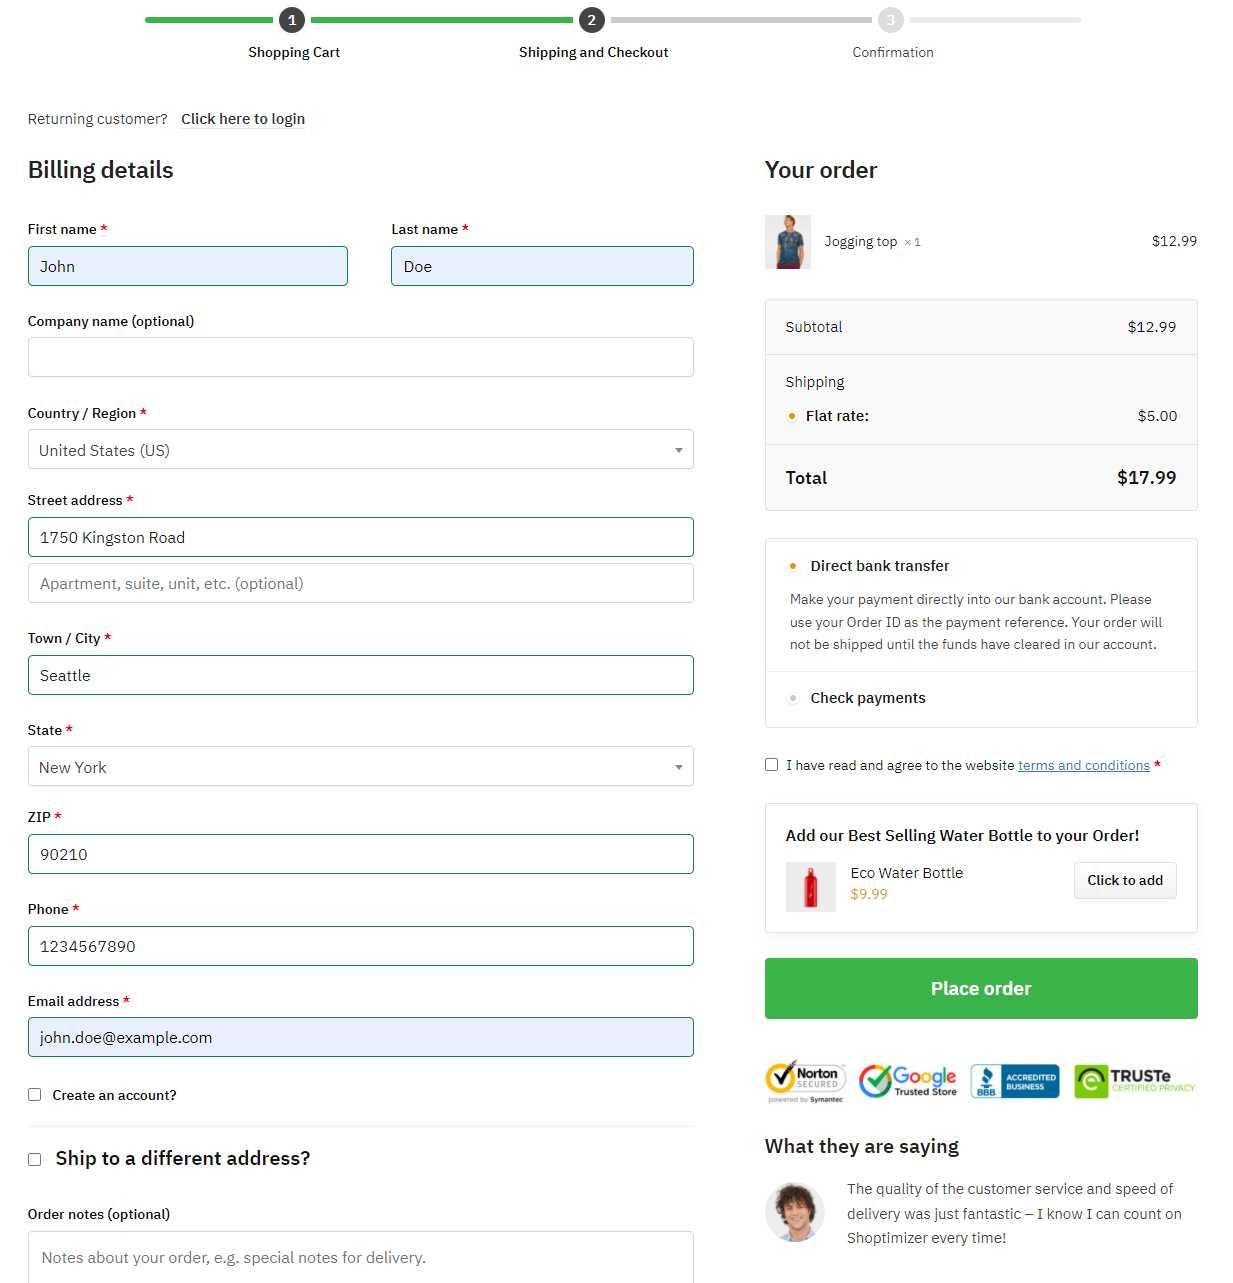
The WooCommerce checkout page is where customers enter their billing details and select their payment method before placing the order. This is what Sodashi’s looks like. It’s out-of-the-box WooCommerce and I think there is considerable scope for improvement, which we’ll get to later.
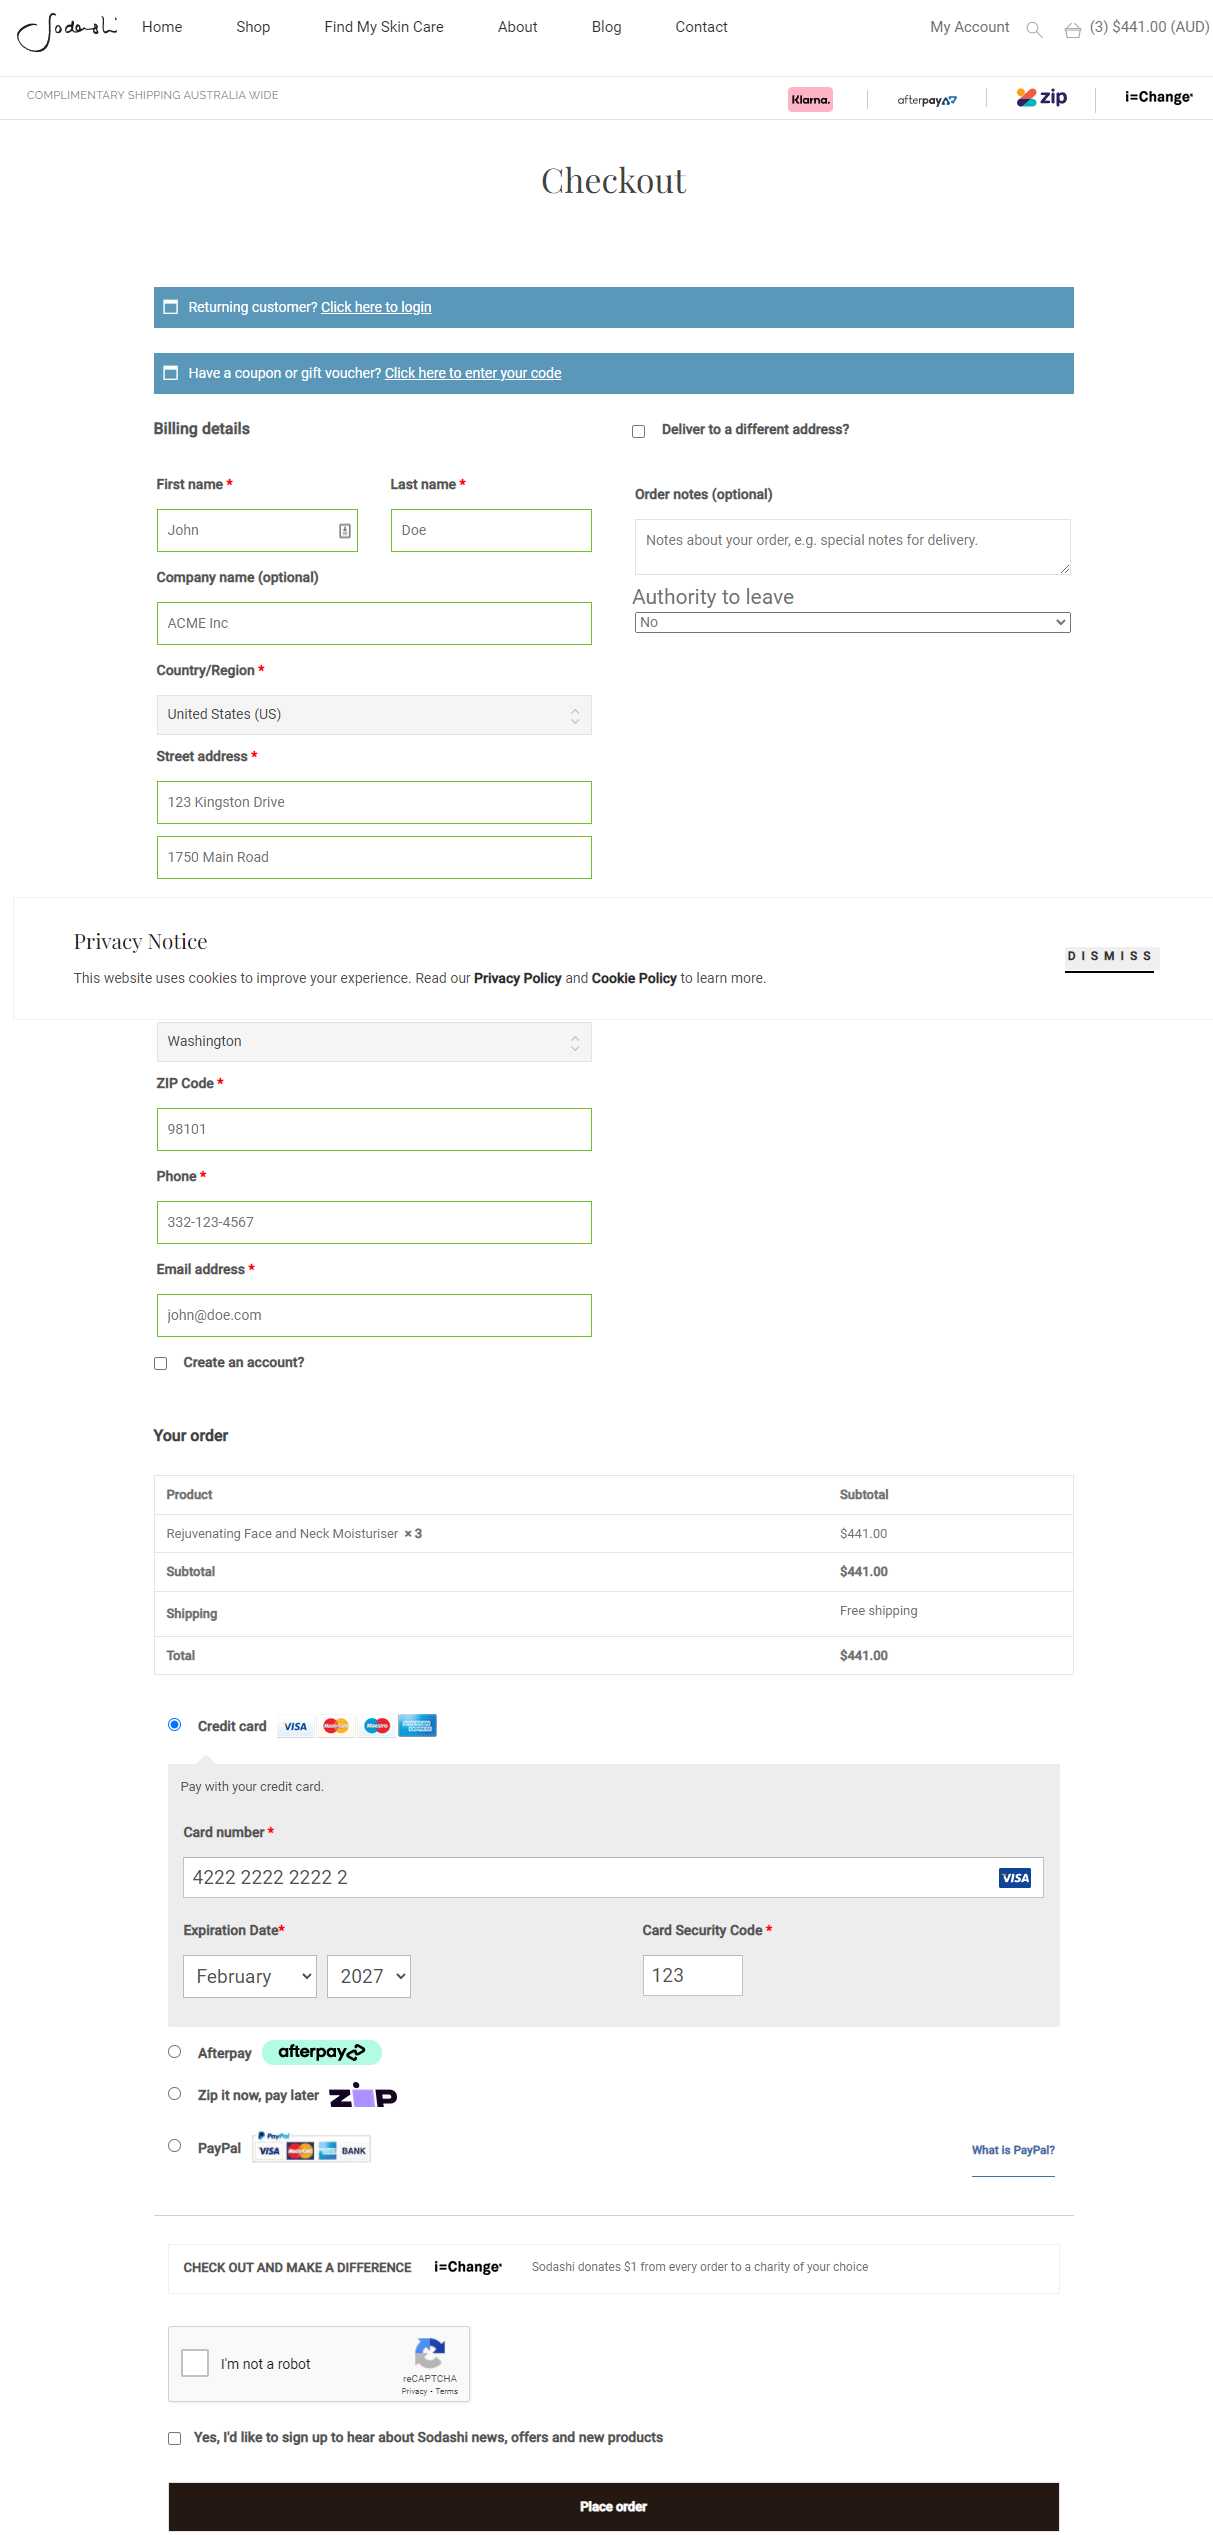
Customers can also enter discount coupons at the checkout page and review their order details before placing the order. It’s worth mentioning that customers can’t change the product quantity or remove items from their cart from the checkout page.
Overall, the process is too long. The card input is too far down the page and the Place order call to action button, although large, still doesn’t stand out enough.
Shopify checkout flow
Shopify offers a more detailed checkout process. It starts off similar to WooCommerce in that customers add products to their cart, proceeds to the cart page, and then select their checkout option before placing their order.
This is where the similarities end and the differences begin.
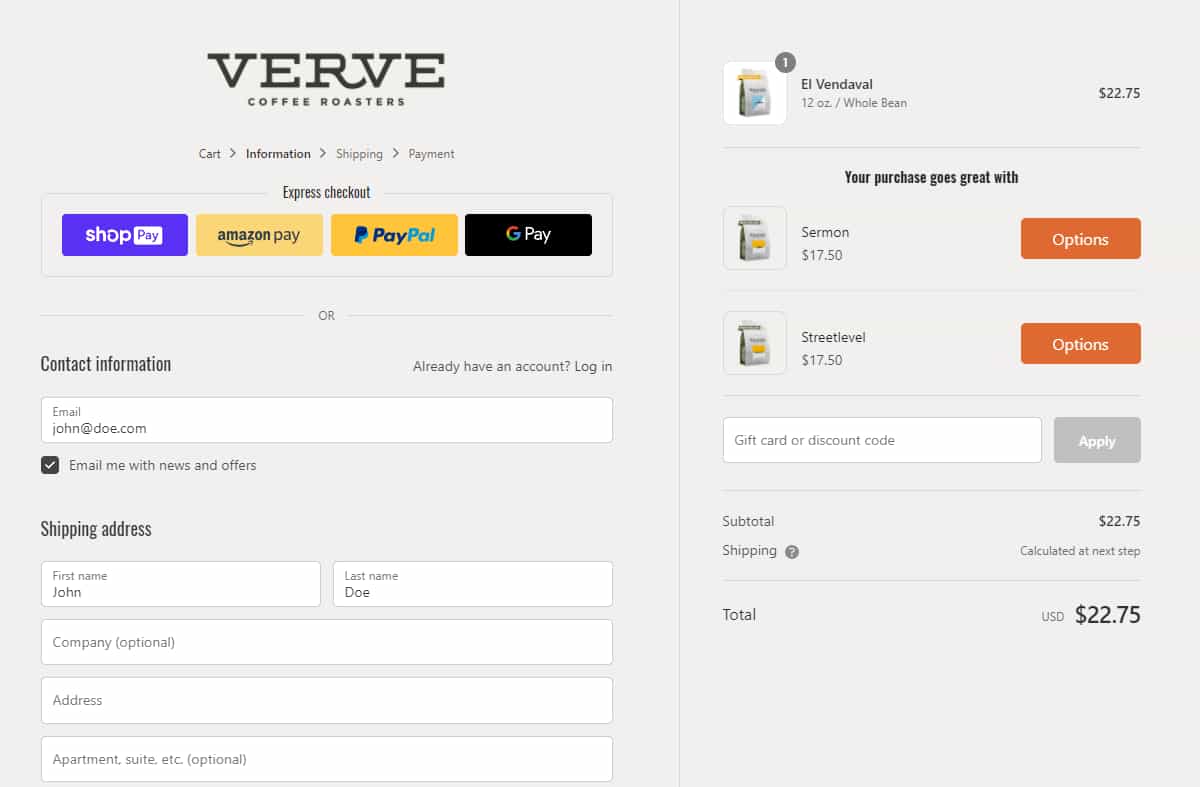
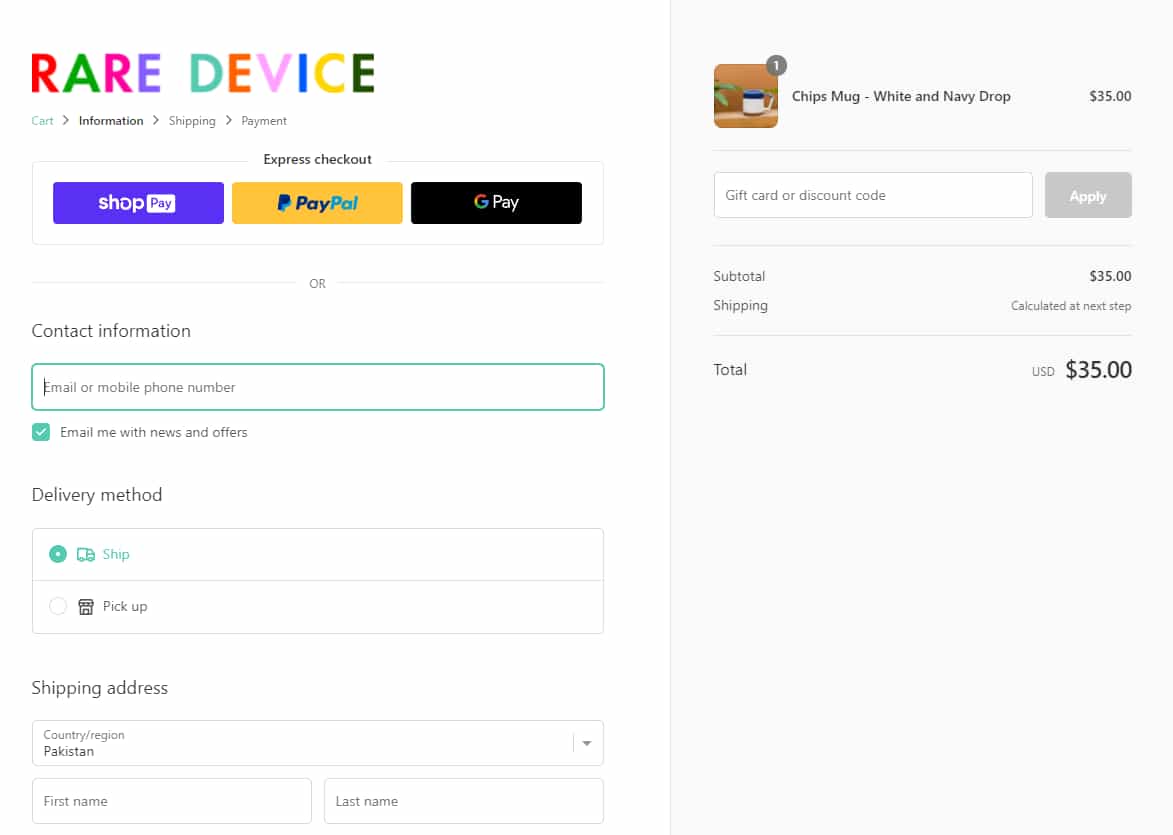
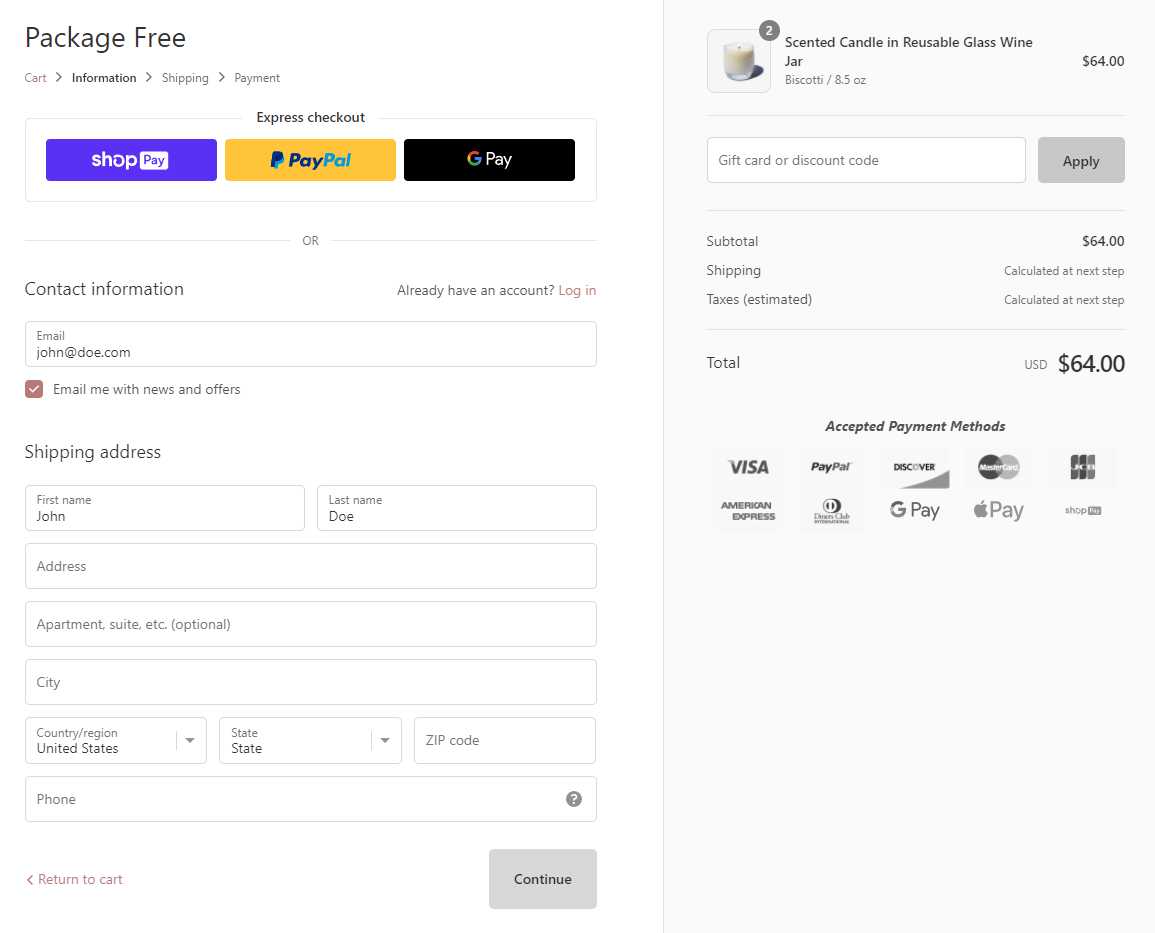
Shopify lets you offer regular checkout that allows customers to fill in their information, enter their shipping details, and then continue to the payment page. Alternatively, you can also offer express checkout which seamlessly lets the customers checkout from your online store.
Here’s how the Shopify checkout flow goes with screenshots taken from the Rare Device online store:
Cart
Customers add products to their cart and go to the cart page to review their shopping cart before proceeding to the checkout page i.e. the Information page.
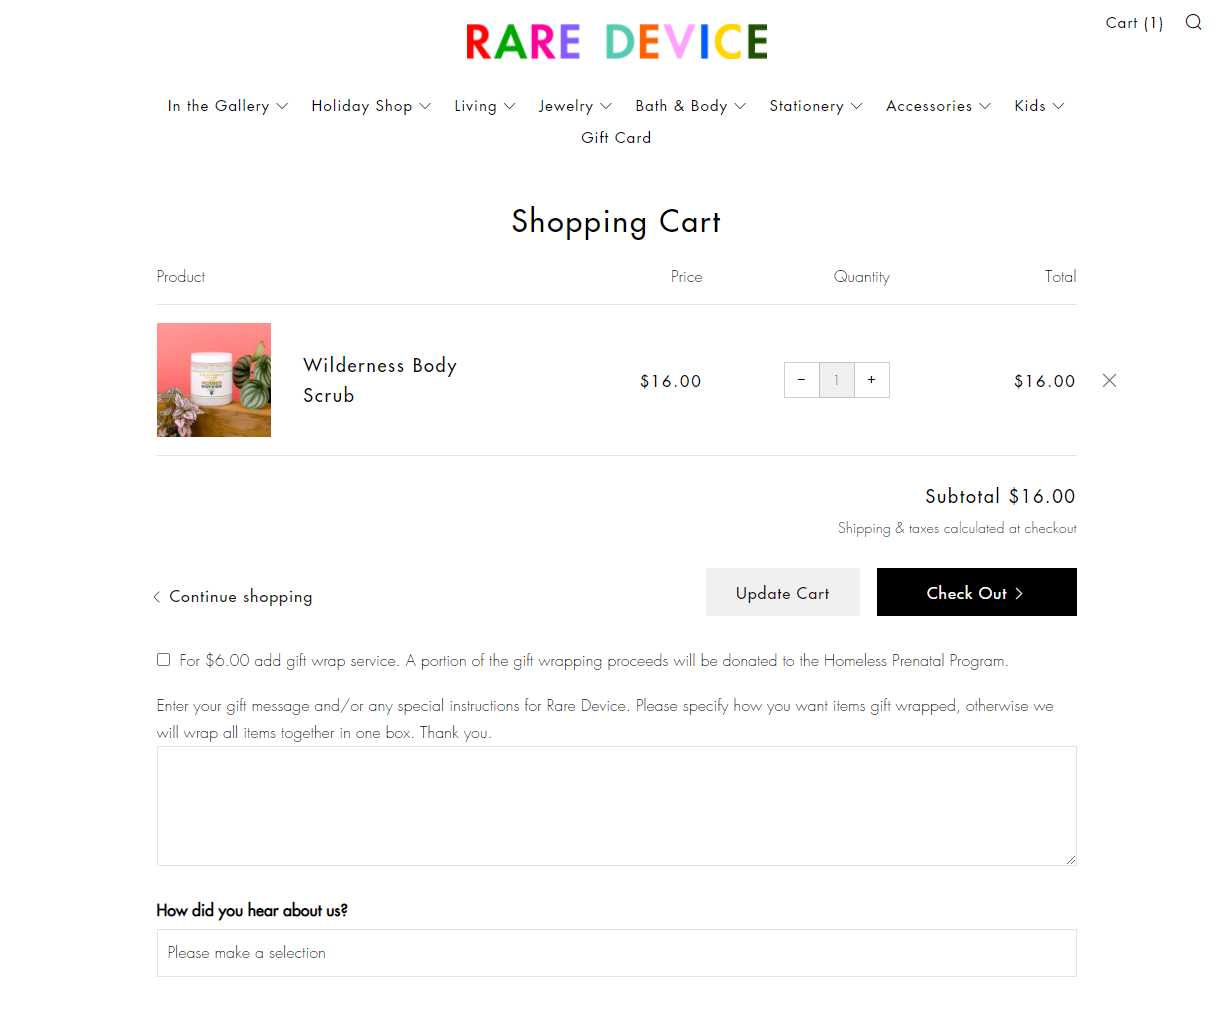
The cart page lets customers change the number of products and remove products from the cart.
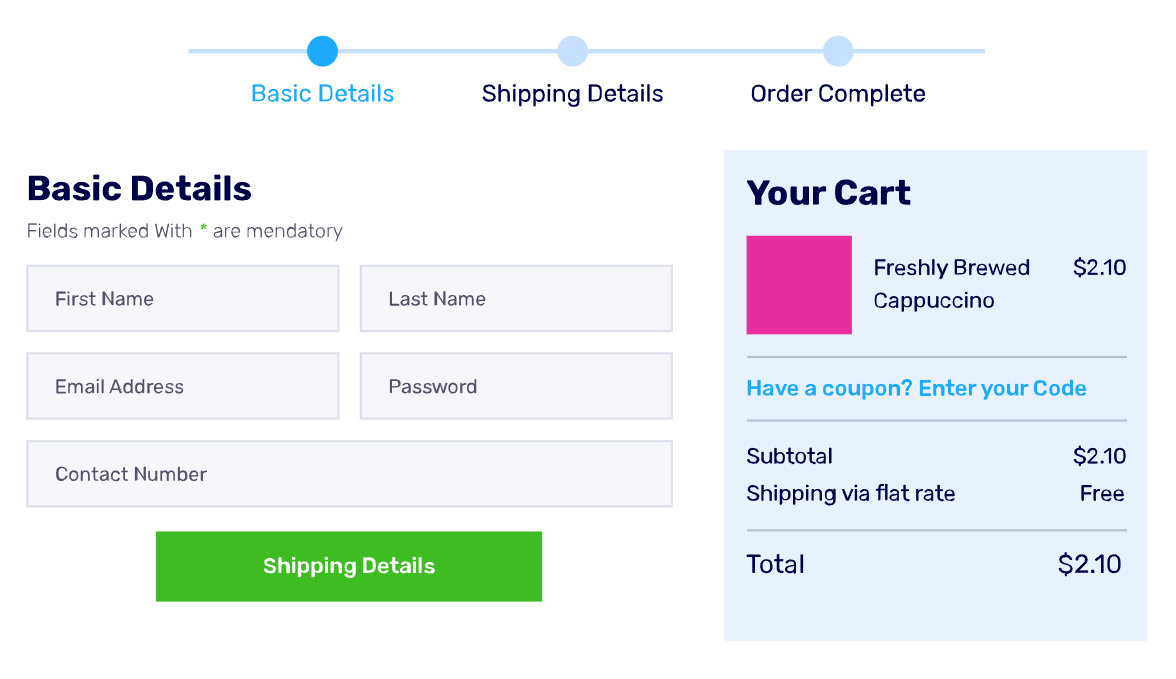
Information

Customers can enter their personal information and billing details. It also offers an overview of the total cart amount before shipping and lets customers enter discount codes.
Shipping
Once the customer clicks on the Continue to shipping button, customers will be prompted to select from the various shipping methods offered by your online store.
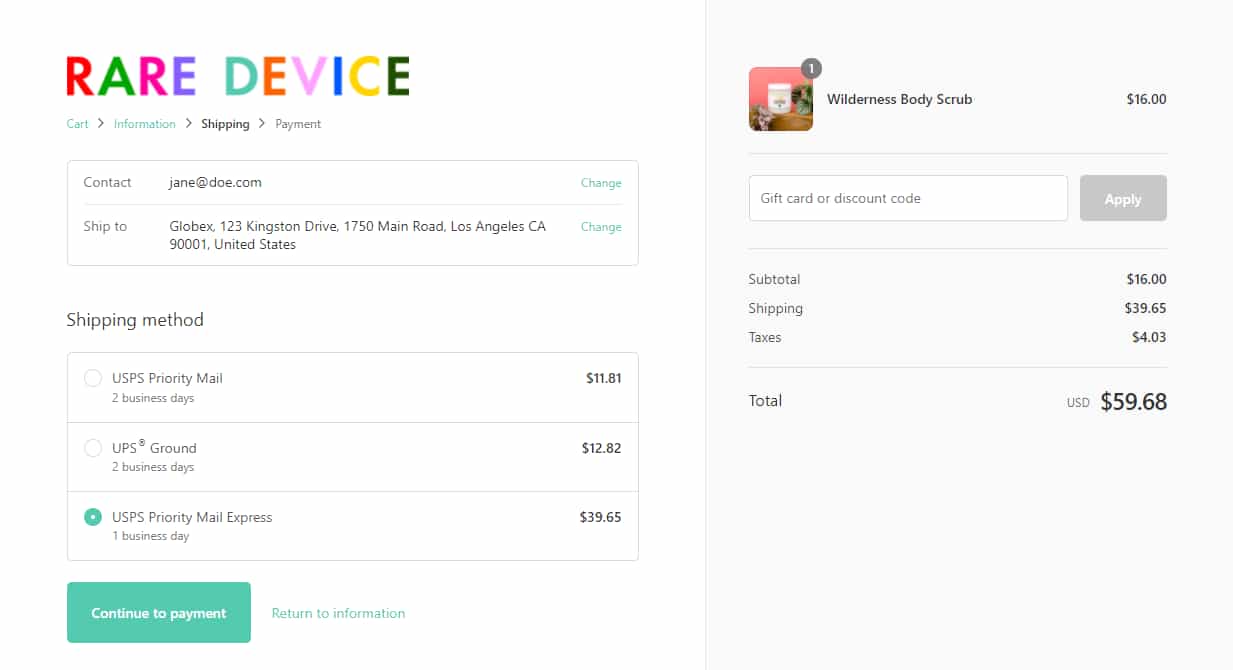
Depending on the shipping method they choose, the total price will dynamically be updated in the shopping cart.
Payment
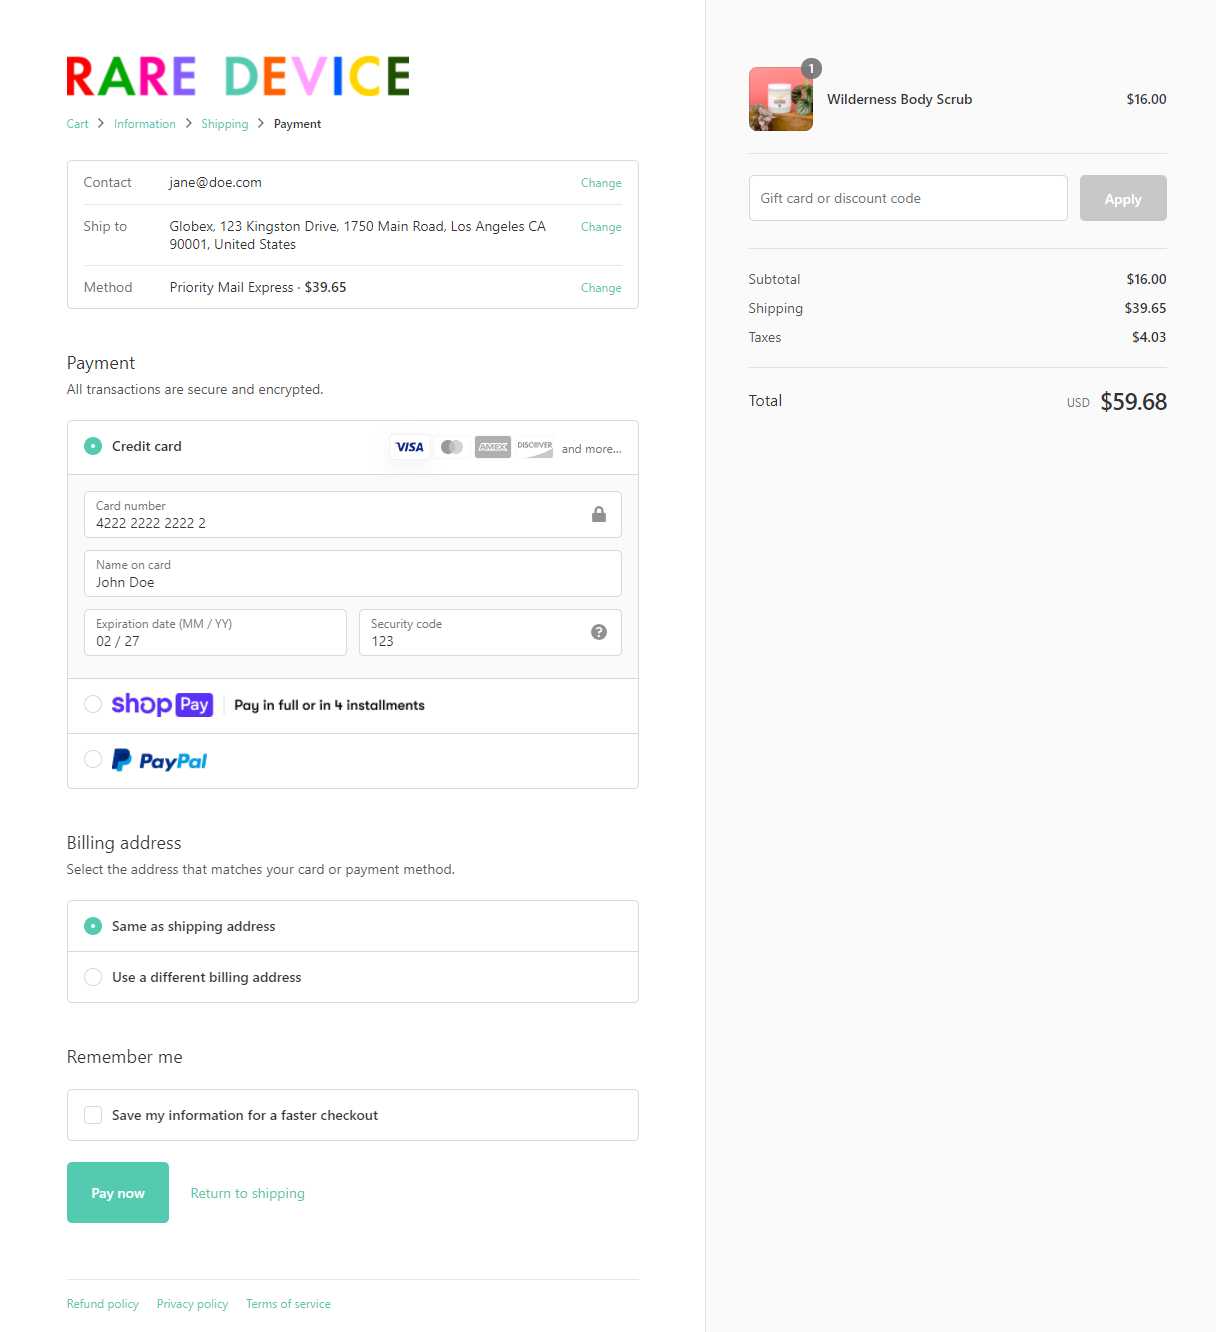
In the last and final step of the Shopify checkout flow, the customer selects their payment method and enters their payment details before placing their order.
WooCommerce vs Shopify checkout flow
From a user experience and conversions standpoint, the default Shopify checkout flow is pretty great. It’s minimal, clean, and everything is in the correct logical order.
More specifically:
- The Shopify checkout has a single, clear call to action button.
- The checkout page’s layout is organized in a logical way that makes it easy for customers to fill out.
- A one-way workflow ensures customers don’t get disoriented mid-checkout.
As a WooCommerce store owner, you might want a checkout experience that’s more similar to this for your online store.
But one area where Shopify falls short is checkout customizability. Unless you’re paying substantially more for Shopify Plus, you don’t really get too many options to customize the checkout flow of your Shopify store.
For most store owners, that’s fine.
WooCommerce, however, is a lot more flexible when it comes to customizability, and changes you might like to make.
6 ways to enhance your WooCommerce store’s checkout flow
While a WooCommerce store’s checkout flow works satisfactorily, it has considerable room for improvement. Enhancing your WooCommerce store’s checkout flow will help make your online store more user-friendly and encourage customers to complete the purchase process. After all, it’s all about the bottom line.
Here are six ways you can enhance your WooCommerce store’s checkout flow and boost sales for your business.
#1: Hide the coupon code field
WooCommerce vs Shopify checkout flow: coupon code field
The WooCommerce checkout flow lets customers enter a coupon on the cart page and on the checkout page.
Shopify, on the other hand, only shows the coupon code field on the checkout page.
When customers see a coupon code field, they’re more likely to stop in their tracks and search for a coupon.
Instead of showing the coupon field on the cart page and checkout page, you should only display it on the checkout page. And, if you don’t offer coupons, consider hiding the coupon field entirely.
Why you should hide the coupon code field
Hiding the coupon code field from WooCommerce can help declutter the cart page, especially if you don’t offer coupons.
While offering discount coupons is a great way to incentivize customers to purchase more from your online store, customers might start to take it for granted. It can cause customers to adopt the habit of only buying products once they receive a discount coupon. Worse still, many buyers go off-piste and start Googling for coupon codes, and inevitably never return to complete their order. In short, including a coupon code input field on the checkout page just might be the biggest UX mistake in eCommerce!
Removing the coupon field completely can help prevent this and speed up the checkout flow for your online store.
Actionable tips
Here’s what you need to do to hide the coupon code field in WooCommerce:
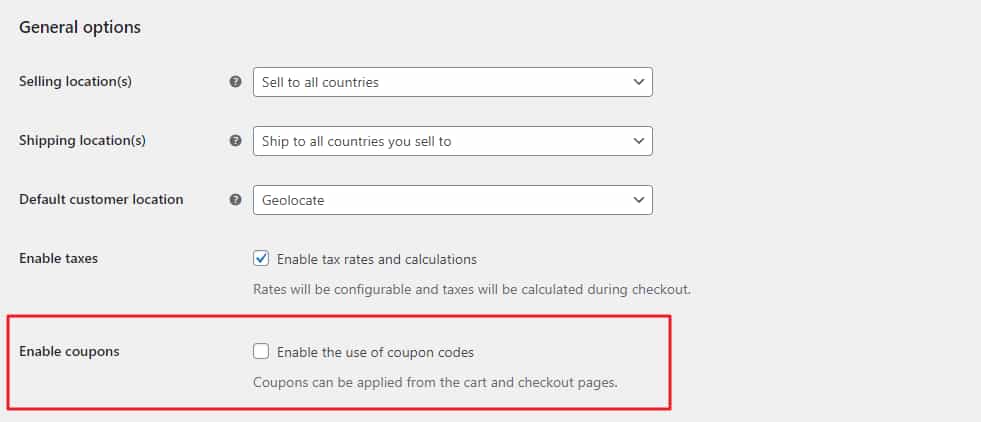
- Navigate to WooCommerce → Settings and click on the General tab.
- Uncheck the Enable coupons check field and click on the Save changes button to continue.
That’s it! All coupon fields on your WooCommerce store will be hidden completely from the front-end.
#2: Skip the Cart page
Optionally, you can use a plugin like Direct Checkout for WooCommerce to skip the Cart page entirely and go straight to the Checkout page. This, for many stores should fast-track the buying process.
#3: Create a distraction-free layout
WooCommerce vs Shopify checkout flow: distraction-free layout
The WooCommerce checkout page, by default, shows the header, navigation and the footer. Customers can get distracted and click any of these links mid-checkout.
On the flip side, Shopify’s checkout page doesn’t have a navigation menu, footer, or sidebars. The brand logo is however maintained which is important. This helps customers stay focused on the checkout form, and completing the task at hand.

Instead of giving customers opportunities to click away from the checkout form, your goal should be to create a distraction-free layout that encourages them to place their orders quickly.
Why you should create a distraction-free checkout page
Creating a distraction-free layout on your online store ensures that customers don’t bounce off from your site before completing the checkout form.
In addition to this, you only want to display information that’s important for the customer to place their order on your online store. If you display social media buttons or have your main navigation showing, customers might be inclined to click on the links before completing the checkout process.
Actionable tips
To create a distraction-free layout, remove the header and footer from your checkout page. This ensures the customer’s attention stays focused on the checkout form. Our Shoptimizer WooCommerce theme includes a terrific distraction-free checkout experience by default.
You should also consider displaying a single call to action (CTA) or Place Order button to get customers to take action.
#4: Include Testimonials
Including testimonials is also a great way to enhance the checkout flow for your WooCommerce store. Seeing testimonials and positive reviews helps customers validate their purchase decision.
For instance, a first-time customer might be worried about giving their credit card information to you. But once they see that other people have securely purchased products from your online store without any issues, they’ll be more likely to place their order.
Testimonials help show customers that other people have had good experiences buying from your WooCommerce store.
Actionable tips
When including testimonials on your WooCommerce site, it’s important to make sure they’re easy to see. Don’t bury testimonials at the bottom of the page where customers might miss them. You might also consider including a photo to put a face to the name and humanize the testimonial.
Best practices suggest that you should keep testimonials short and sweet. You don’t want to put up a wall of text as a testimonial. It makes your page look cluttered and makes it difficult for customers to read the testimonial and make a purchase decision.
#5: Upsell with order bumps
The checkout page is a great place to upsell additional relevant items. Once customers are ready to place their order, they’re more likely to add an affordable, complementary item to their cart. This can help you increase your average order value.
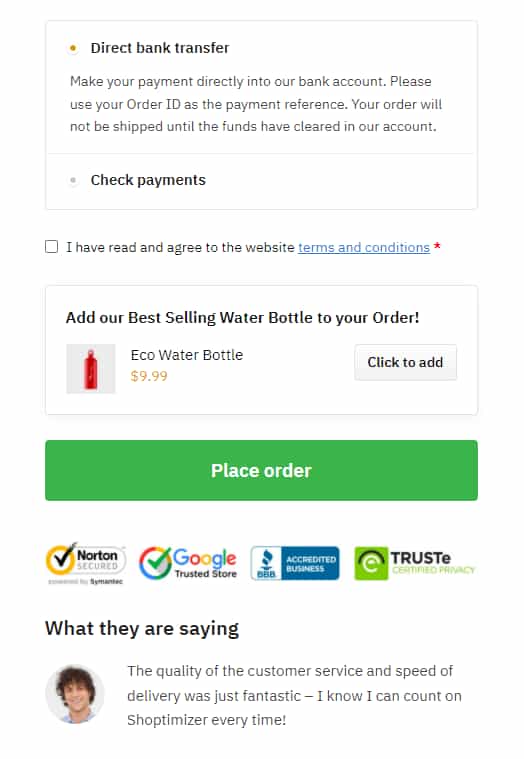
#6 Display trust badges
Displaying trust badges on your WooCommerce site is a great way to build trust with your customers. Trust badges essentially guarantee customers a secure checkout experience when purchasing from your WooCommerce store.
There are many types of trust badges you can display on your WooCommerce site to gain customers’ trust and loyalty.
- Security badges. You can display security badges that let customers know that your WooCommerce site has SSL certification. This means that all payments are processed through a secure channel.
- Money-back guarantee badges. Display money-back guarantee badges on your WooCommerce site to let customers know that if they get the wrong product or if their product is damaged, they will get their money back from you.
- Accepted payment badges. It’s a smart idea to display accepted payment badges on your online store. This helps customers quickly see whether your online store accepts popular payment options such as PayPal, Visa, and Mastercard.
- Third-party endorsement badges. These badges speak to your business’s credibility. This is because getting a third-party endorsement badge (like the Google Customer Reviews trust badge) involves an application and review process.
Bonus: Other ways you can improve the default WooCommerce checkout flow
There are other ways you can improve the default checkout flow of your WooCommerce site and make look and behave it a bit more like Shopify.
You can use themes and plugins specifically designed for WooCommerce sites that help enhance the checkout flow and make your online store better suited to your business.
Let’s go over some of the best themes and plugins that let you do this:
#1: Shoptimizer
Our own Shoptimizer WooCommerce theme is designed to help store owners optimize their business for conversions while making it look attractive and professional.
It’s a performance-optimized WooCommerce theme that helps you enhance your online store and boost conversions. The theme offers a distraction-free checkout page out of the box that removes the header, footer, and sidebars from the checkout page of your online store. This ensures that customers stay focused on completing the checkout form.
In addition to this, you can use the Shoptimizer theme to display trust badges and testimonials on the checkout page. This gives you an opportunity to ease any concerns customers might have and help them validate their purchase decision.
#2: CartFlows
CartFlows is a popular sales funnel builder for WooCommerce that packs a variety of excellent features to help you increase conversions.
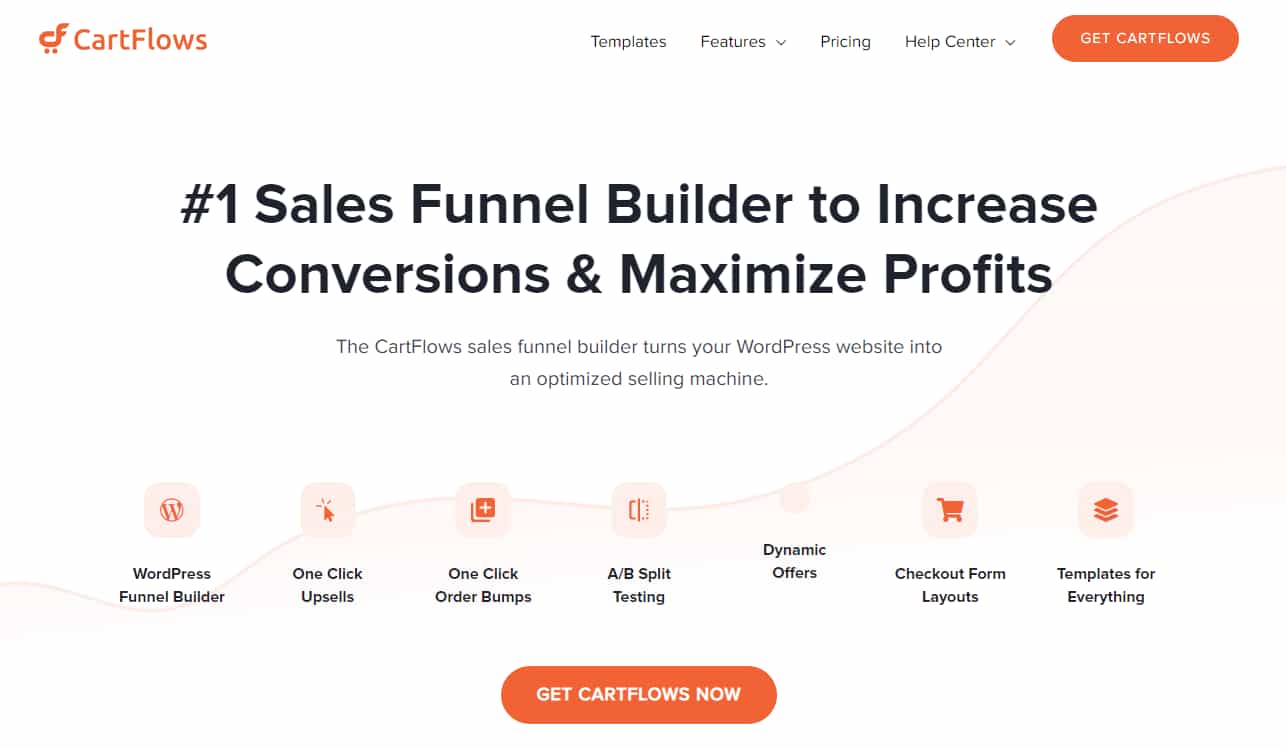
You can use it to add one-click upsells, order bumps, and dynamic offers to your online store. Its Checkout Editor feature lets you customize the WooCommerce checkout experience however you like and you can use the included sales funnel templates to get started quickly. In addition to this, you can A/B test checkout designs to find the version that converts best for you.
#3: Aero Checkout
The Aero Checkout plugin offers an all-in-one solution for creating a fully customized checkout page for your online store.
Using the robust plugin, you can create a multi-step checkout process, similar to Shopify. This gives customers a clear idea of where they are in the checkout process and encourages them to complete it before navigating away.
The Aero Checkout plugin comes with pre-designed templates that let you quickly create a professional-looking custom checkout page within minutes.
#4: PeachPay
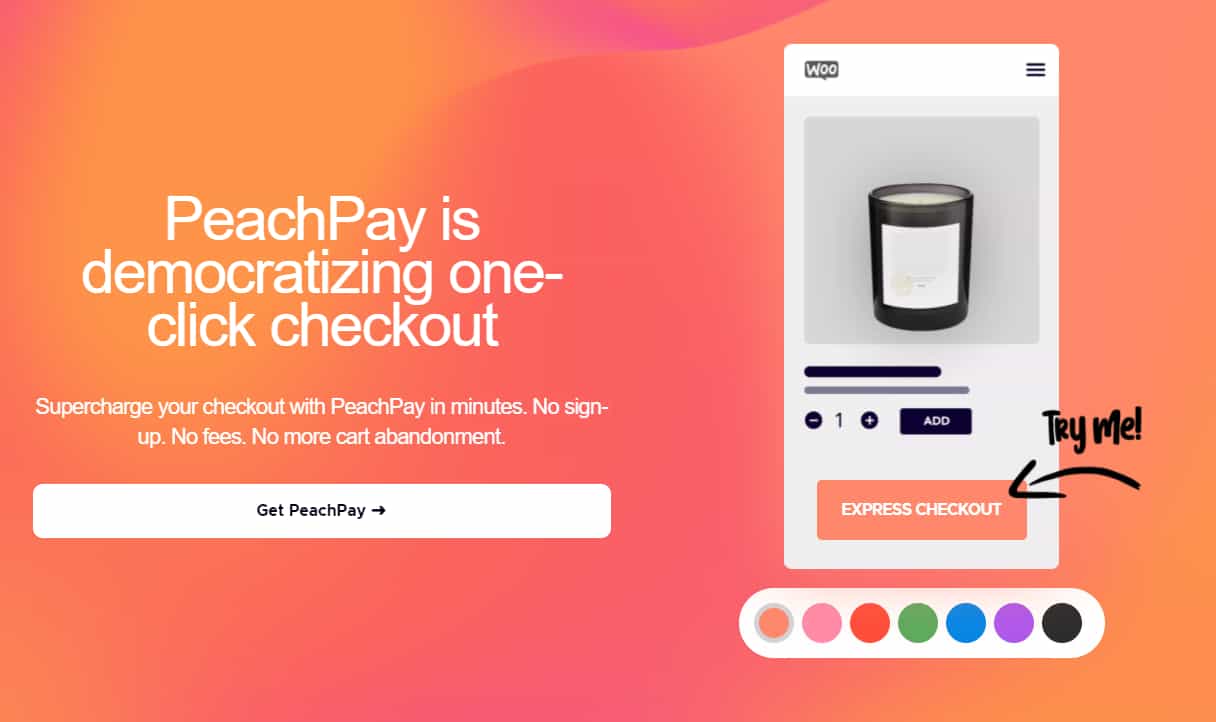
The PeachPay plugin is a WooCommerce checkout plugin that lets you supercharge the checkout flow of your online store. More specifically, it lets you create a fully custom checkout window and use it instead of the default WooCommerce checkout page.
Customers can fill in their shipping and payments details using an attractive checkout window that lets them checkout within a few clicks. This works like the express checkout method that Shopify offers.
#5: CheckoutWC
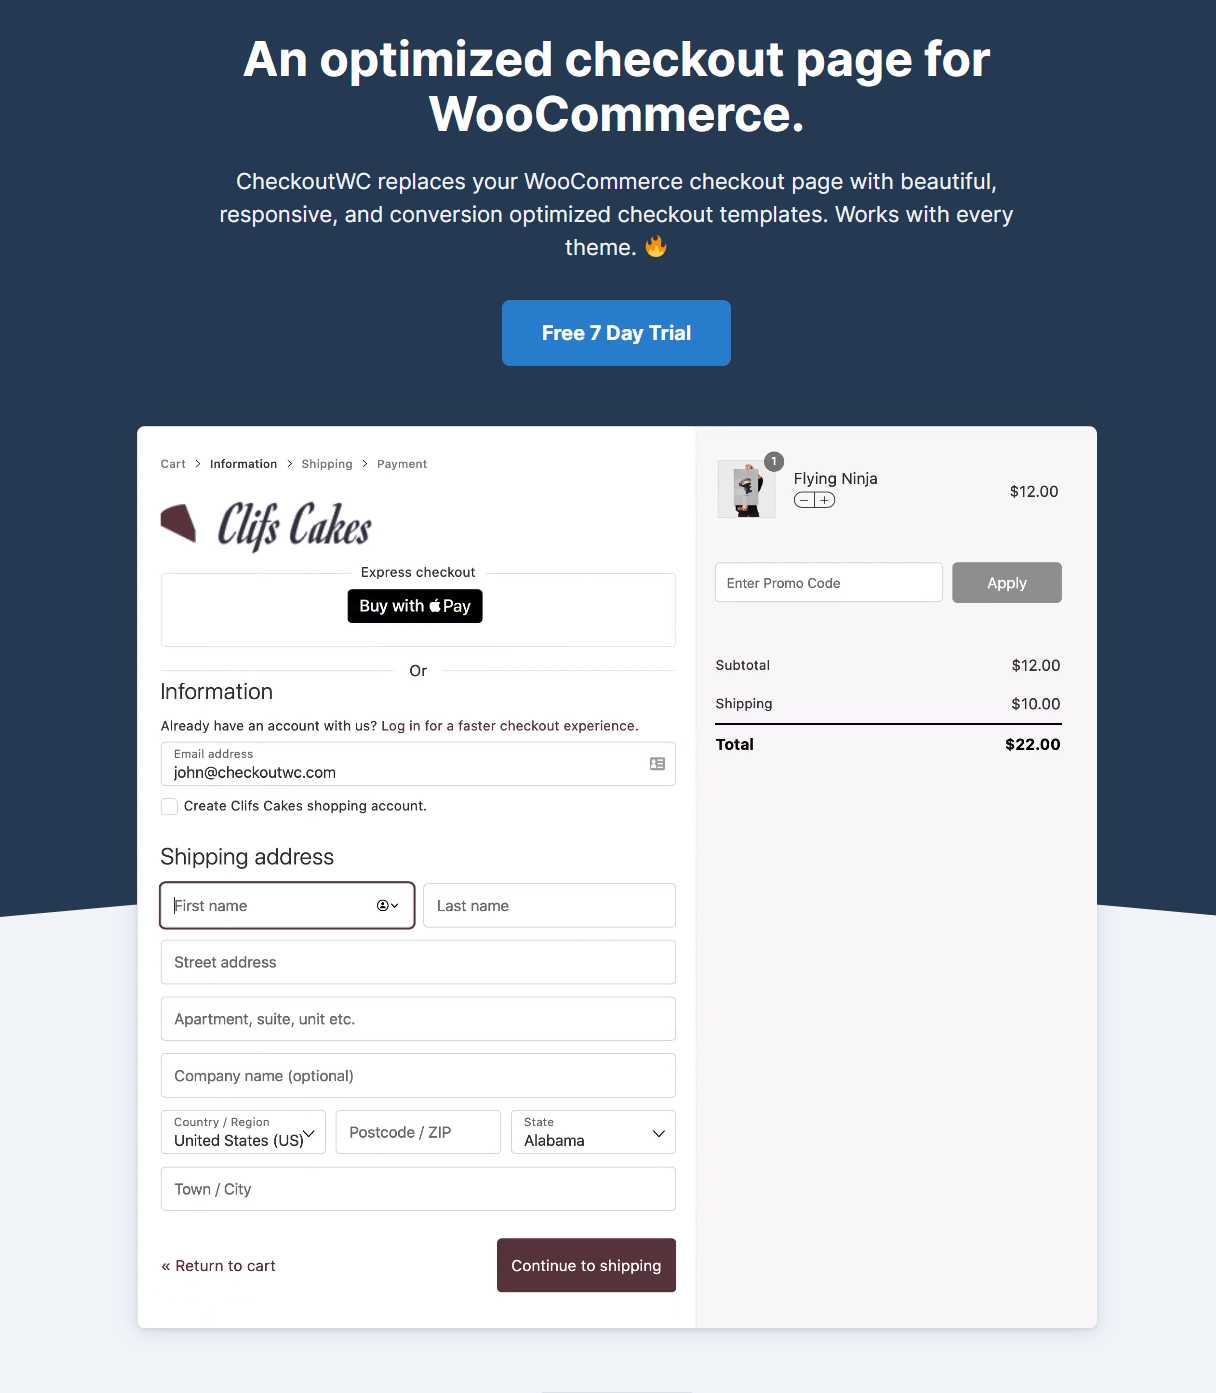
The CheckoutWC plugin is designed to help make your online store’s checkout process much simpler and quicker.
It lets you create a three-step checkout process which is a great way to keep customers focused on completing the checkout form instead of getting distracted by other content on your eCommerce site.
The plugin also lets you replace the default WooCommerce checkout form with an intuitive, more engaging checkout form. This not only helps increase conversions but also enhances the checkout flow on your online store.
Conclusion
WooCommerce and Shopify checkout flows are similar in some aspects and different in others.
While the WooCommerce checkout flow is simple and straightforward, there are some easy modifications you can make to enhance it.
To recap:
- You want to offer a distraction-free layout for the checkout form of your online store. This helps your customers stay focused on checking out from your online store rather than getting distracted and bouncing off to another site or another page.
- If you don’t offer coupons, you can hide coupon fields from the cart and checkout page.
- Consider including testimonials on the checkout page to help customers validate their purchase decision.
- Add trust badges on the checkout page to make it easier for customers to trust your brand.
Did you know that Shoptimizer packs features that enhance the WooCommerce checkout flow? You can create a distraction-free layout, hide coupon fields, and include testimonials or trust badges on your WooCommerce site using this theme.


 Introducing CommerceGurus Turbo: Faster WooCommerce Stores
 Extend your WooCommerce products with the Products Add-ons plugin
 Cumulative Layout Shift – Everything you need to know about CLS
While I like the Shoptimizer checkout, I am getting more and more frustrated with how payment plugins destroy its clean design.
It’s the “buy now – pay later” plugins and the Express Checkout methods that get me cranky.
The “buy now – pay later” plugins put their marketing messages “…pay 4 x $x.xx” all over the place with different fonts, looks, logo sizes,….
The Express Checkout options don’t use the same hooks so some are above the “Add to Cart” button and some below, or on the checkout page some above the products and some below the “Place Order” Button.
Would you know of any plugin or method that sorts this out without coding? That allows me to shift those elements around and harmonise their styling?
Hi Edward, Matt Mullenweg has said that the WooCommerce checkout will be a big focus of his in 2022. His interview with the Do the Woo discusses the topic on the 47 minute mark. Hopefully this will come to fruition.