In this guide I’m going to show you exactly how to add Google Analytics to your WordPress and WooCommerce powered online store. Google Analytics is the undisputed king of the website and eCommerce analytics world. There’s simply no other platform that comes even close to providing what Google Analytics can do for free (as long as you’re comfortable giving all your website data to Google that is!).
There are a whole range of statistics, metrics and key performance indicators (KPI’s) that the world’s largest eCommerce websites know inside and out and watch and analyze in real time to understand if they’re cashing bonus checks for their quarter or whether they need to start tightening their belts. It doesn’t matter if you’re running a billion dollar eCommerce empire or are just getting started selling your handmade monkey mugs, eCommerce Analytics is the central nervous system of your online business and it’s vital you get your Analytics systems setup correctly before you can truly measure the performance of your online business.
While there are tons of existing guides on how to setup Google Analytics for WordPress and WooCommerce, many of them are full of poor advice or only get you half way there. If you’re trying to grow an online store, half measures simply aren’t good enough! So we’ve put together a comprehensive guide to make sure you’ve got everything you need to know exactly what is happening with your eCommerce website from basic analytics through to sophisticated Checkout behaviour analysis.
Let’s dive in! This is a 3-part guide:
Part 1 – How to setup and optimize Google Analytics for WooCommerce
Step 1 – Create a new Google account for your eCommerce business
If you’ve never used Google Analytics before, the very first thing you’ll need to do is setup an account.
Pro Tip! DON’T setup Google Analytics under your personal Google account. Always, always create a separate Google account for your eCommerce business.
That way in a few years time when Warren Buffet gives you a call with that $100 million acquisition offer, you’re eCommerce Analytiics aren’t stuck inside your personal account 🙂
Step 2 – Sign up for Google Analytics
The setup process is pretty straightforward. Head to the Google Analytics login to sign up for Google Analytics.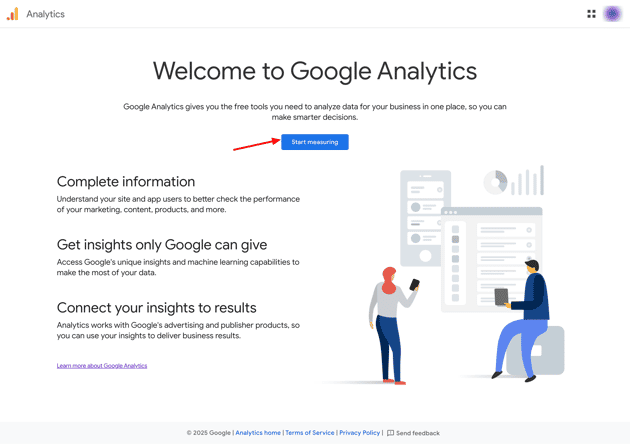
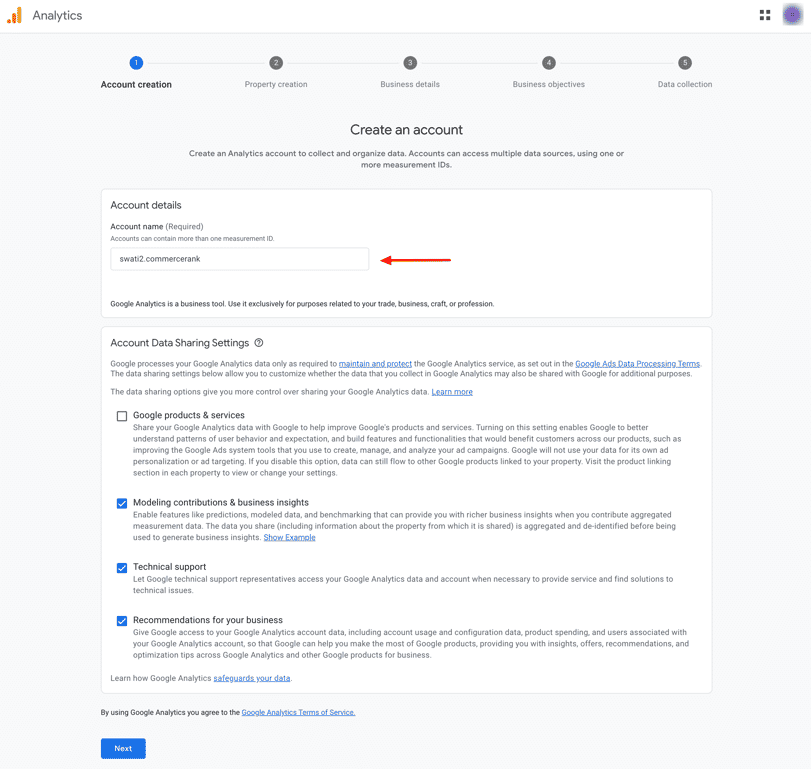
Complete the new account Sign up step. Most of these details on this screen are self-explanatory. Just watch out to make sure you select https for your url AND make sure to select your time zone so that you can clearly see when your website activity is happening 🙂
Account creation:
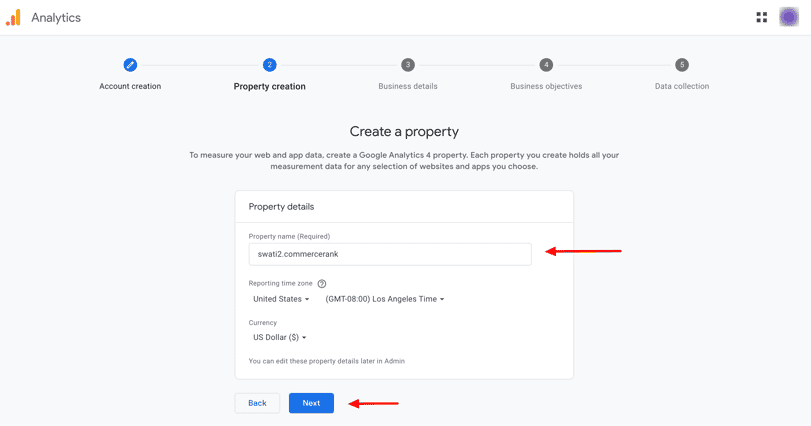
Property creation:
Business details:

Business objectives:
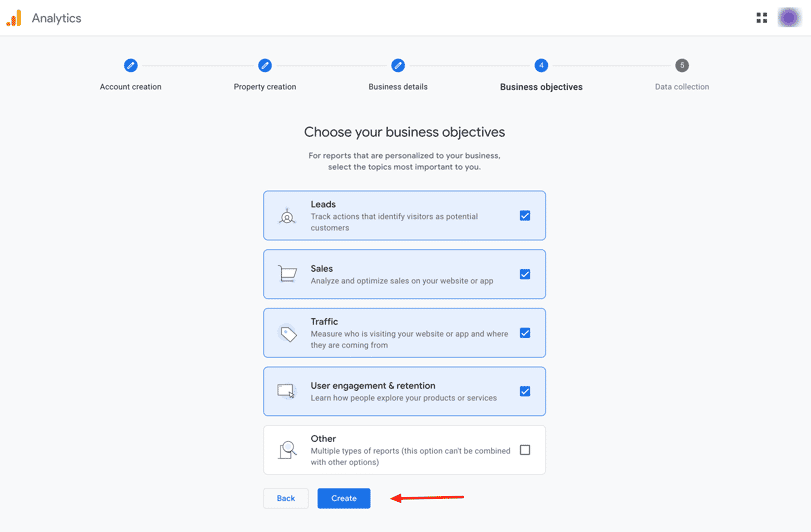
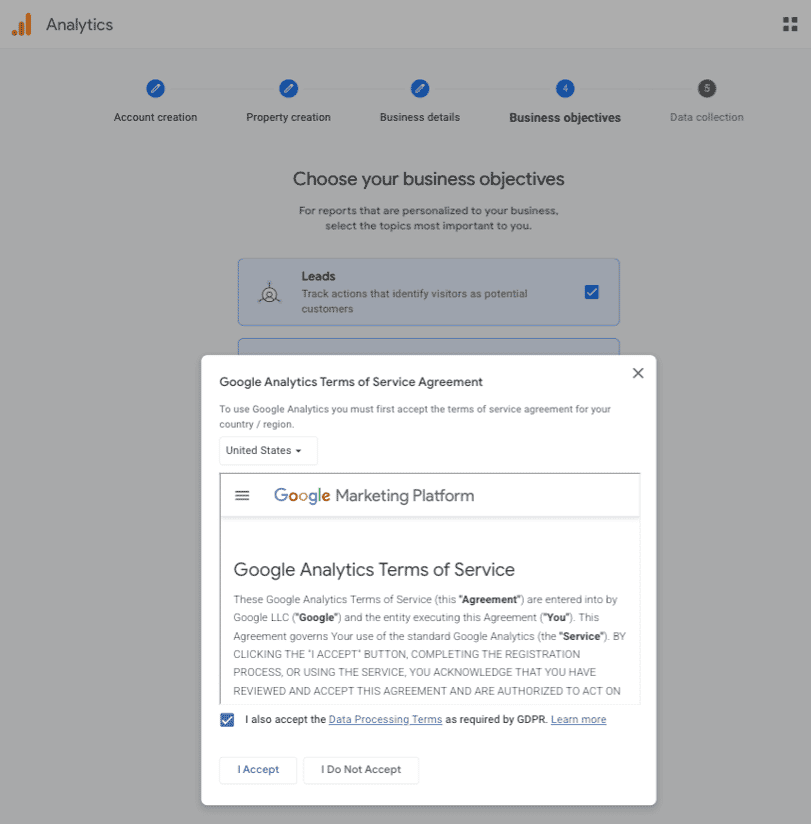
Accept Google Analytics Terms of Services:
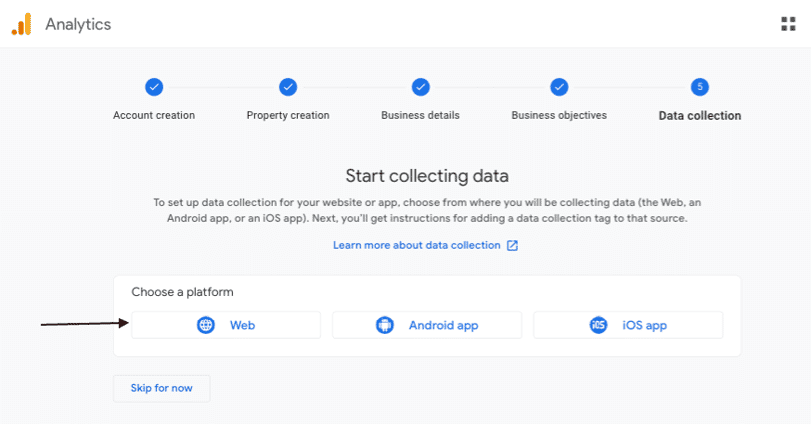
Data Collection:
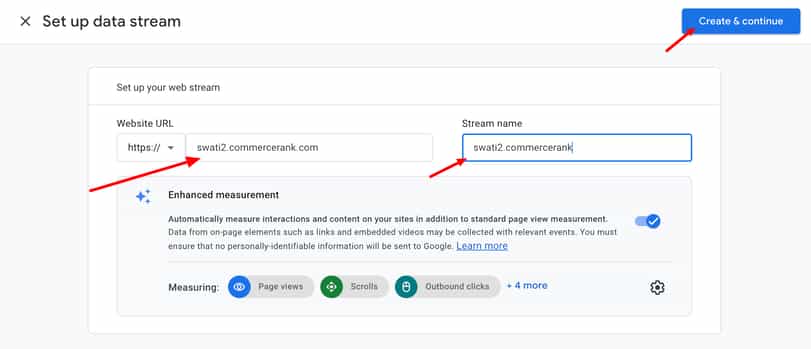
Setup Data Stream:
Start collecting data:
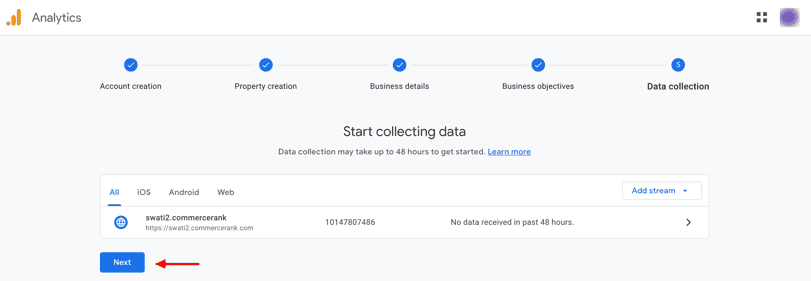
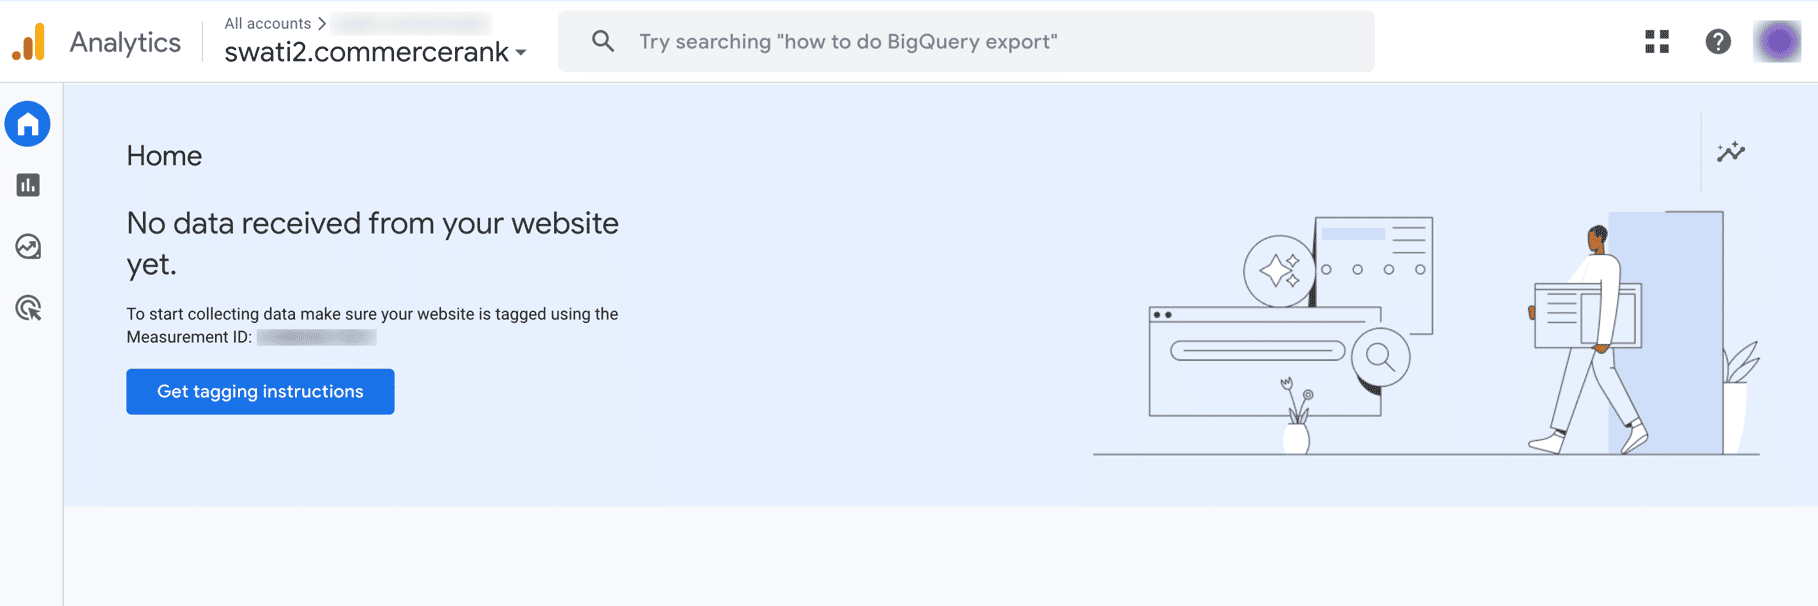
After you’ve signed your life away to all Google’s Terms of Service (!) you’ll end up at a screen that looks something like this. The most important piece of data on this screen is your Tracking ID. This is the key you’ll be using when we connect WordPress and WooCommerce to Google Analytics (GA).
Step 3 – Activate Enhanced eCommerce
To enable this, we’ll need a tag manager. However, many plugins in their pro versions automatically add data layer tracking events for you, making the process much easier.
Part 2 – How to add Google Analytics to WordPress and WooCommerce the right way
There are a ton of different ways to add Google Analytics to WordPress and WooCommerce. Let’s quickly list how you shouldn’t do it!
- Do NOT add your Tracking ID to your Theme control panel. Never ever do this. Just don’t. It’s a recipe for disaster. I know many theme authors promote this as a feature of their theme. It’s not. It’s an accident waiting to happen. If you ever decide to switch to another WooCommerce theme you’ll probably have forgotten by then that you configured Google Analytics via the theme – and poof! There goes your Analytics. By the time you figure it out you’ll probably have lost days of precious data. Theme authors- shame on you – you should know better – ditch those Google Analytics ‘features’.
- Do NOT add your Tracking ID to your theme source code. This is also an accident waiting to happen. If you’re using a WooCommerce theme and start editing the source files of the theme to add tracking codes, you’ll lose your Analytics the second you update the theme. Many will get around this by adding it to a child theme instead. Ok cool – if you’ve already got a child theme that’s not the worst case, but you’re still on the hook for managing this code and you’ll need to ensure you never ever delete it!
So now you know how NOT to do it, what’s the correct way to add your Google Analytics Tracking code to WordPress and WooCommerce? Well, there’s actually a two ‘right’ ways to do it 🙂
- Method 1 – Using a trusted Google Analytics WordPress plugin with excellent support for WooCommerce
- Method 2 – Using Google Tag Manager
Method 1 – Using a trusted Google Analytics WordPress plugin with excellent support for WooCommerce
WordPress offers a variety of plugins to integrate Google Analytics into your website, some of which also cater to WooCommerce. However, the landscape has shifted significantly in recent years, particularly with the introduction of GA4, which relies heavily on event-based tracking and Enhanced eCommerce features. Many free plugins still fall short in providing deep integration with advanced features like Enhanced eCommerce, Dynamic Remarketing, and Checkout Behavior Analysis. Depending on the complexity of your store and your budget, here are some updated recommendations for plugins that support WooCommerce.
WooCommerce Google Analytics by WooCommerce – A Decent Free Option with Limitations
The official WooCommerce Google Analytics plugin remains a solid free choice for basic integration. While it doesn’t rival the features of paid plugins or addons, it now offers improved GA4 support. This includes basic Enhanced eCommerce tracking, such as events like view_item, add_to_cart, begin_checkout, and purchase.
However, its functionality is still limited in several ways:
- It doesn’t provide comprehensive tracking for all product types (e.g., variable or subscription products).
- Customization of events or parameters isn’t possible in the free version.
The major advantage of this plugin is its official backing by WooCommerce, ensuring regular updates and compatibility as WooCommerce evolves. If you’re looking for a no-frills, reliable option, this plugin can get the job done, but don’t expect advanced features or detailed insights.
WooCommerce Google Analytics Pro by WooCommerce – The Best Paid Option for Comprehensive Tracking
The Pro version of the WooCommerce Google Analytics plugin takes tracking to the next level, especially with GA4. If you’re serious about understanding customer behavior, this is worth the investment. Key benefits include:
- Shopping and Checkout Behavior Analysis: Track how users move through your store, from viewing products to completing purchases, and identify where drop-offs occur.
- Enhanced Event Tracking: Gain insights from events like add_payment_info, begin_checkout, and abandoned carts. You can also customize and rename events to suit your reporting needs.
- User ID Tracking: Connect user sessions across devices for better customer insights.
Priced at $79/year for a single-site license, the Pro version offers excellent value, backed by robust support from the SkyVerge team. It’s ideal for store owners who need in-depth analytics to optimize their sales funnel.
MonsterInsights – The Best All-Round Google Analytics Plugin for WordPress
With over 3 million installs and consistently stellar reviews, MonsterInsights remains one of the most popular Google Analytics plugins. While its free version is perfect for basic analytics, it doesn’t support Enhanced eCommerce tracking for WooCommerce. However, the eCommerce addon (available in the Pro plan) transforms MonsterInsights into a powerful tool for WooCommerce.
What makes MonsterInsights stand out is its ease of use, intuitive reporting, and exceptional support. The eCommerce addon provides detailed GA4 insights into sales performance, popular products, and conversion rates. If you prioritize responsive support and an easy setup, MonsterInsights Pro is a fantastic option for WooCommerce stores.
Enhanced eCommerce Google Analytics Plugin for WooCommerce – A Lightweight Option
This plugin is another viable choice for WooCommerce integration, offering compatibility with GA4 for Enhanced eCommerce tracking. However, the free version has some notable limitations:
- It supports only simple product types.
- Subscription or variable products aren’t tracked.
- Limited customization options compared to premium solutions.
For small stores with straightforward product catalogs, this plugin can work well, especially when combined with other tools like MonsterInsights.
Start by creating a Google Analytics: GA4 Configuration tag to send data to your Analytics property.
Method 2 – Using Google Tag Manager
Google Tag Manager (GTM) is a VERY powerful and sophisticated way of augmenting a website with all sorts of tags that are becoming more and more commonplace when running any modern website.
But be warned, it’s definitely going to take a bit longer to setup Google Tag Manager for WooCommerce than the plugin based methods we’ve already described. So why then pray tell would you even want to use GTM instead? I think can tell you a few reasons:
- You might already need or use Google Tag Manager to deploy tags for other integrations you need to setup. Tag managers have almost reached the point where they’re becoming a must have feature for your website infrastructure. If that’s the case for you, then it can makes sense to re-use your existing setup rather than having to manage and maintain yet another plugin. (And remember mo’ plugins, mo’ problems with security, performance, maintenance and cost)
- More control over your Google Analytics integration – most plugins are pretty rigid when it comes to how they integrate with Google Analytics. With GTM, you have pretty much got complete control over what tags you serve and what triggers and variables you use to serve them.
Personally, I’m leaning towards using GTM more and more for all sorts of tag and pixel integrations purely just to cut down on the amount of time I spend managing plugins. So if you like the sound of that and have a bit more spare time to get everything up and running then it’s worth a shot 🙂
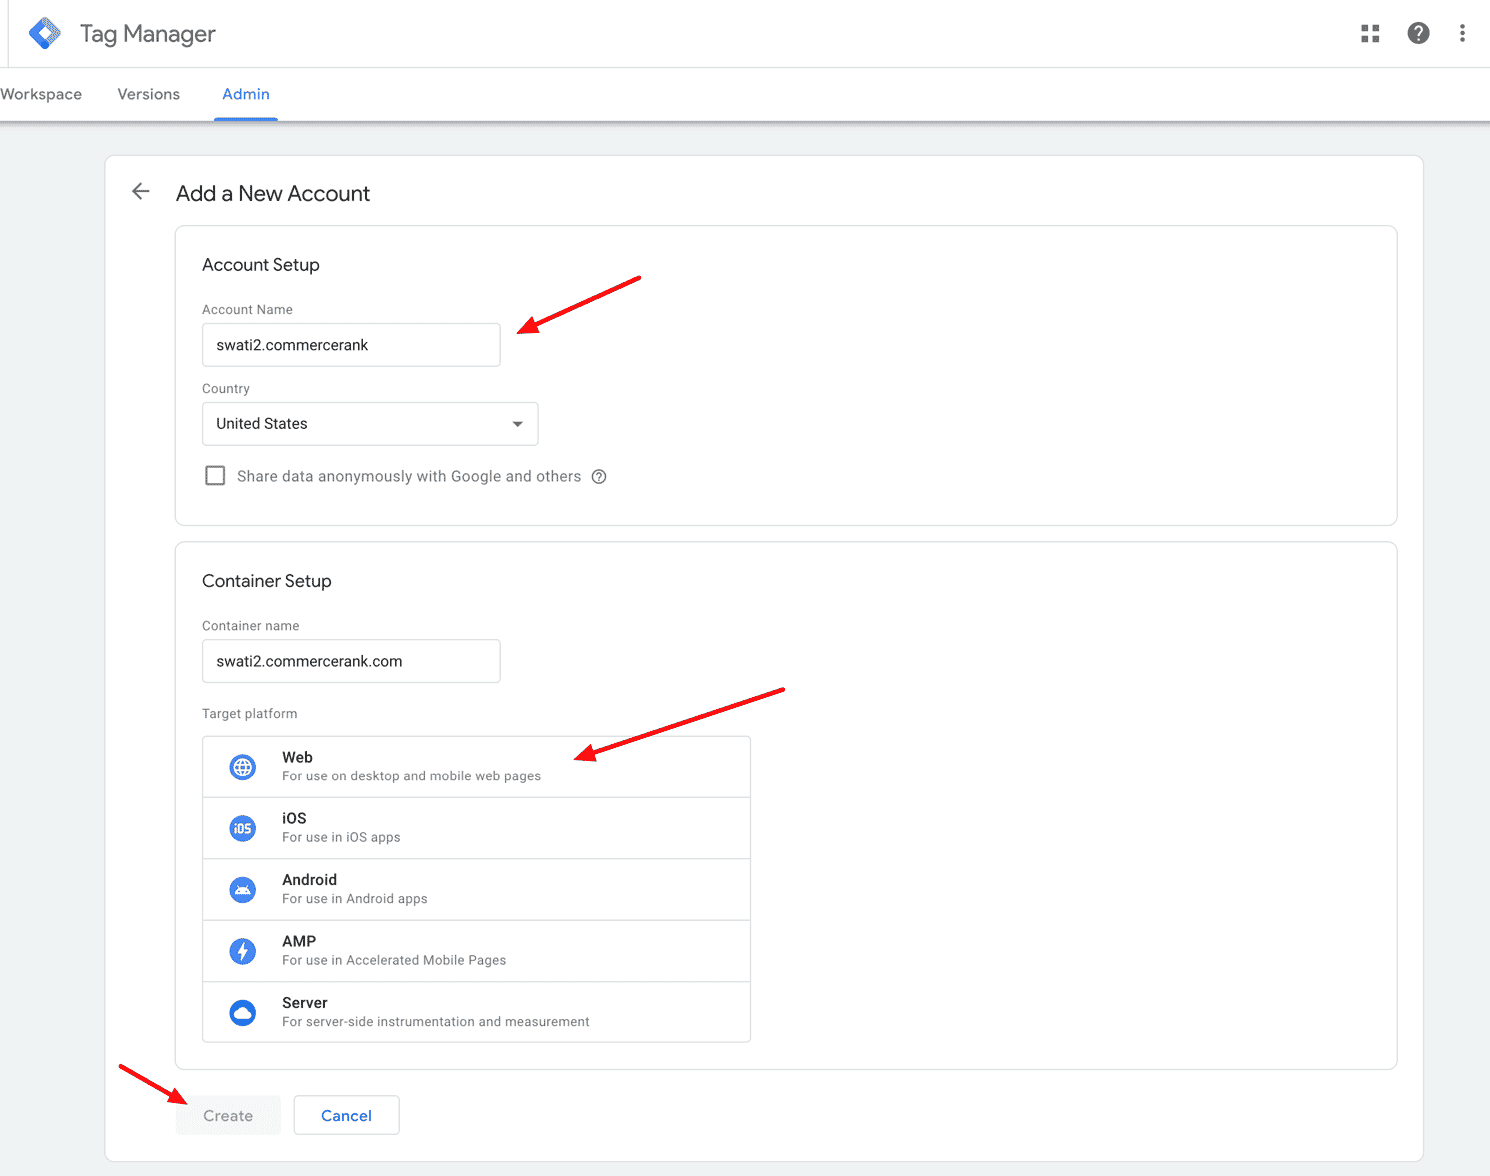
Step 1 – Sign up for Google Tag Manager
Head over to Google Tag Manager and Sign up (under your eCommerce Google account remember!). Sign up is pretty straightforward, remember to choose “Web” during sign up.
Once you complete sign up you’ll see a screen which includes you’re all important GTM ID. (NOTE: It’s the ID in the format GTM-XXXXXXX ).
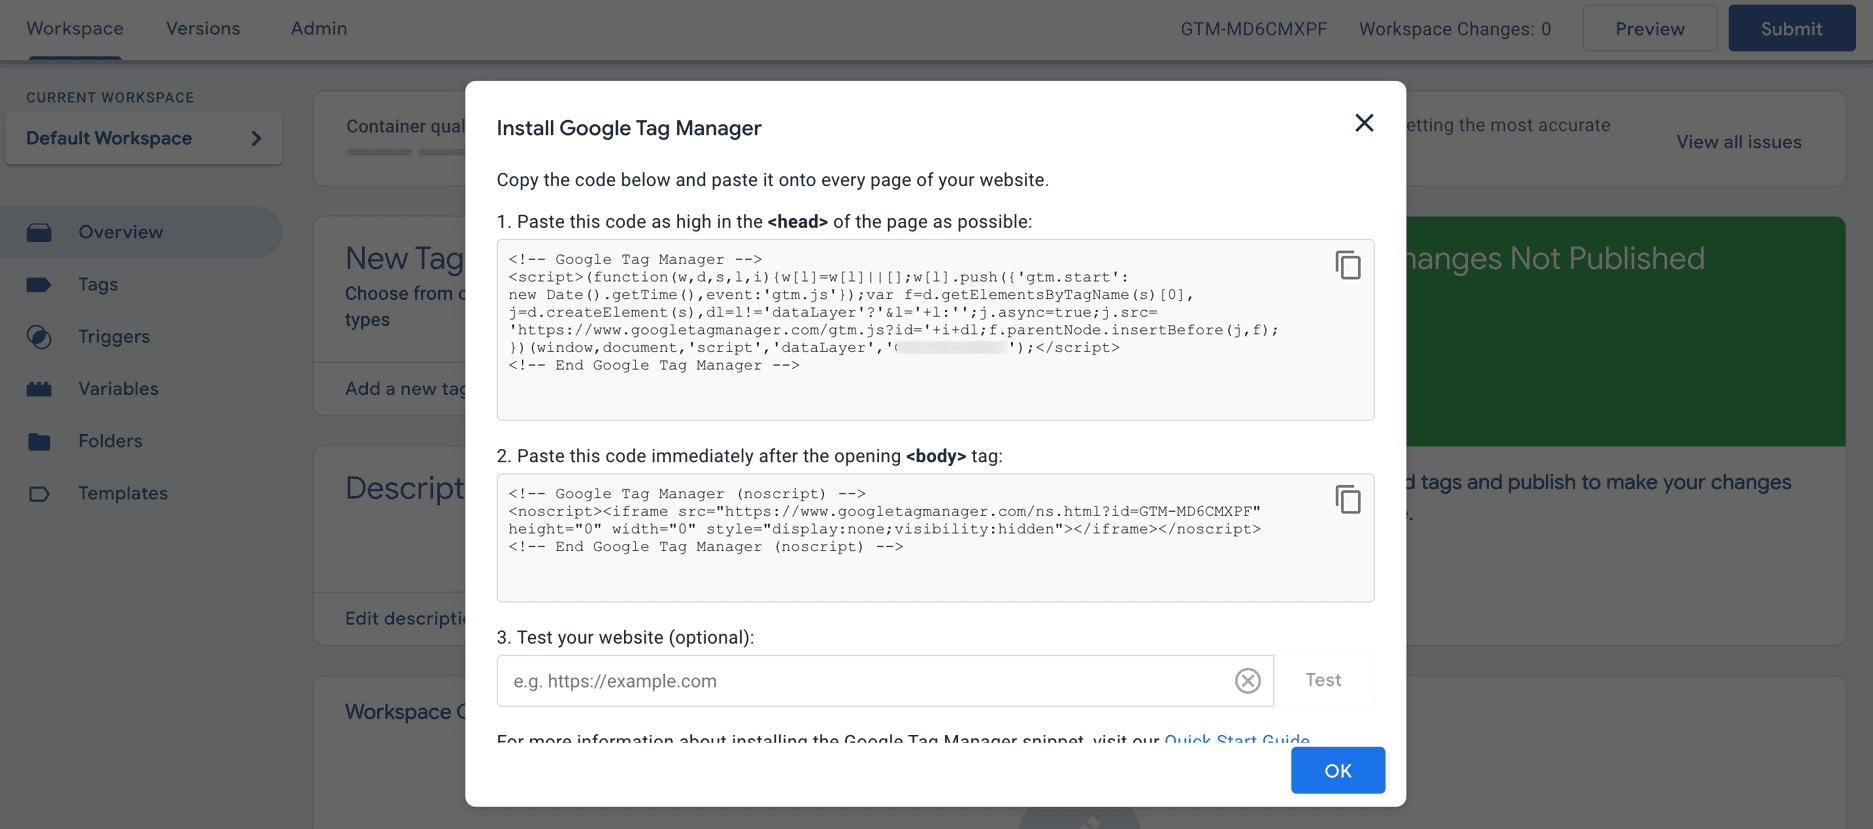
Hit OK and move on to Step 2.
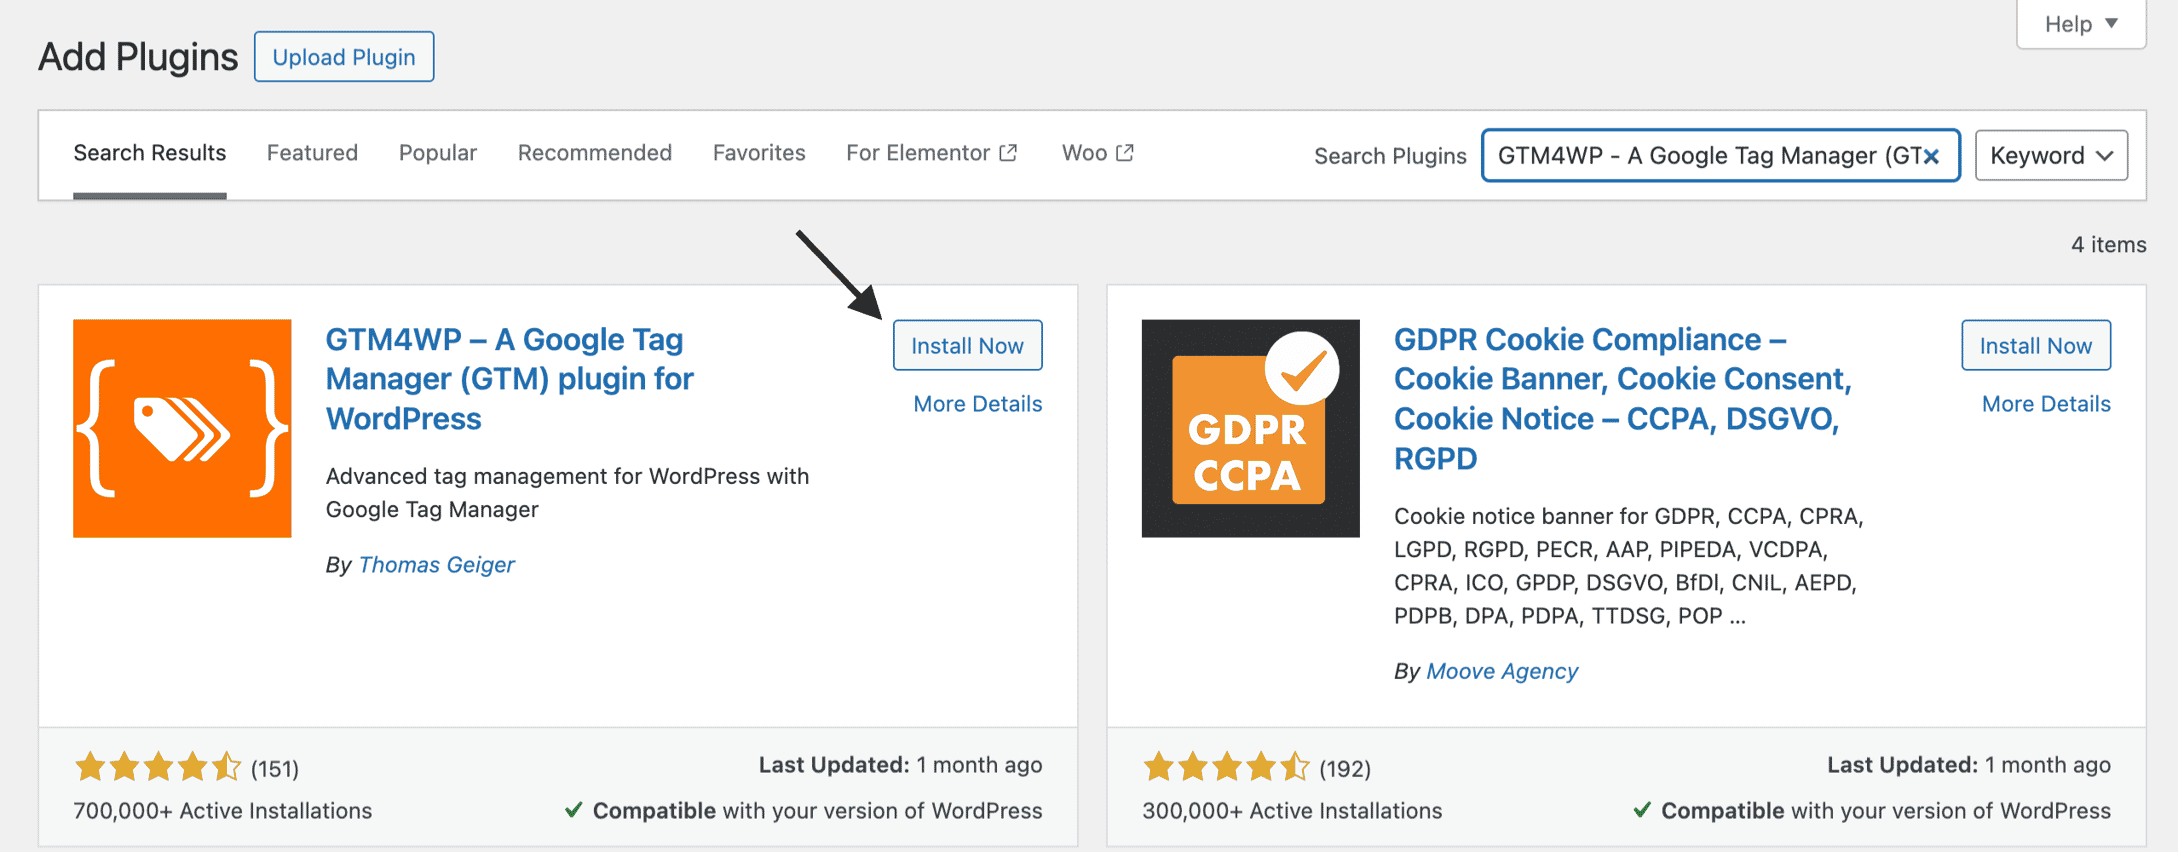
Step 2 – Install and configure DuracellTomi’s Google Tag Manager (GTM4WP) for WordPress
Wait, didn’t you just tell me I’d have less plugins to worry about?? Yip I did 🙂 But hear me out. This fantastic plugin is the key to unlocking all the value of GTM for your WooCommerce website. Think of it this way. If you have 10 tags/pixels that need to be fired on your WooCommerce website, would you rather have 10 plugins (1 for each tag) or a single plugin that allows you to add those 10 tags to GTM? That’s what GTM4WP does for you. But I’m oversimplifying its value a little. GTM4WP provides all sorts of wonderful support for WooCommerce events like triggering events when your customers add products to their cart which you can attach GTM events to. This allows you to build very sophisticated GTM triggers and full support for things like Enhanced eCommerce – 100% free!
So go ahead and install and activate GTM4WP.
Once activated, you should see a message like this in your admin screen.

Go ahead and click that link and enter your GTM ID on the main GTM4WP setting screen as follows:
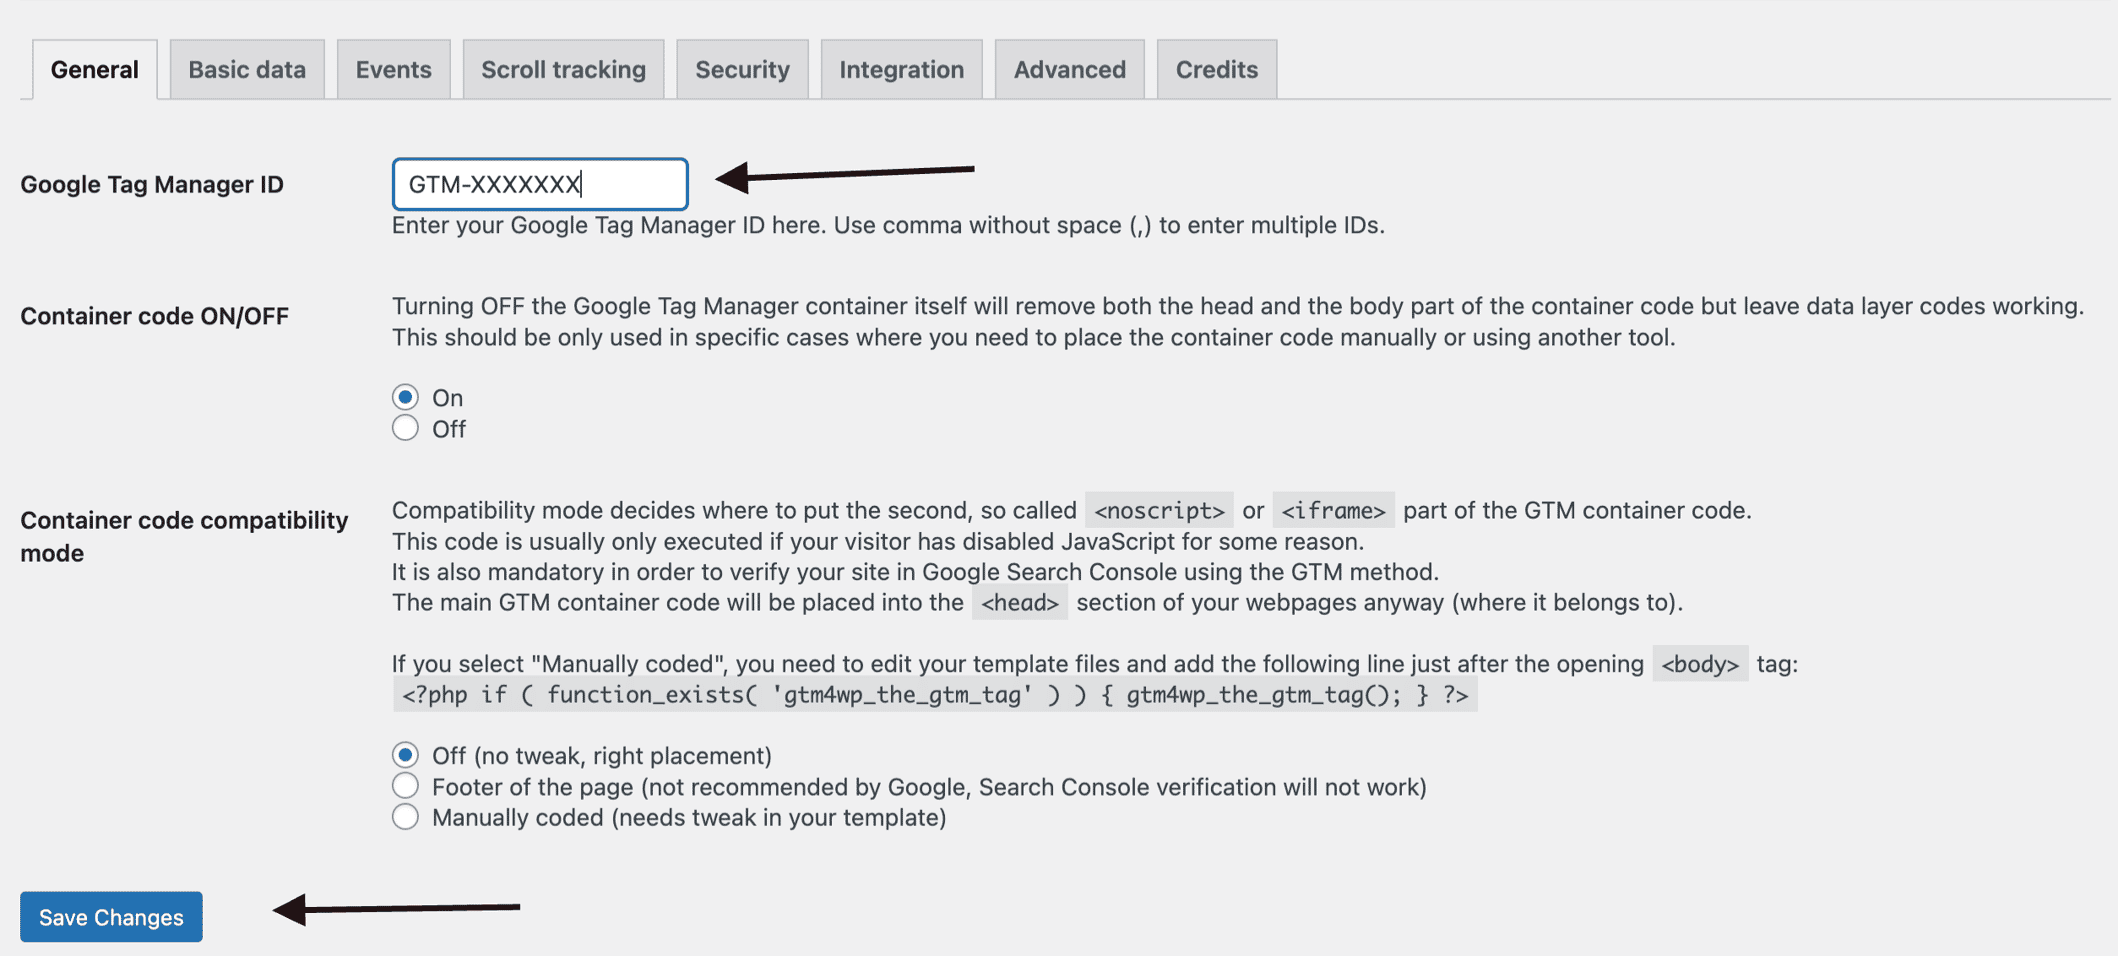
The Container Code ON/OFF setting in the new Google Tag Manager allows you to control the placement of the container code on your site.
- When ON, the container code (head and body parts) is automatically added to your site.
- When OFF, the container code is removed, but the data layer remains active.
Click Save Changes and then click on Integration -> WooCommerce
There are 4 checkboxes that I usually tick on this screen – I leave everything else as is (for now):
- Track e-commerce: Enables sales and purchase data tracking.
- Cart content in data layer: Adds cart details to the data layer for better tracking.
- Customer data in data layer: Helps trigger pixel events using customer info.
- Order data in data layer: Sends order details to analytics tools.
- Exclude tax from revenue: Ensures revenue data is accurate by leaving out tax.
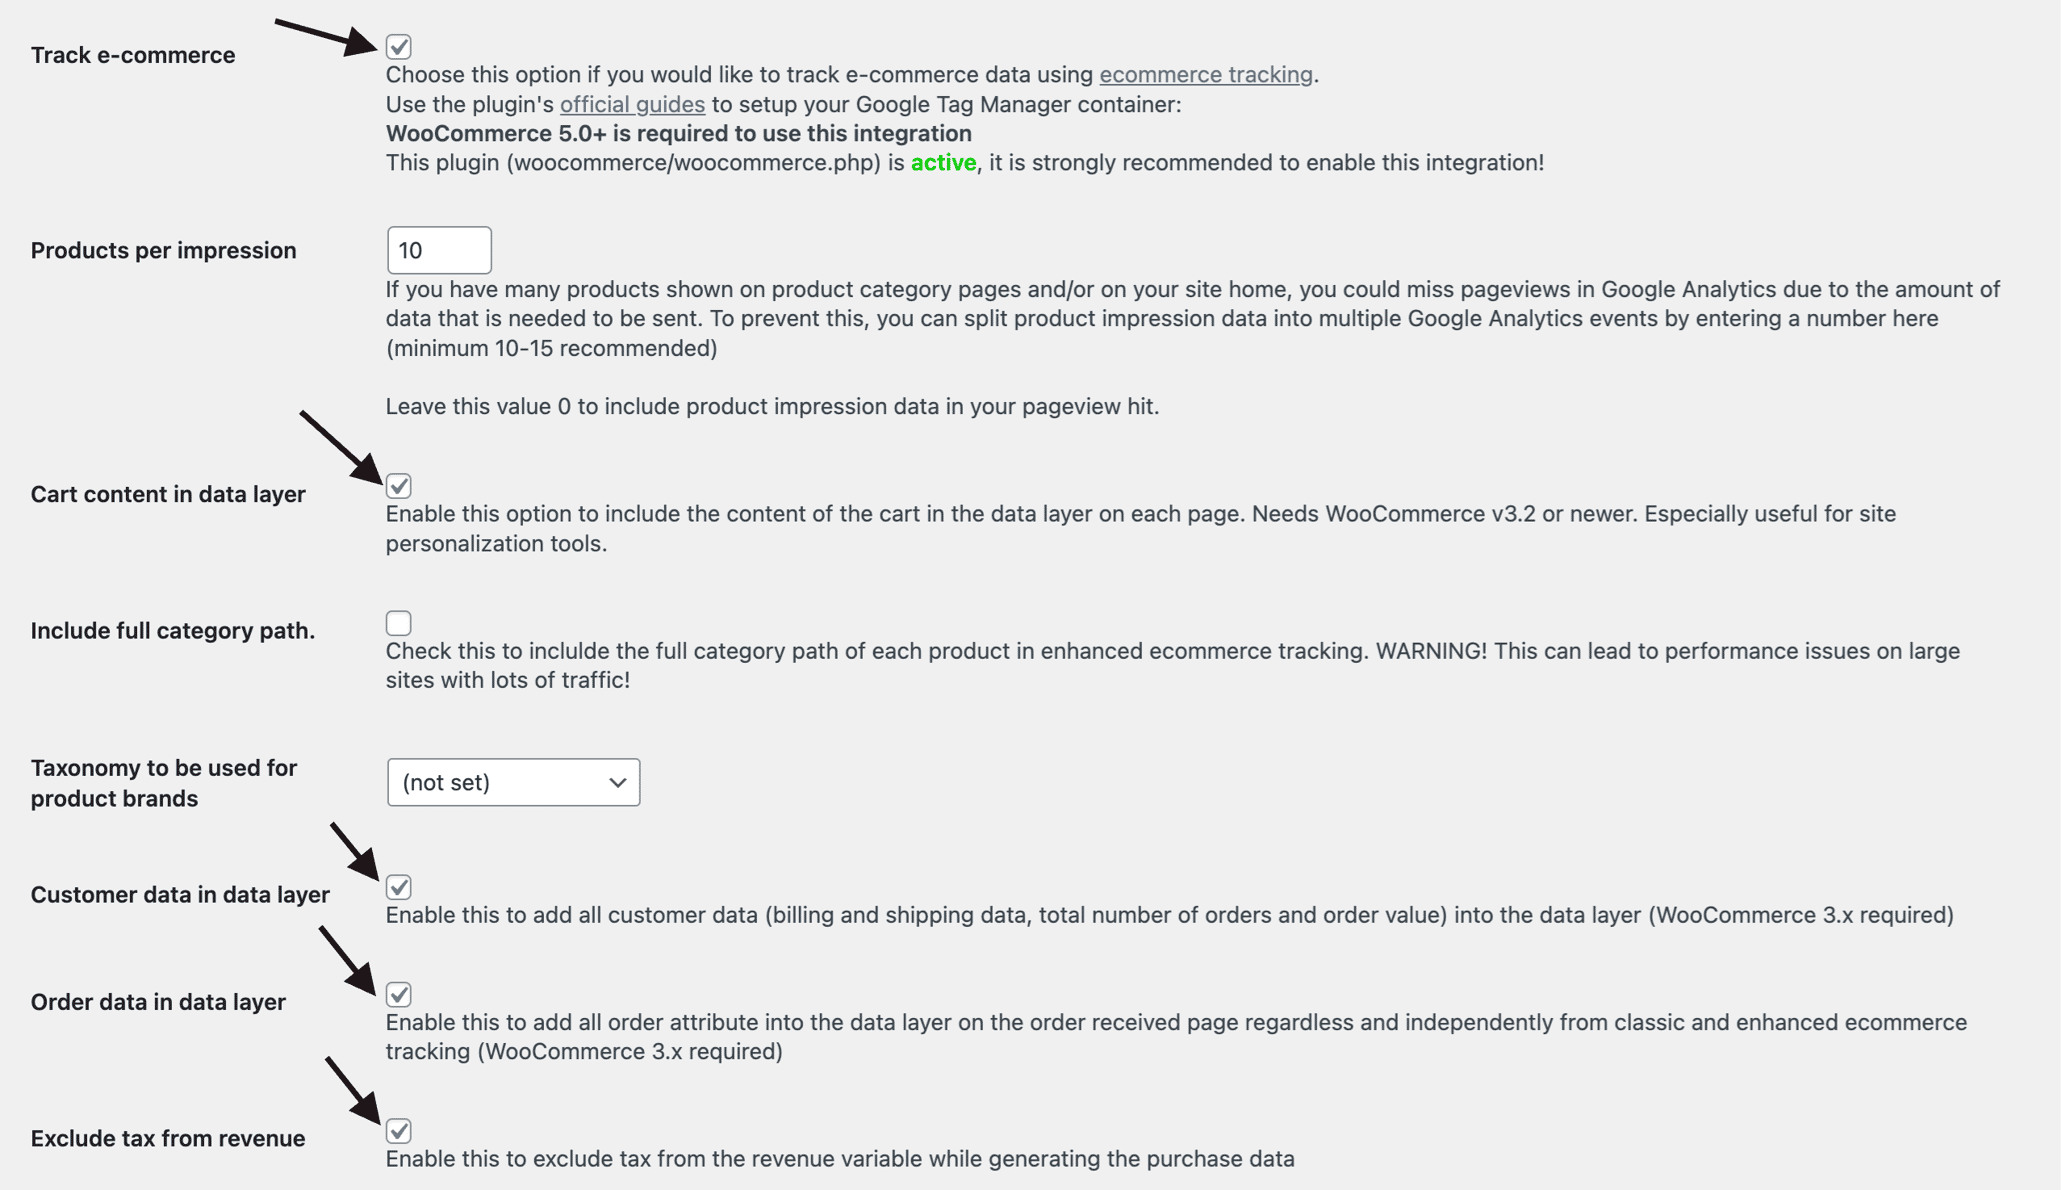
There are tons of other features you may wish to experiment with enabling, but for now that’s all we need to do to configure GTM4WP.
NOTE: If you have any other Google Analytics plugins/tracking methods setup, now would be a good time to deactivate them to ensure you’re not double tracking your website activity.
Step 3 – Configure Google Tag Manager
Let’s head back over to Google Tag Manager and setup our first tag!
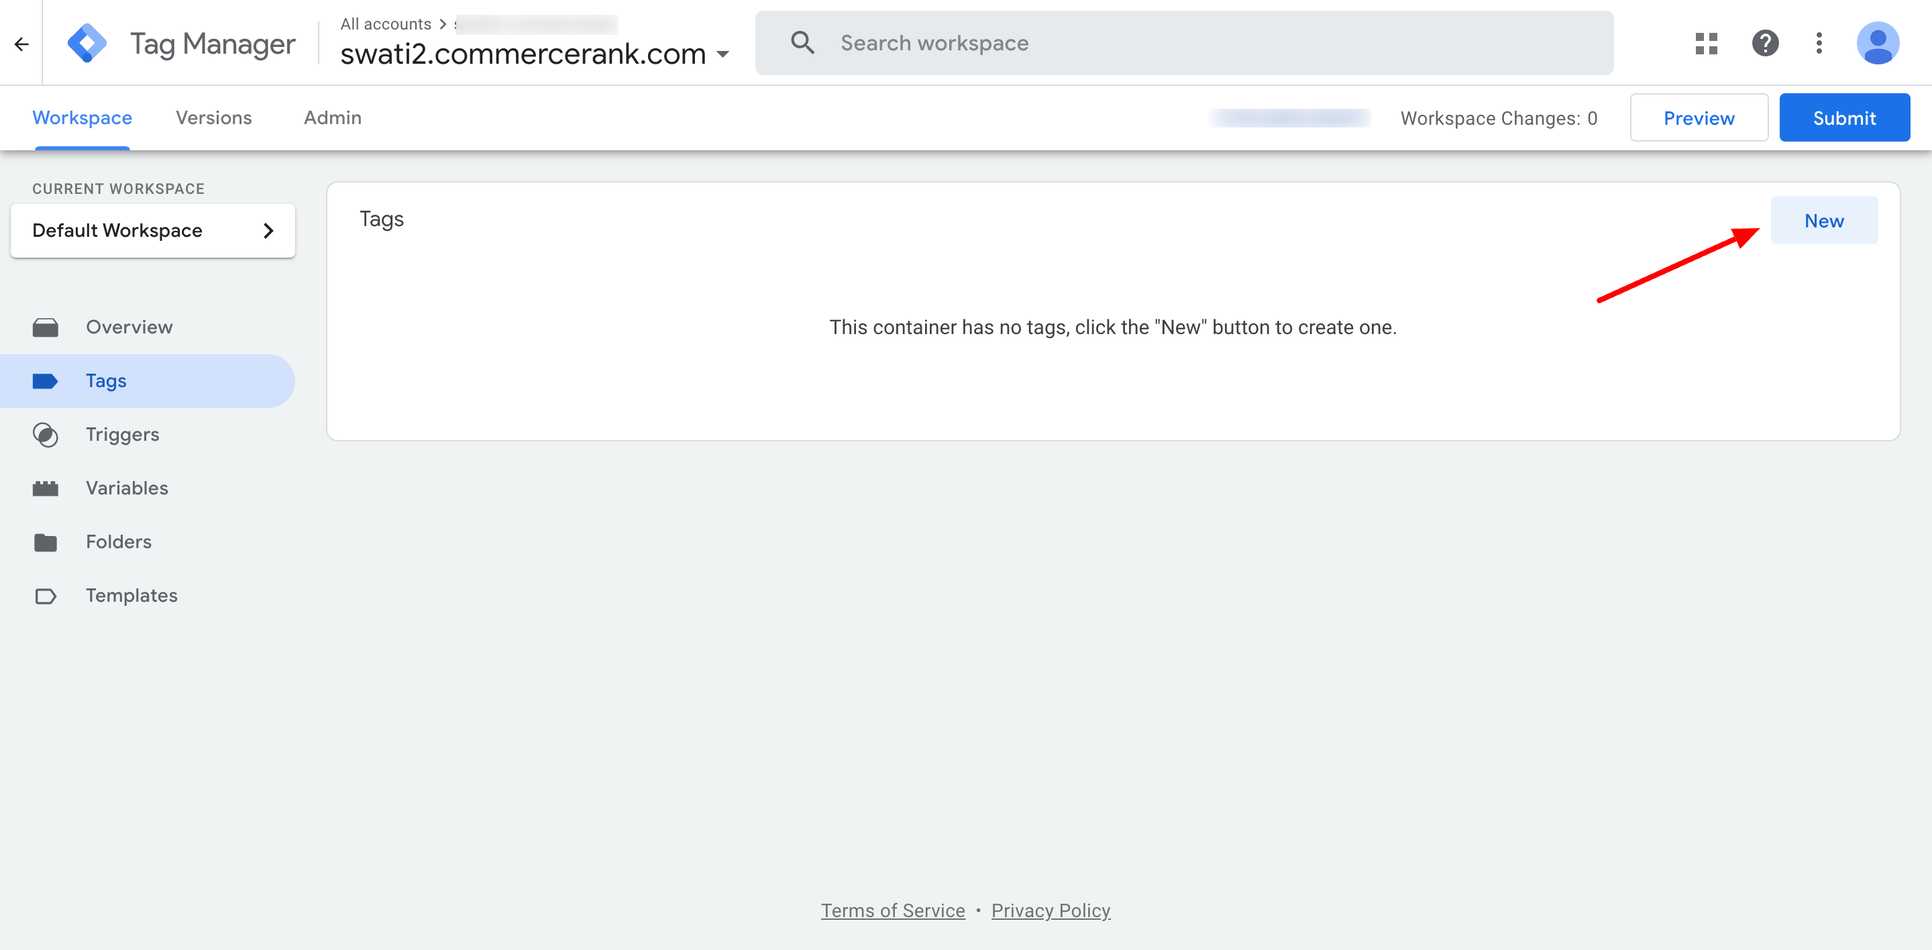
In your default Workspace, click on Tags -> New
Next, give the tag a clear and meaningful name. In Google Tag Manager (GTM), having a good naming system is essential. Once you have several tags, it can get confusing to figure out what each tag does, especially when there are multiple tags for the same service. To keep things organized, I recommend using a format like SERVICE – TAG for tags or SERVICE – EVENT for events.
For example, since this is our default Google Analytics GA4 Event tag, I named it Google Tag | GA4 | Page View. You can create a naming style that works best for you, but keeping it consistent will save time later.
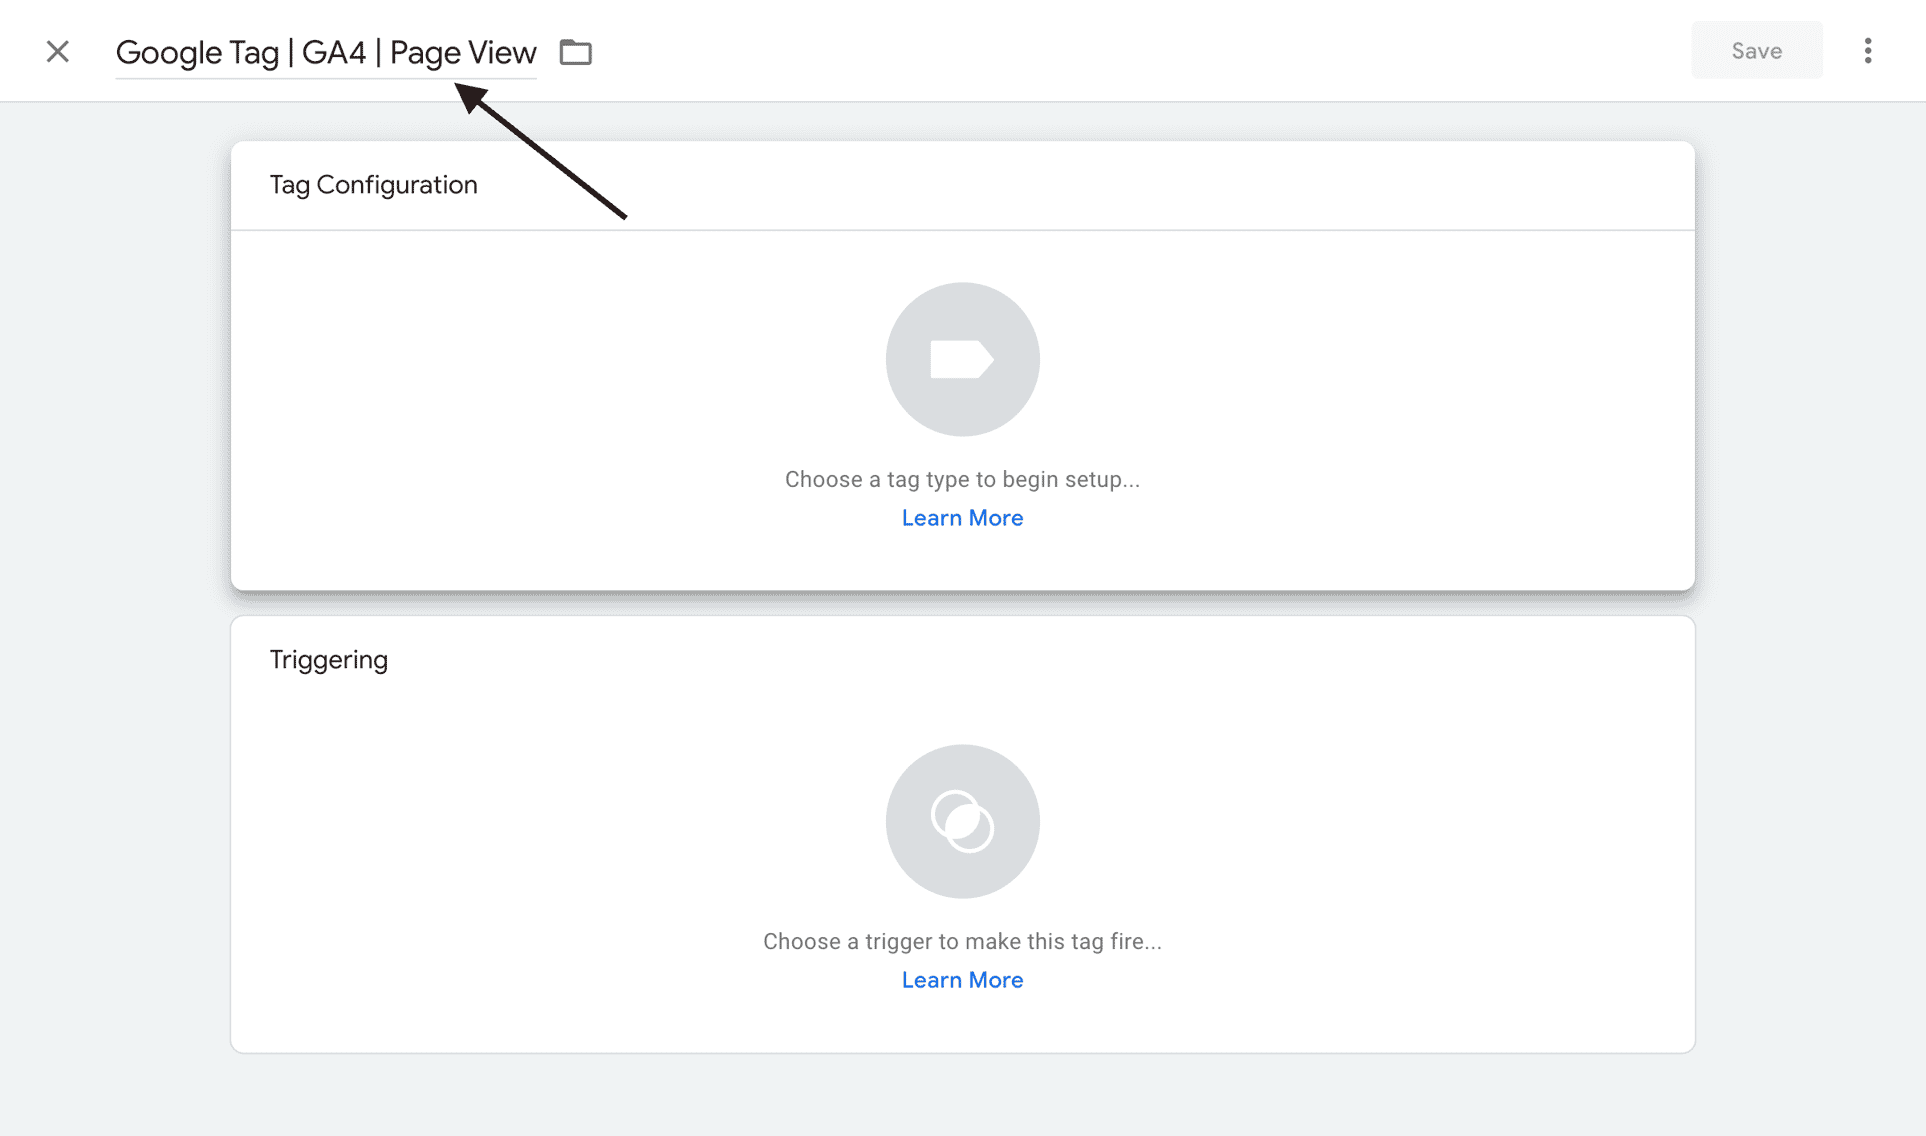
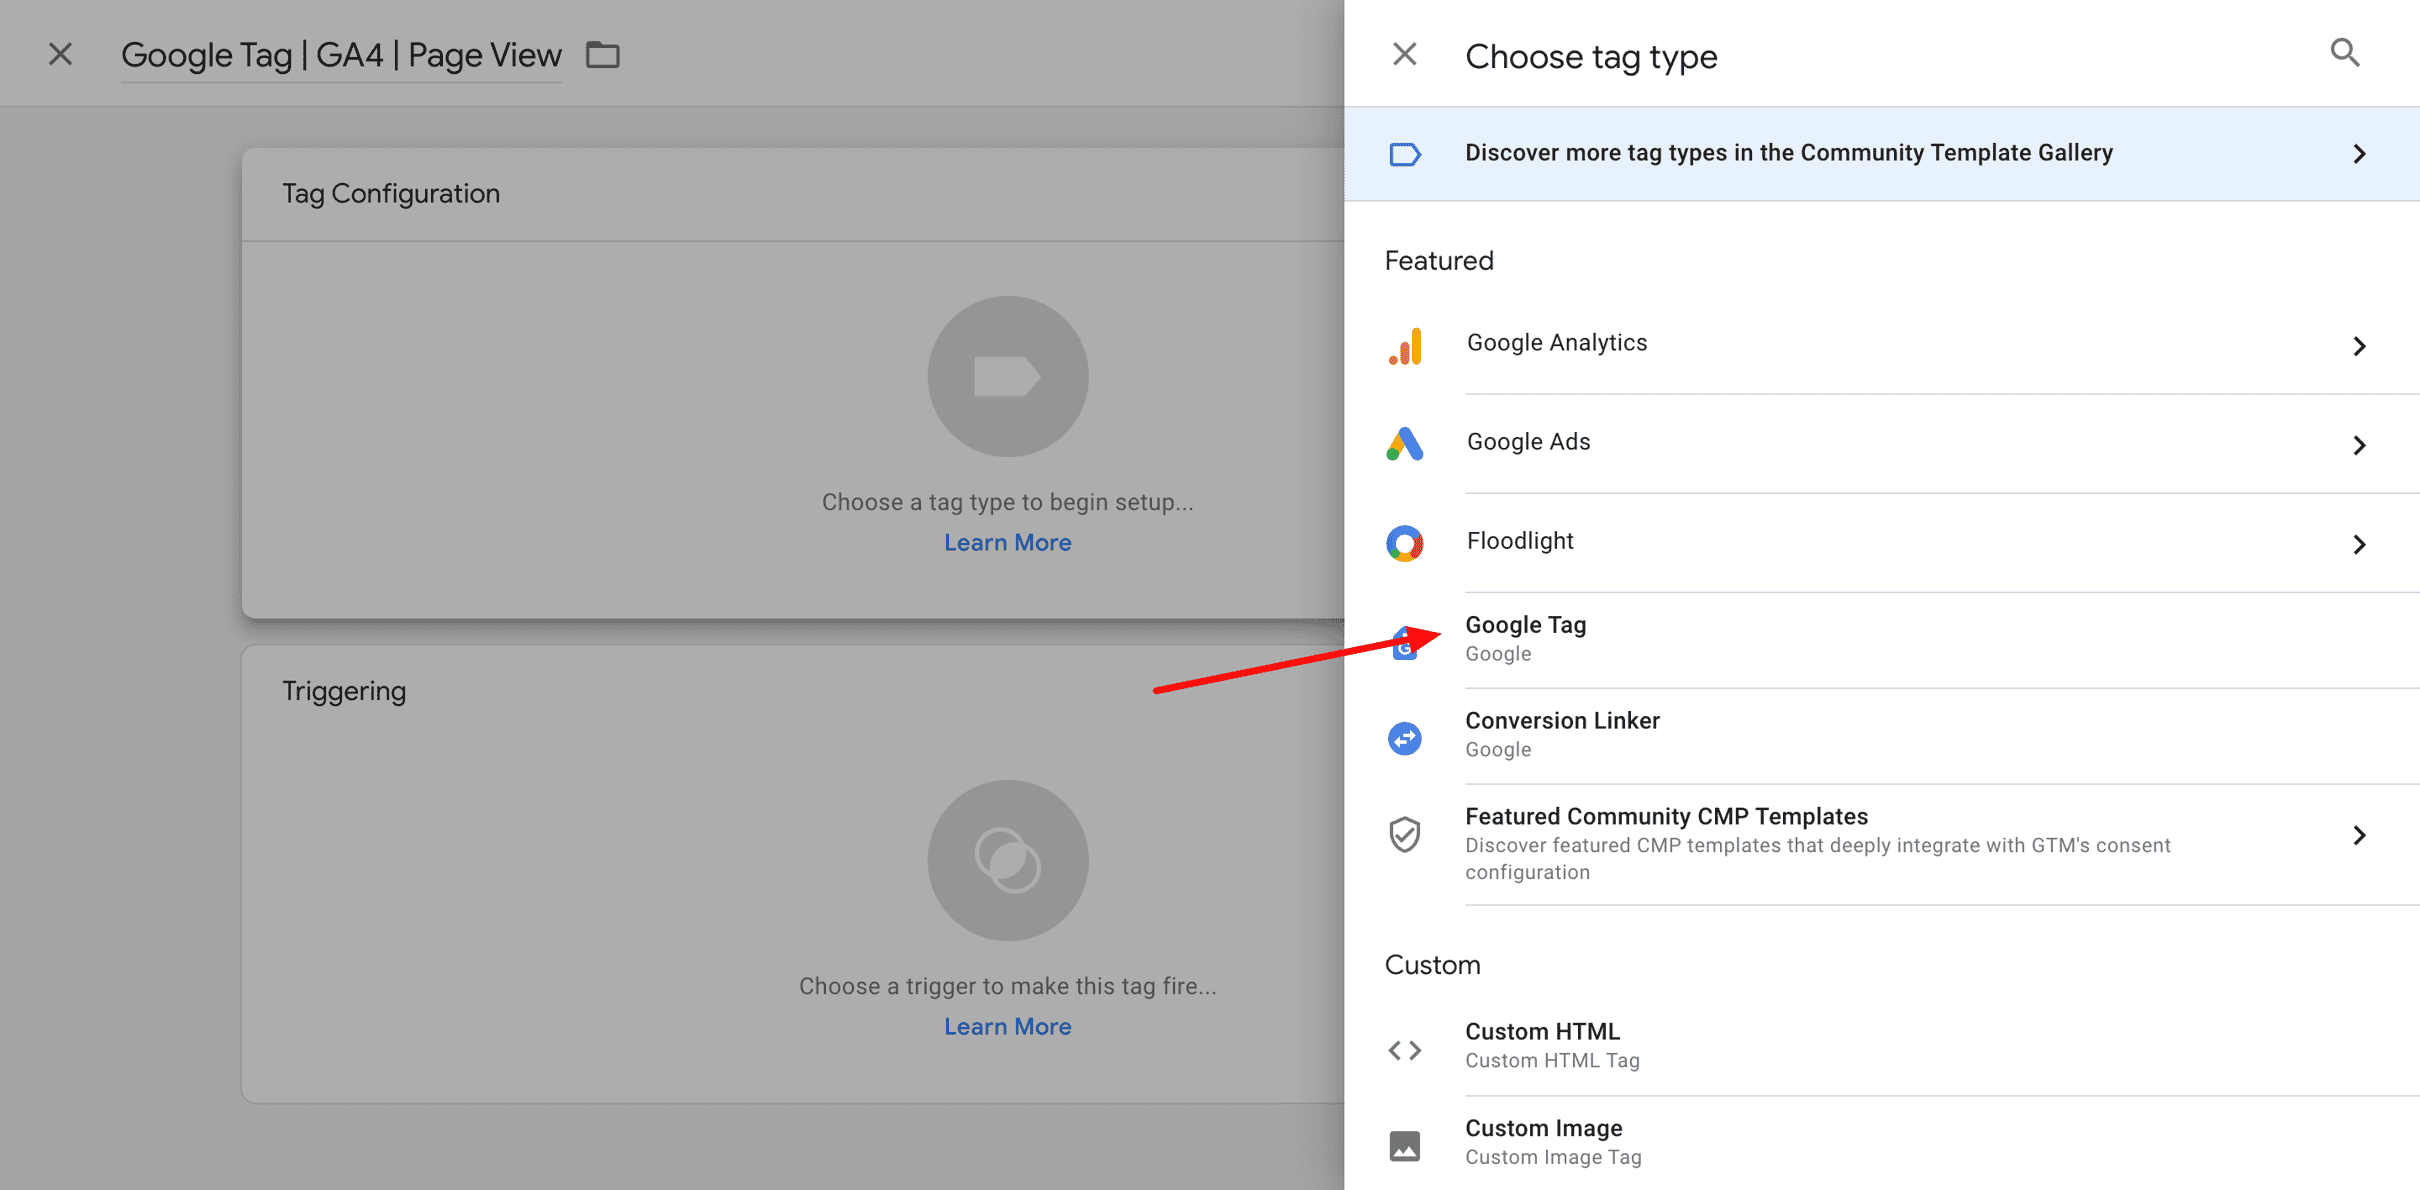
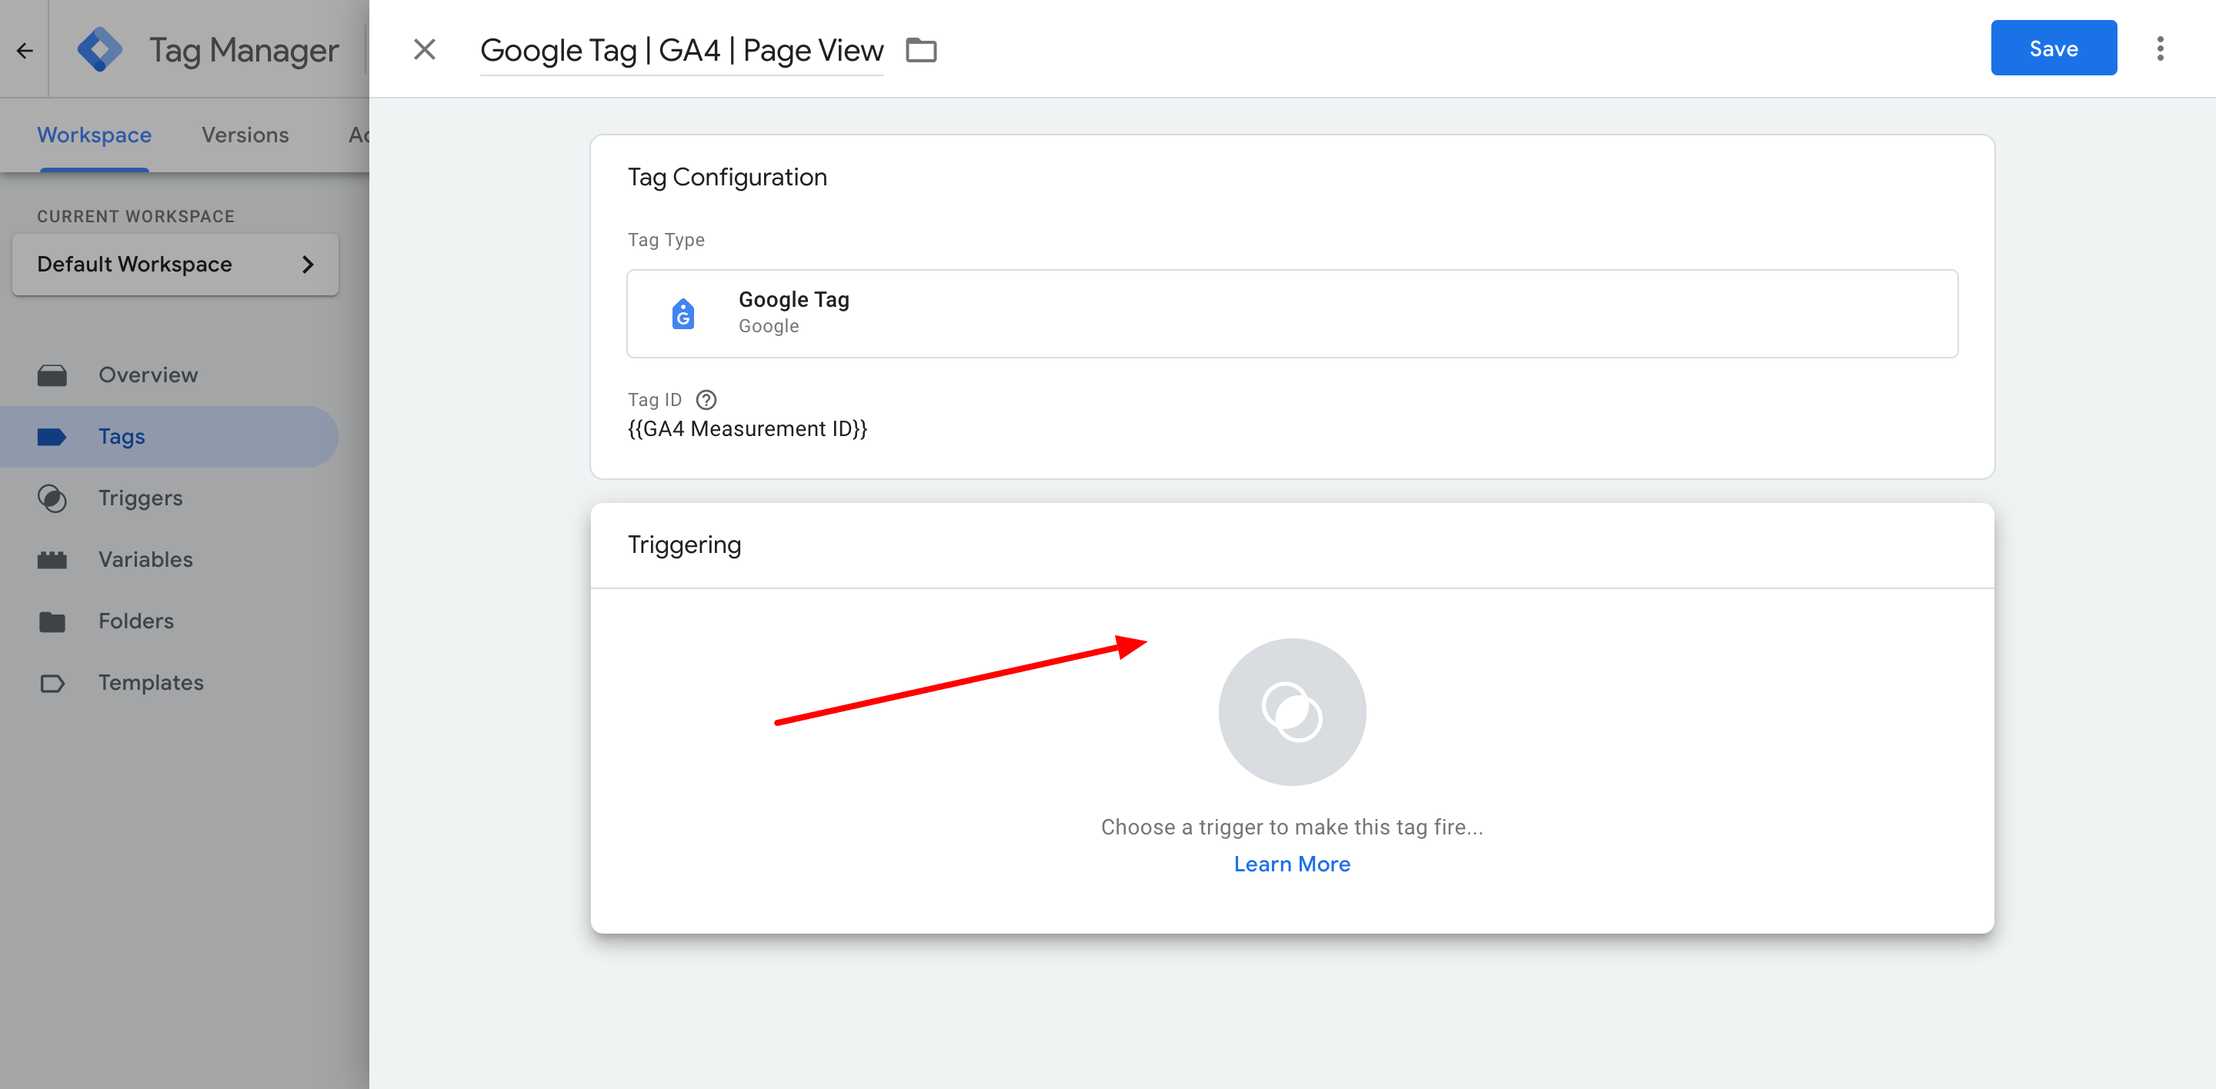
In the Tag Configuration box, select Google Tag and put the example name “Google Tag | GA4 | Page View”
Next, click on “Choose a tag type to begin setup.” A list of options will appear. From these, select “Google Tag” as your tag type.
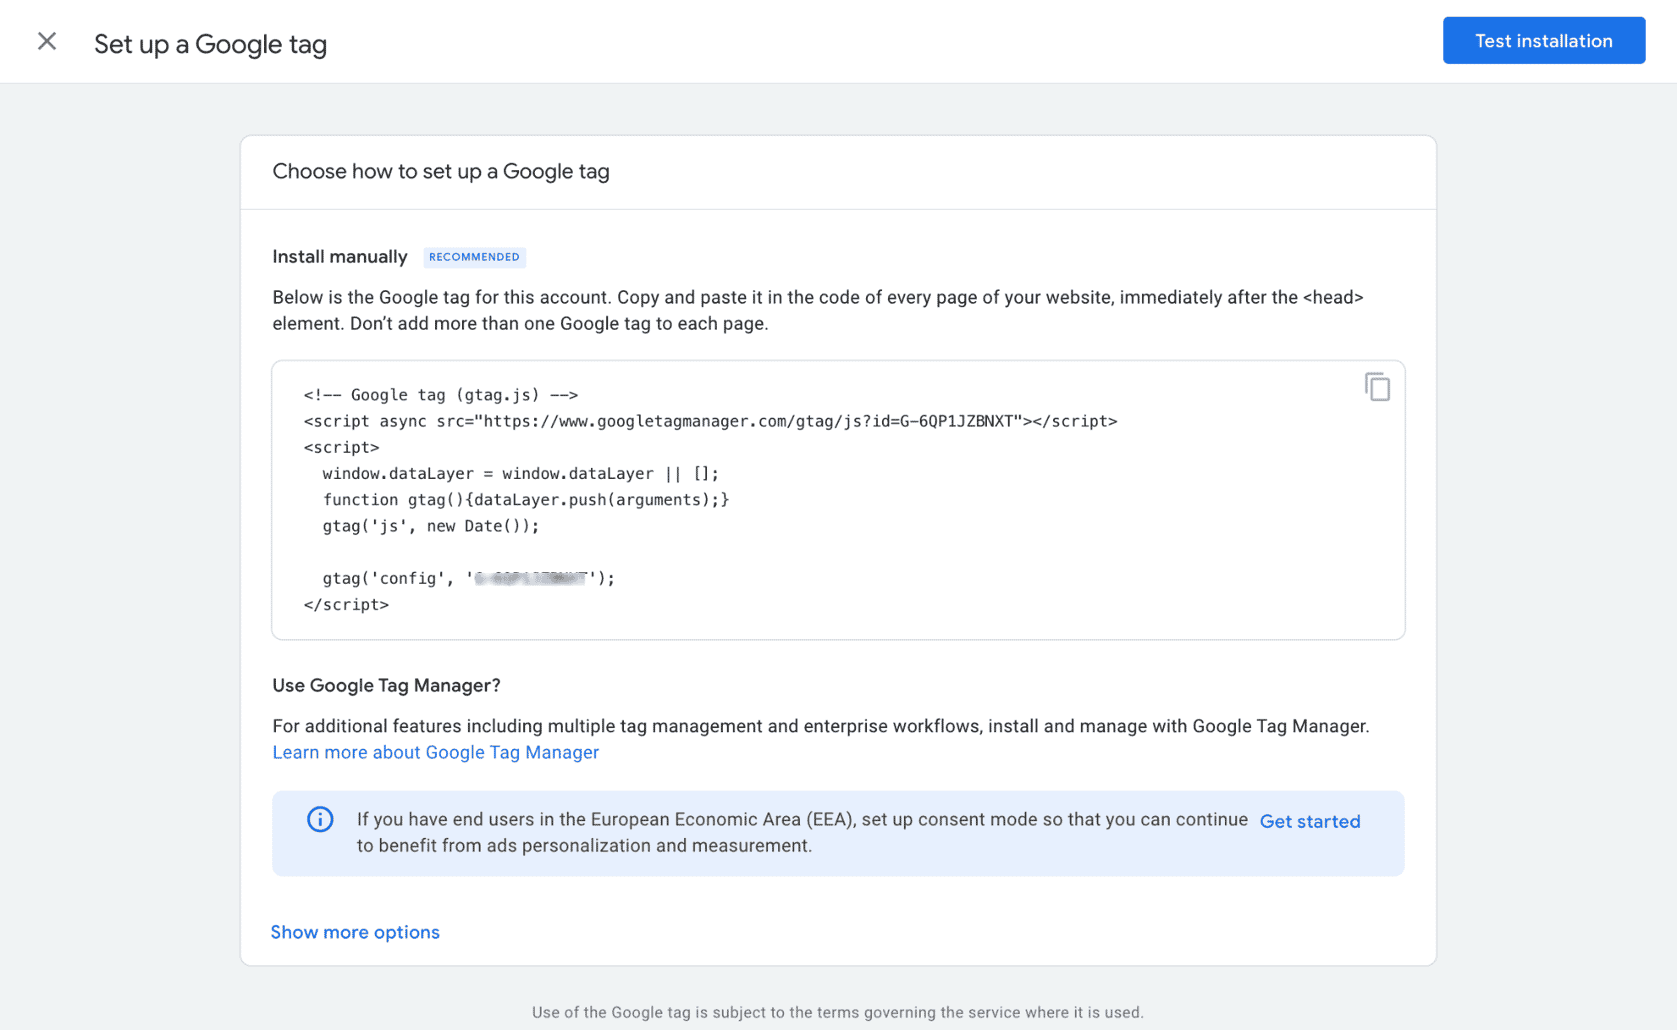
Next, configure your tag, in the field Measurement ID, enter your “G-” ID.
Now there are two options, you can either enter directly your “G-” ID here or
a variable to keep it dynamic so you will not need to change the ID multiple times if you will need to in future.
You can find your measurement ID here.
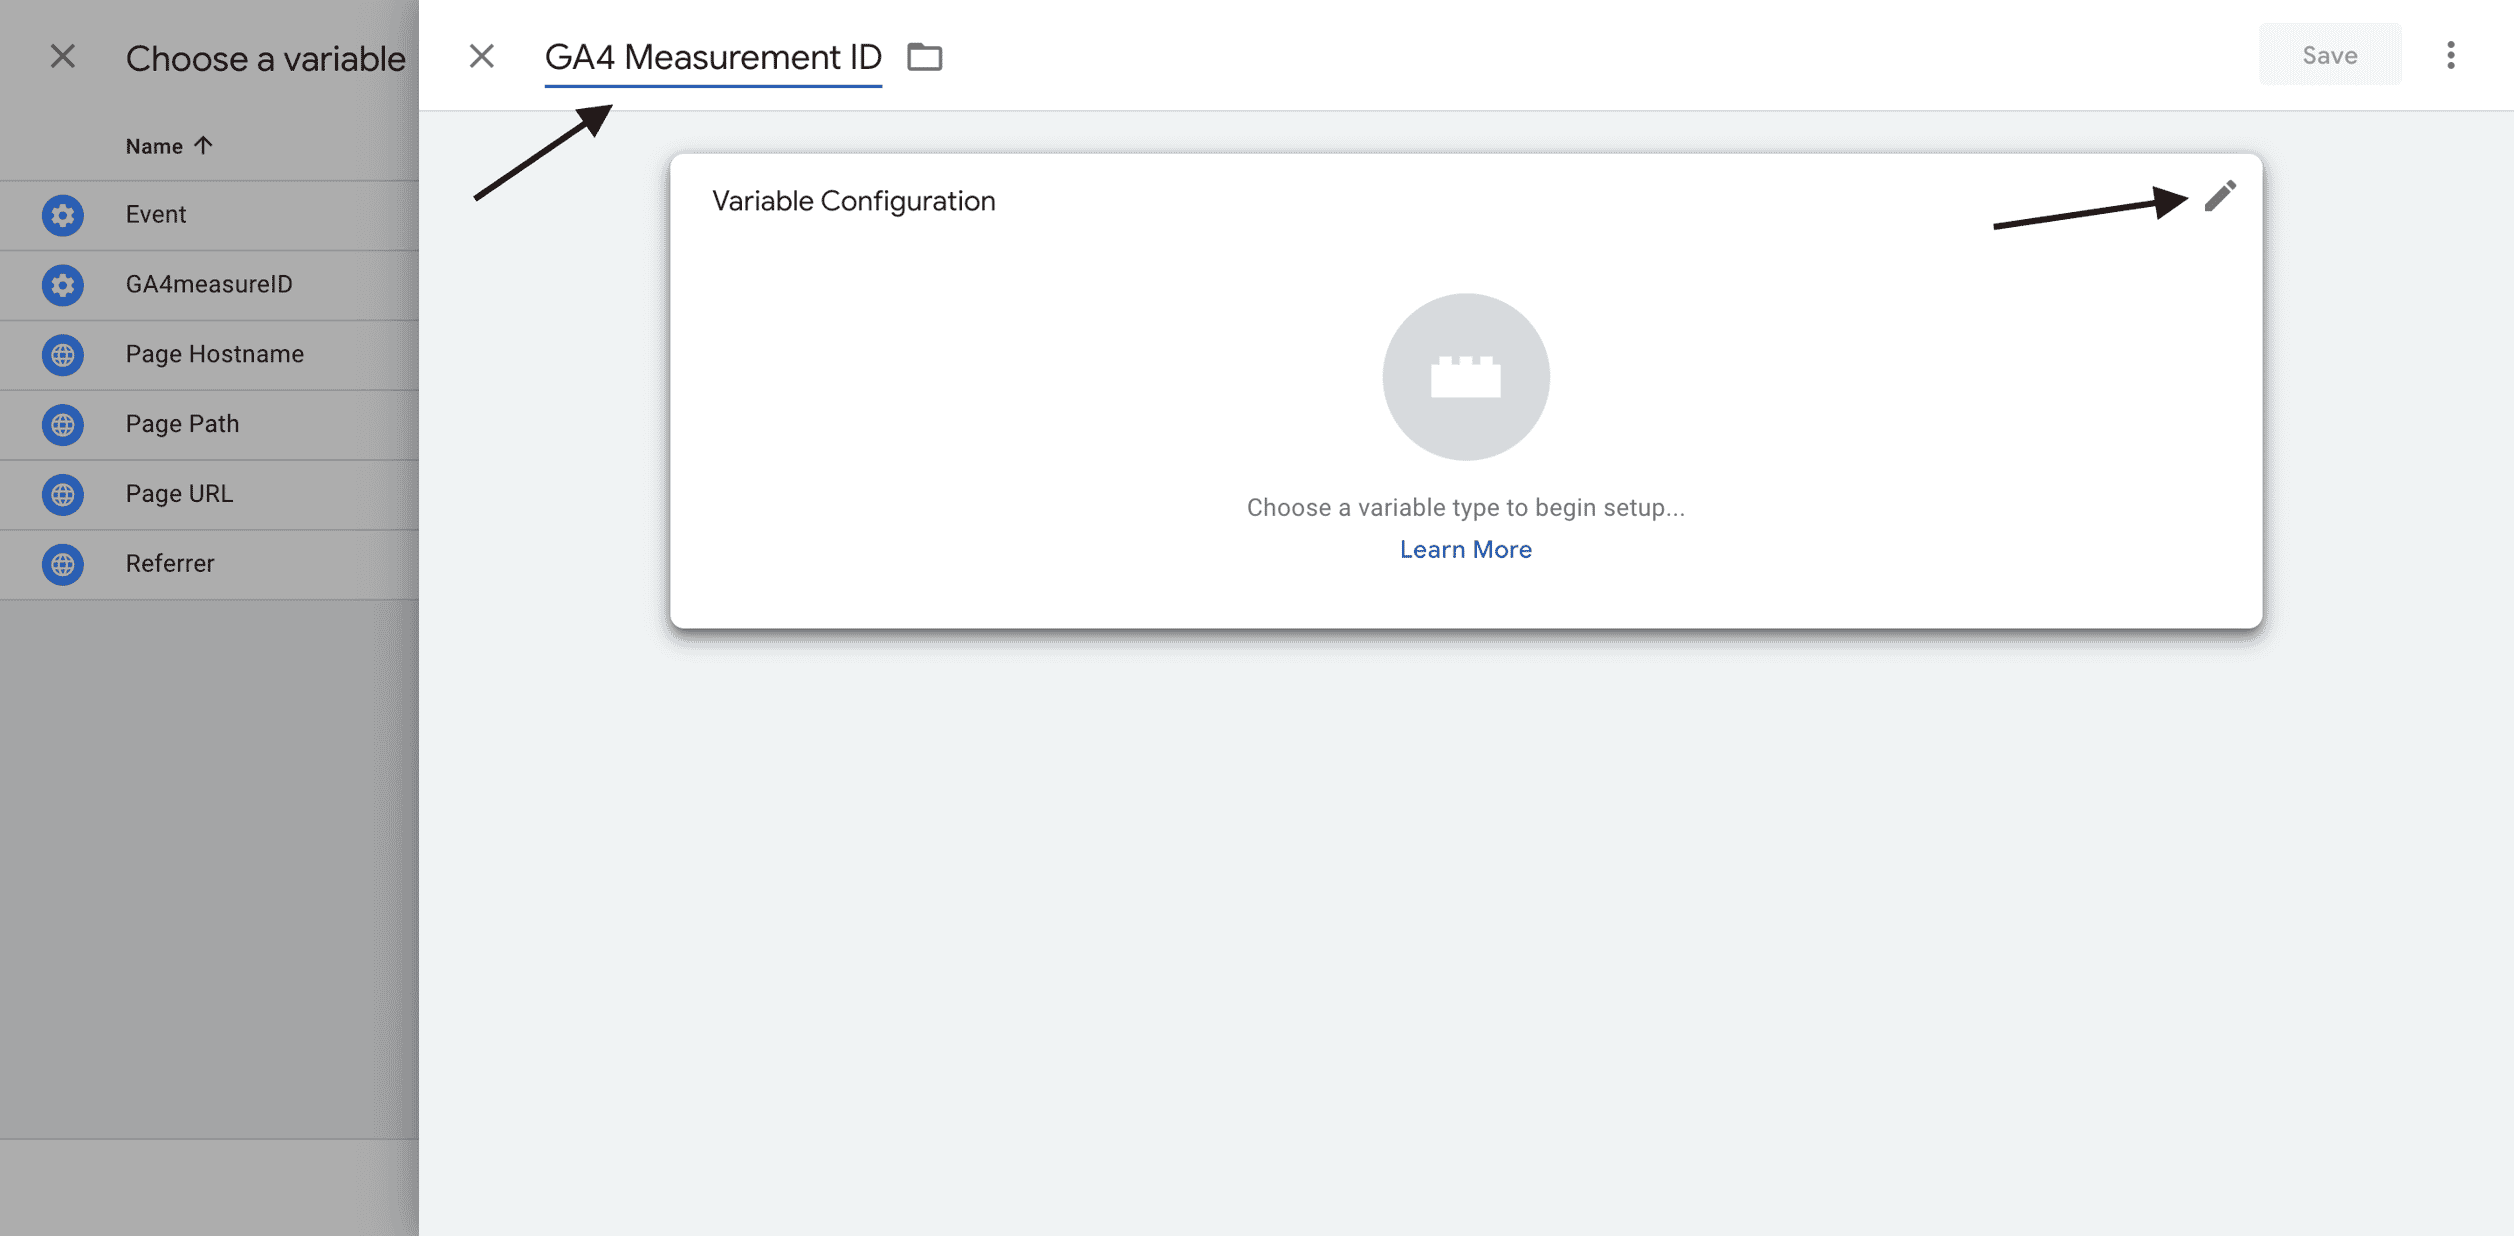
Let’s click on the variable icon, and a page will open from the right side showing “Choose a Variable.” On the same page, click the plus icon in the top corner.

The next page will open from the right side, showing the variable creation options. We’ll name the variable “GA4 Measurement ID” and select “Variable Configuration.” When you hover the cursor over it, an edit button will appear. Click on that button to proceed.
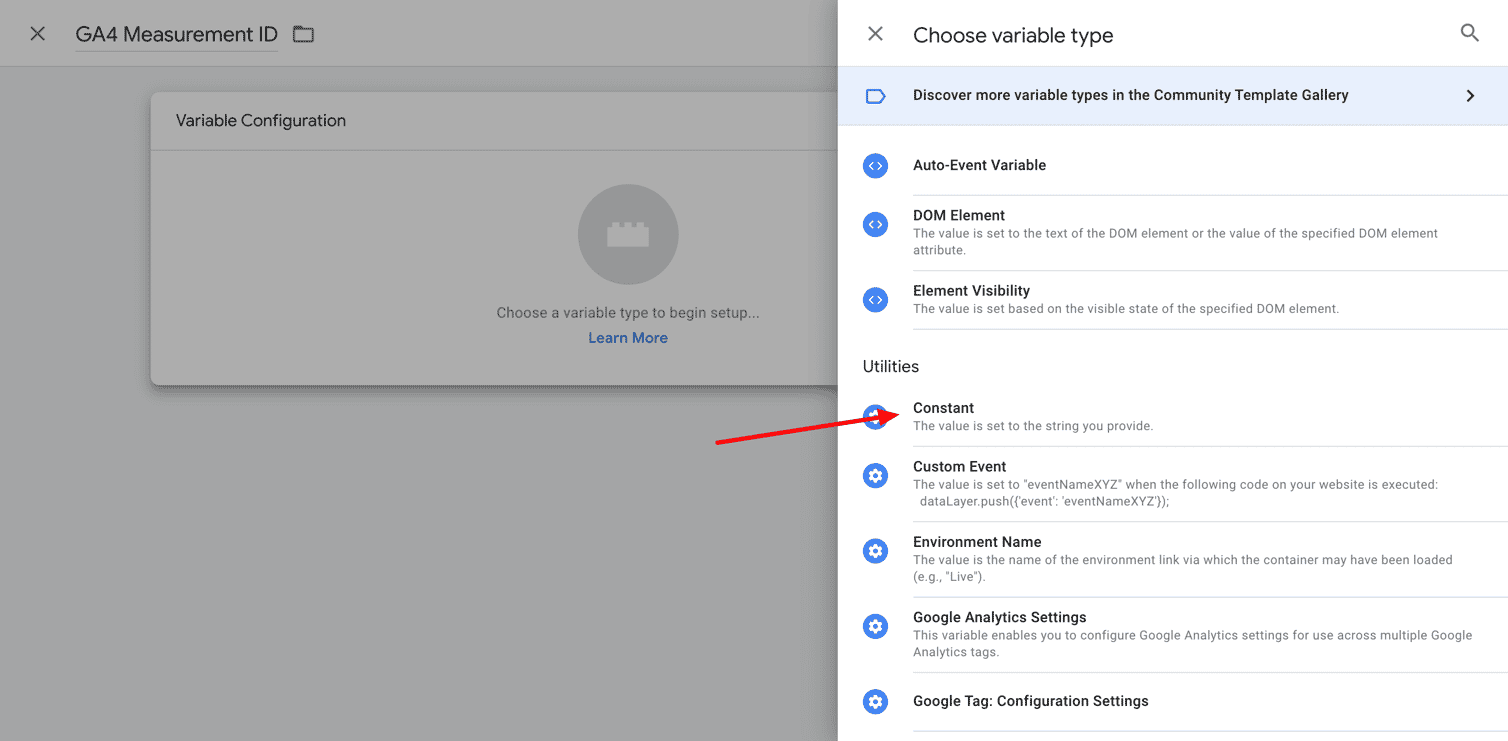
The next page will open from the right side, showing the option to choose the variable type. In this step, select “Constant”as the variable type.
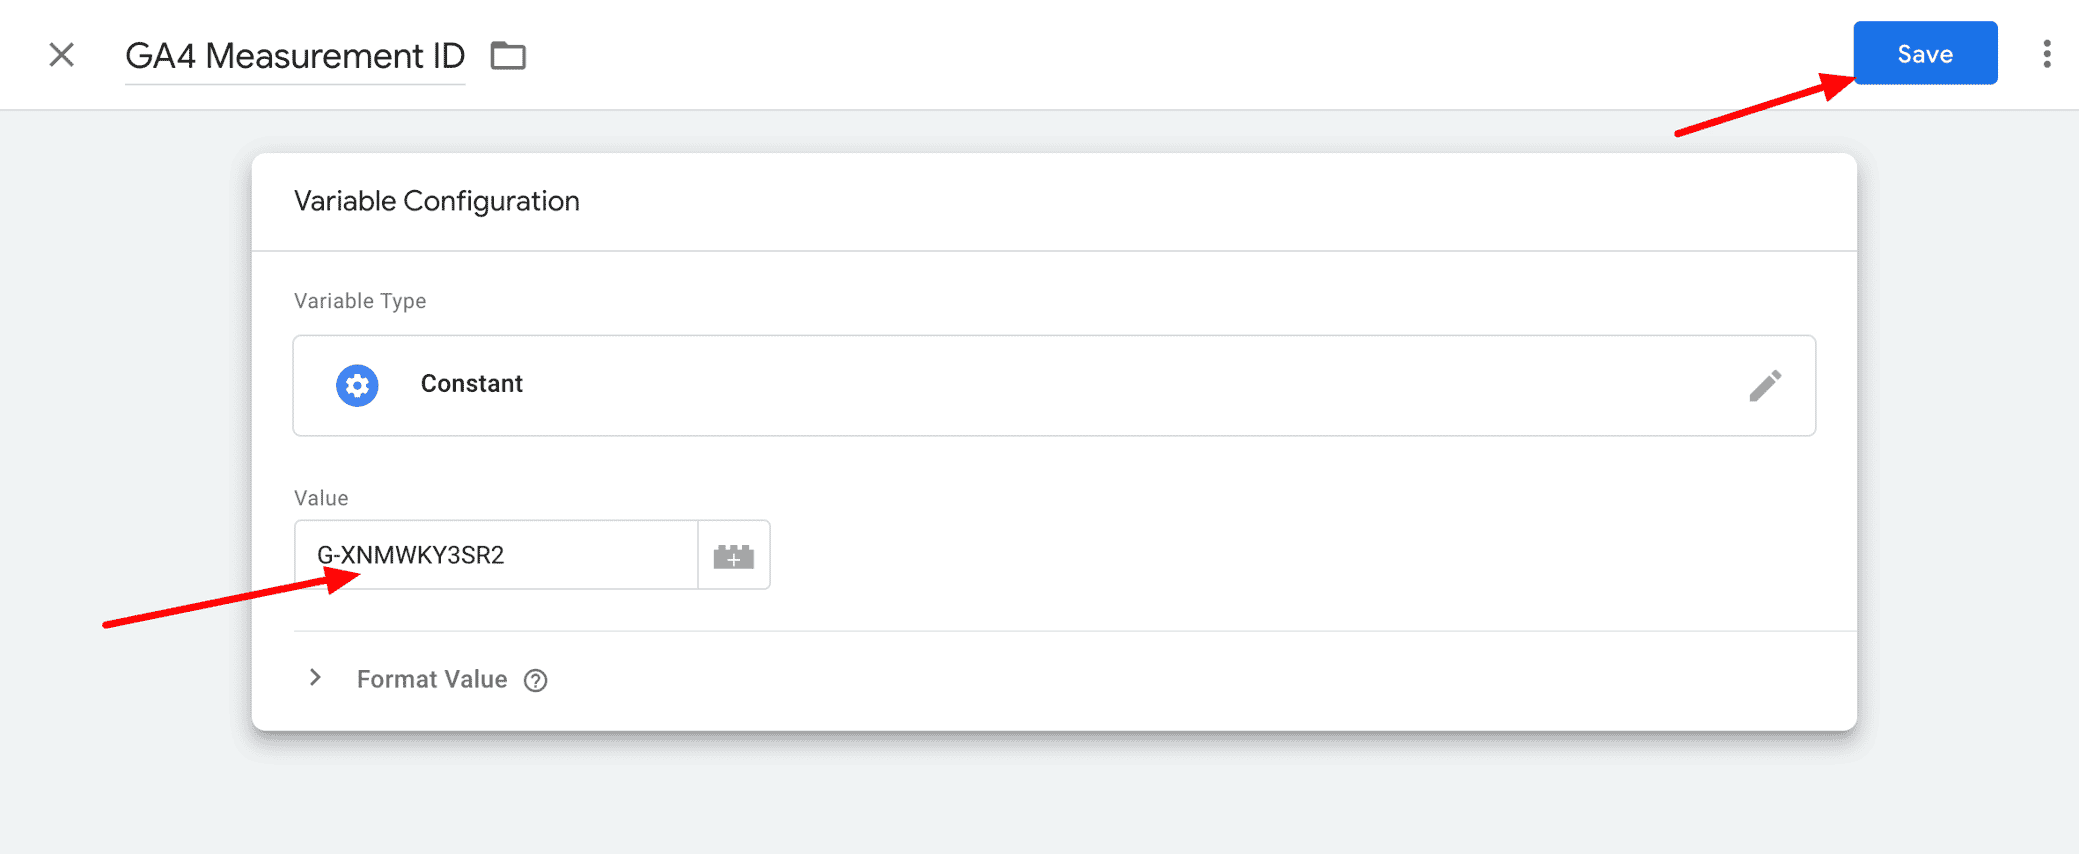
After this, paste the measurement ID in the provided field. Once you’re done, click Save to save the variable.
Next, you’ll need to click on Choose a Trigger to make this tag fire. For now, select “Initialization – All Pages”.

You’ll end up back at this screen. Finally, click Save.

And your new GTM tag is complete!
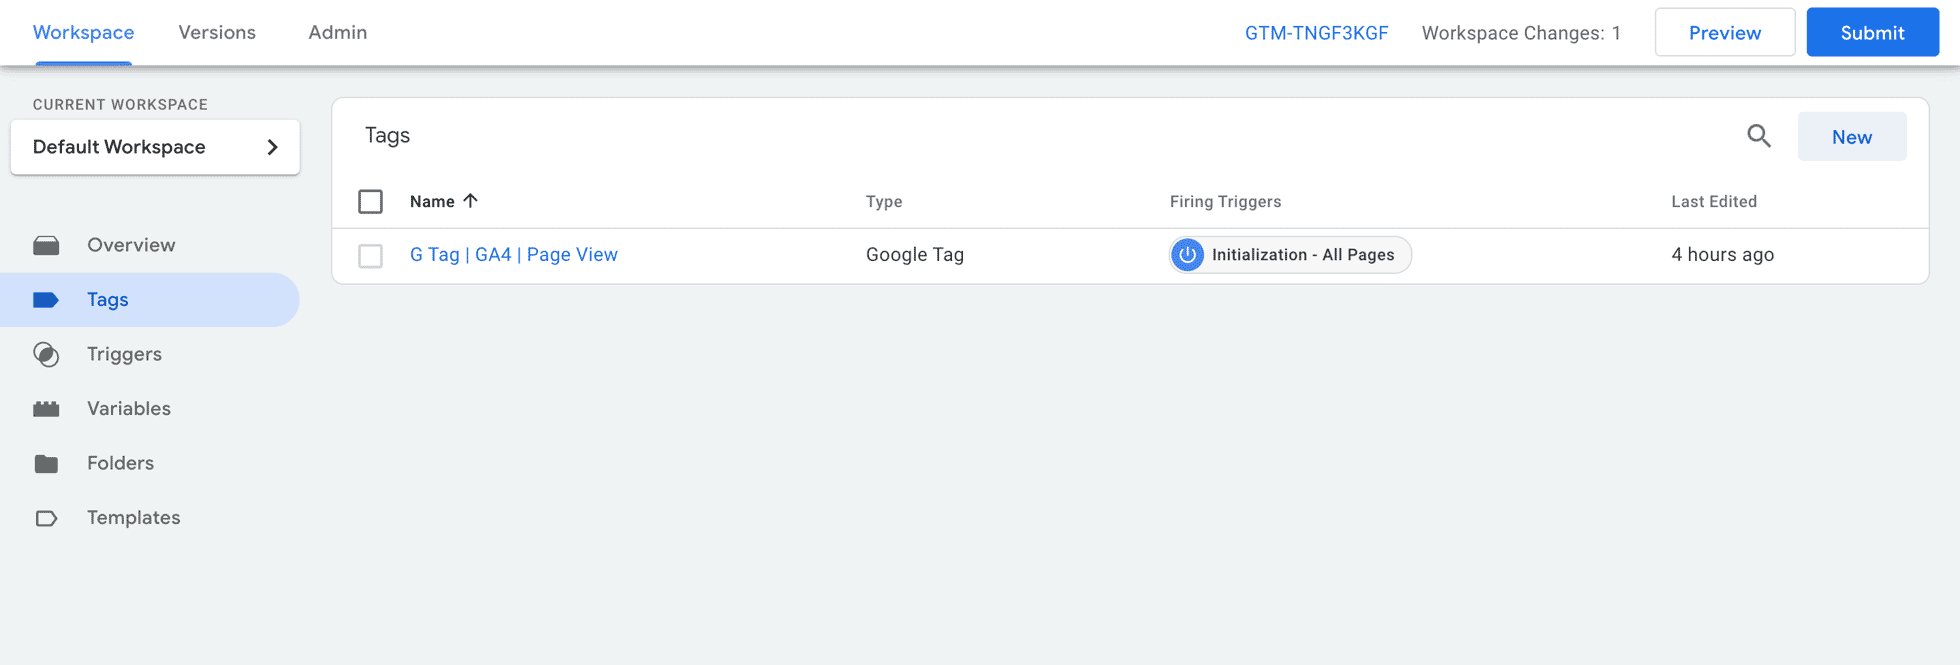
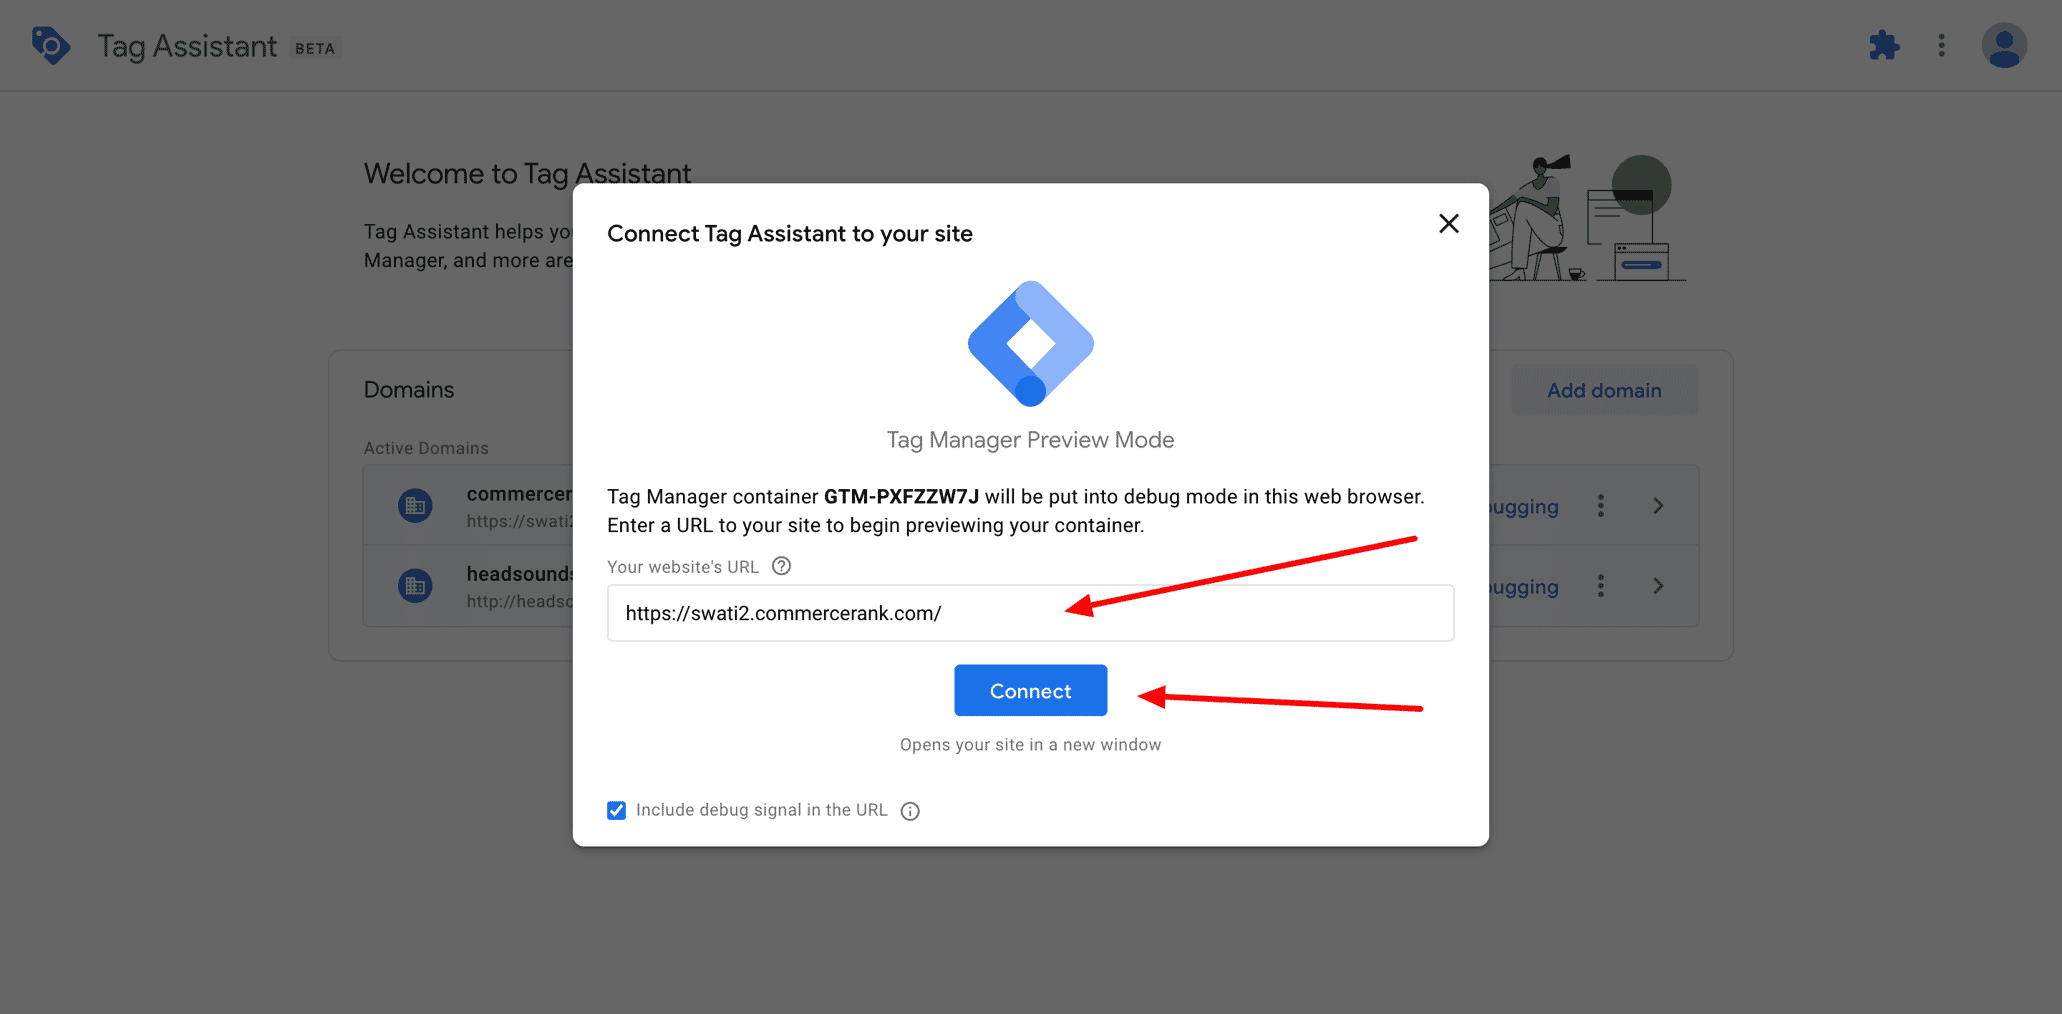
So now that our tag is setup and configured, we can test it out. Click the Preview button.

A window will appear asking for the URL of the site or page you want to test. Enter the URL and click “Connect.”
a new tab called Tag Assistant opens showing connection
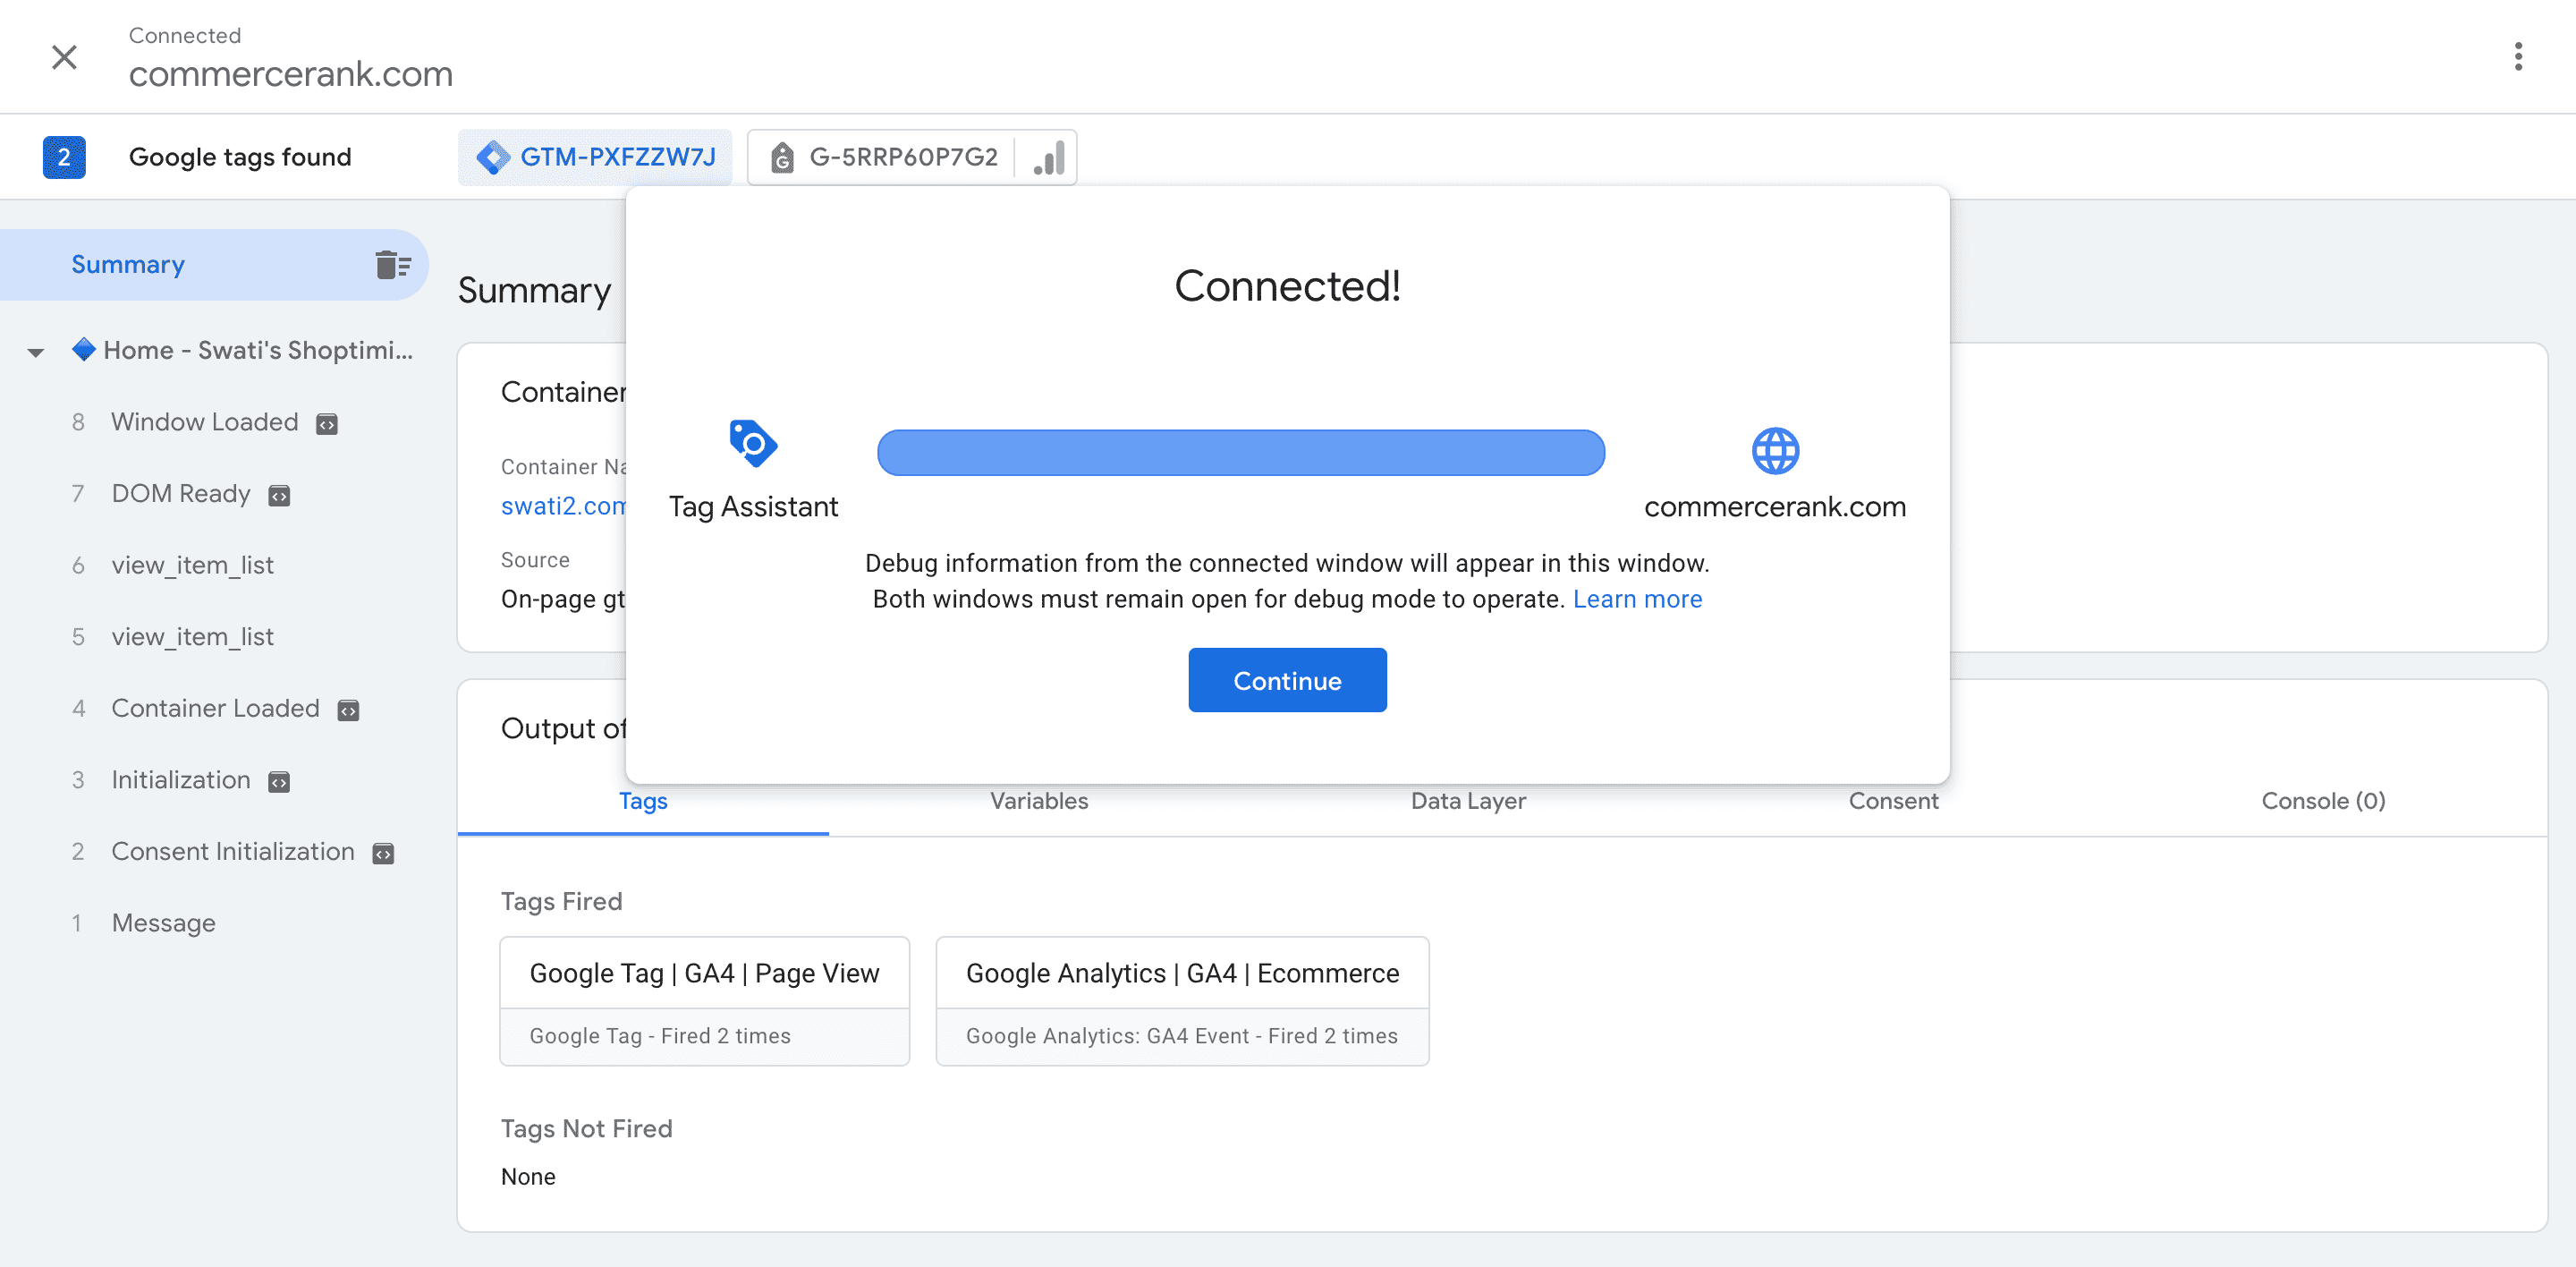
Your website opens alongside it in a separate tab. On your website tab, you’ll see a TAG_ASSISTANT_BADGE in the bottom-right corner of the page. This badge serves as a link between the two tabs, keeping the Tag Assistant and your website connected seamlessly.
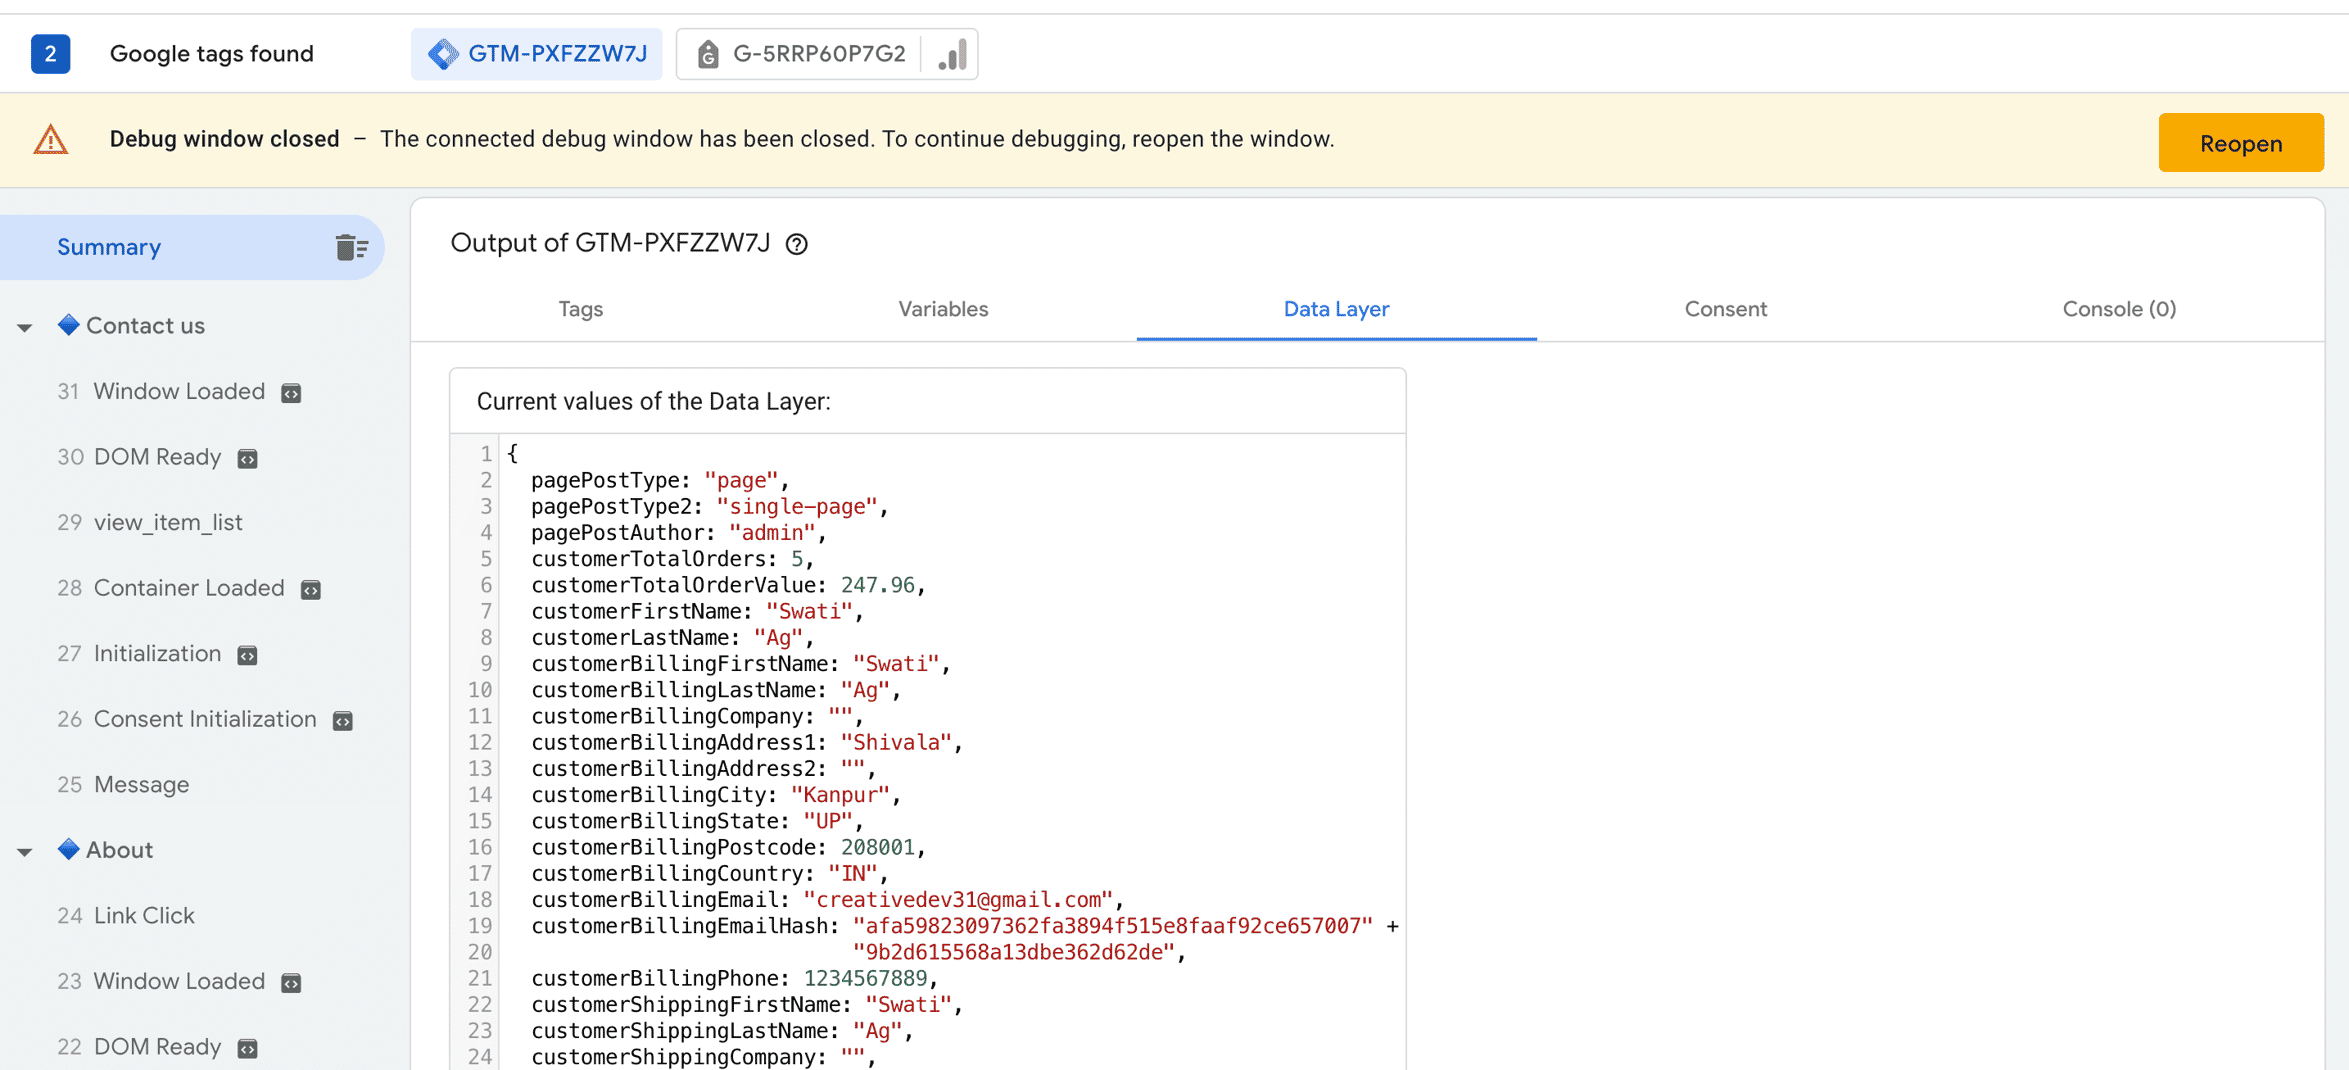
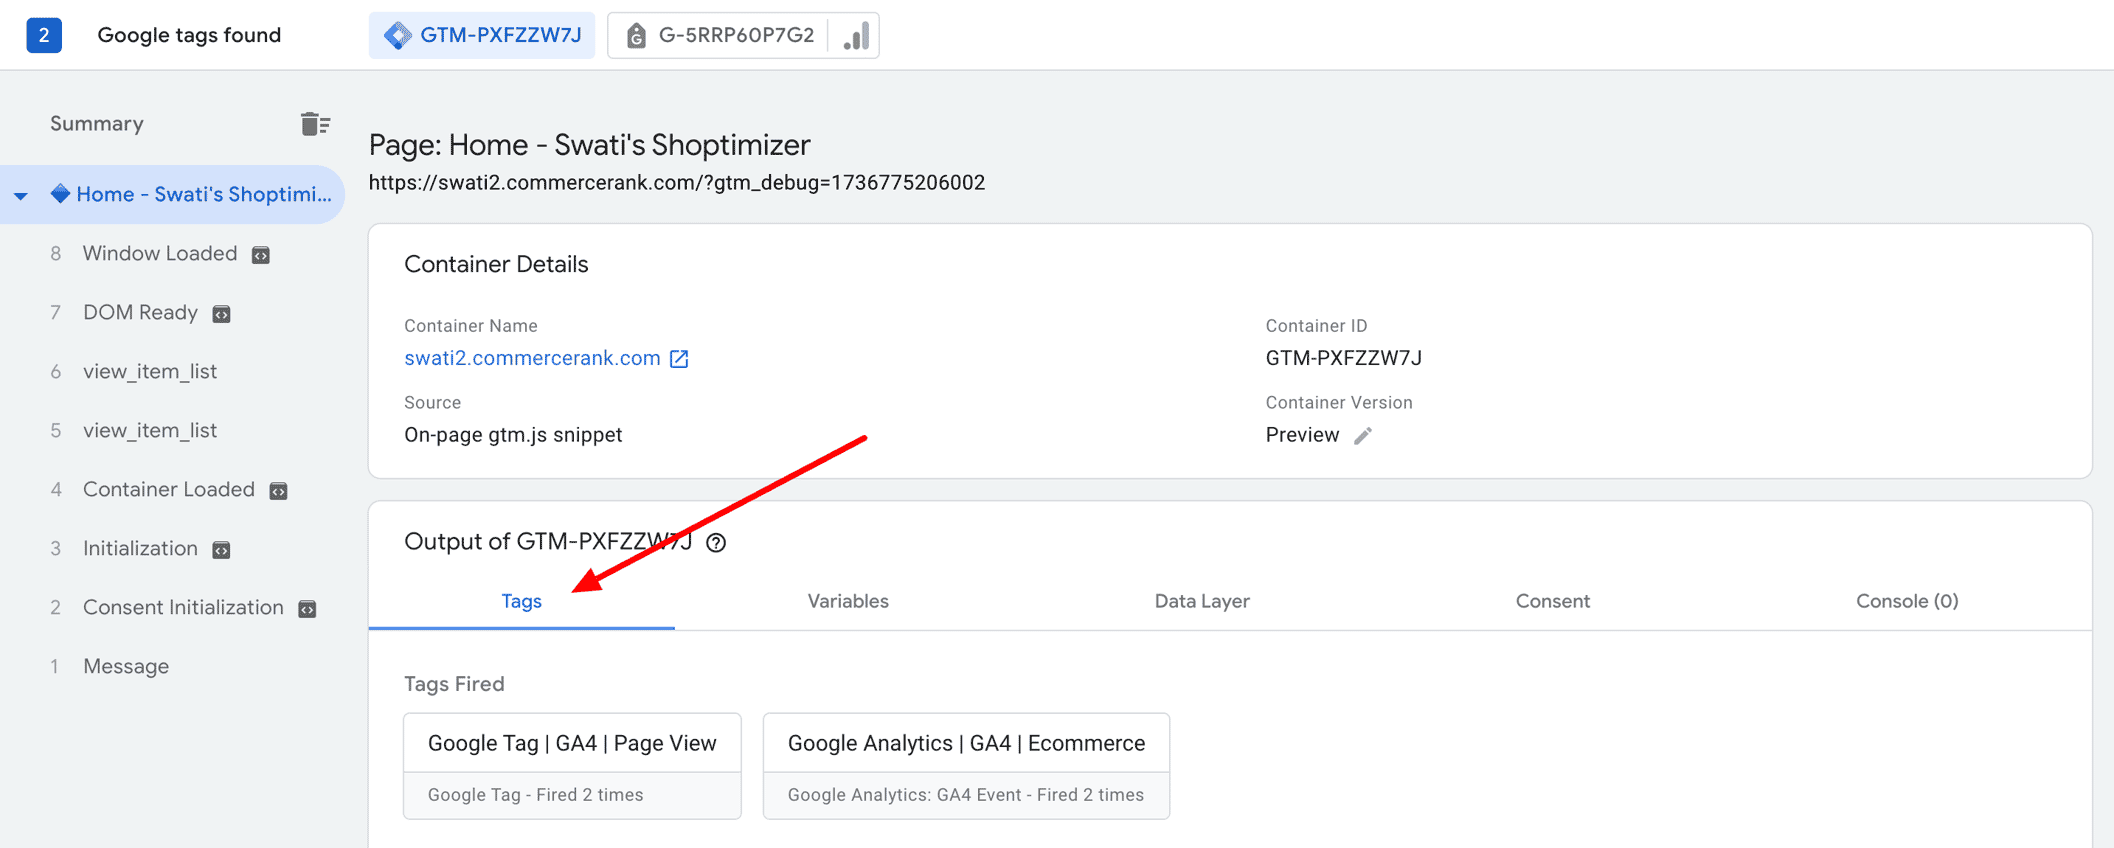
The Tag Assistant tab shows details like which tags are firing, activated triggers, and sent data. You can interact with your site in a separate tab, and actions reflect in real-time in Tag Assistant, making it easy to debug your GTM setup. Under Data Layer, you can check the data generated by the GTM4WP plugin to ensure accurate information is being passed to Google Tag Manager.
In addition, if you click the Tags tab you should see your GA tag is firing correctly.
Great! Now go back to GTM and click the Submit button, located next to the Preview button you clicked earlier. A screen called Submit Changes will appear. Make sure to give it a clear, descriptive name so you can easily recognize this workspace change later.
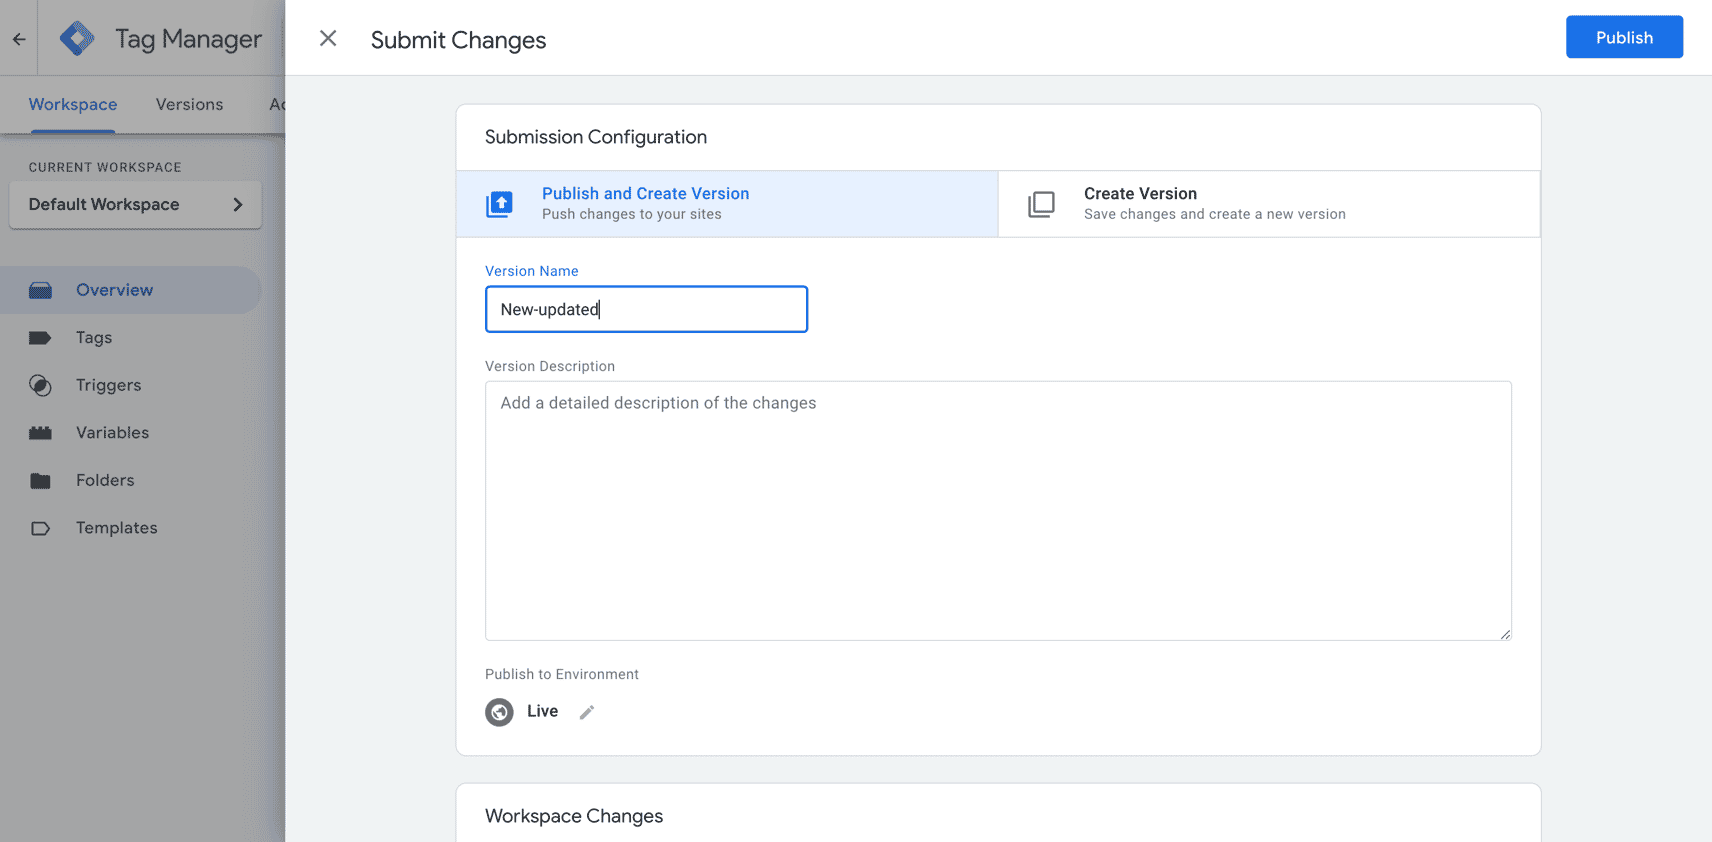
The Preview->Publish workflow of GTM is a fantastic way of first testing out new pixels and events on your live website without disrupting live users. While I’m a massive fan of WooCommerce staging environments, GTM live previews are one of the rare instances where you can get away with testing on live websites 🙂 That said, you can also configure multiple publishing environments for your GTM workspace which I would highly recommend after you’ve got comfortable with how GTM works. Go ahead and click Publish and you’ll eventually a Version summary for this publish event.
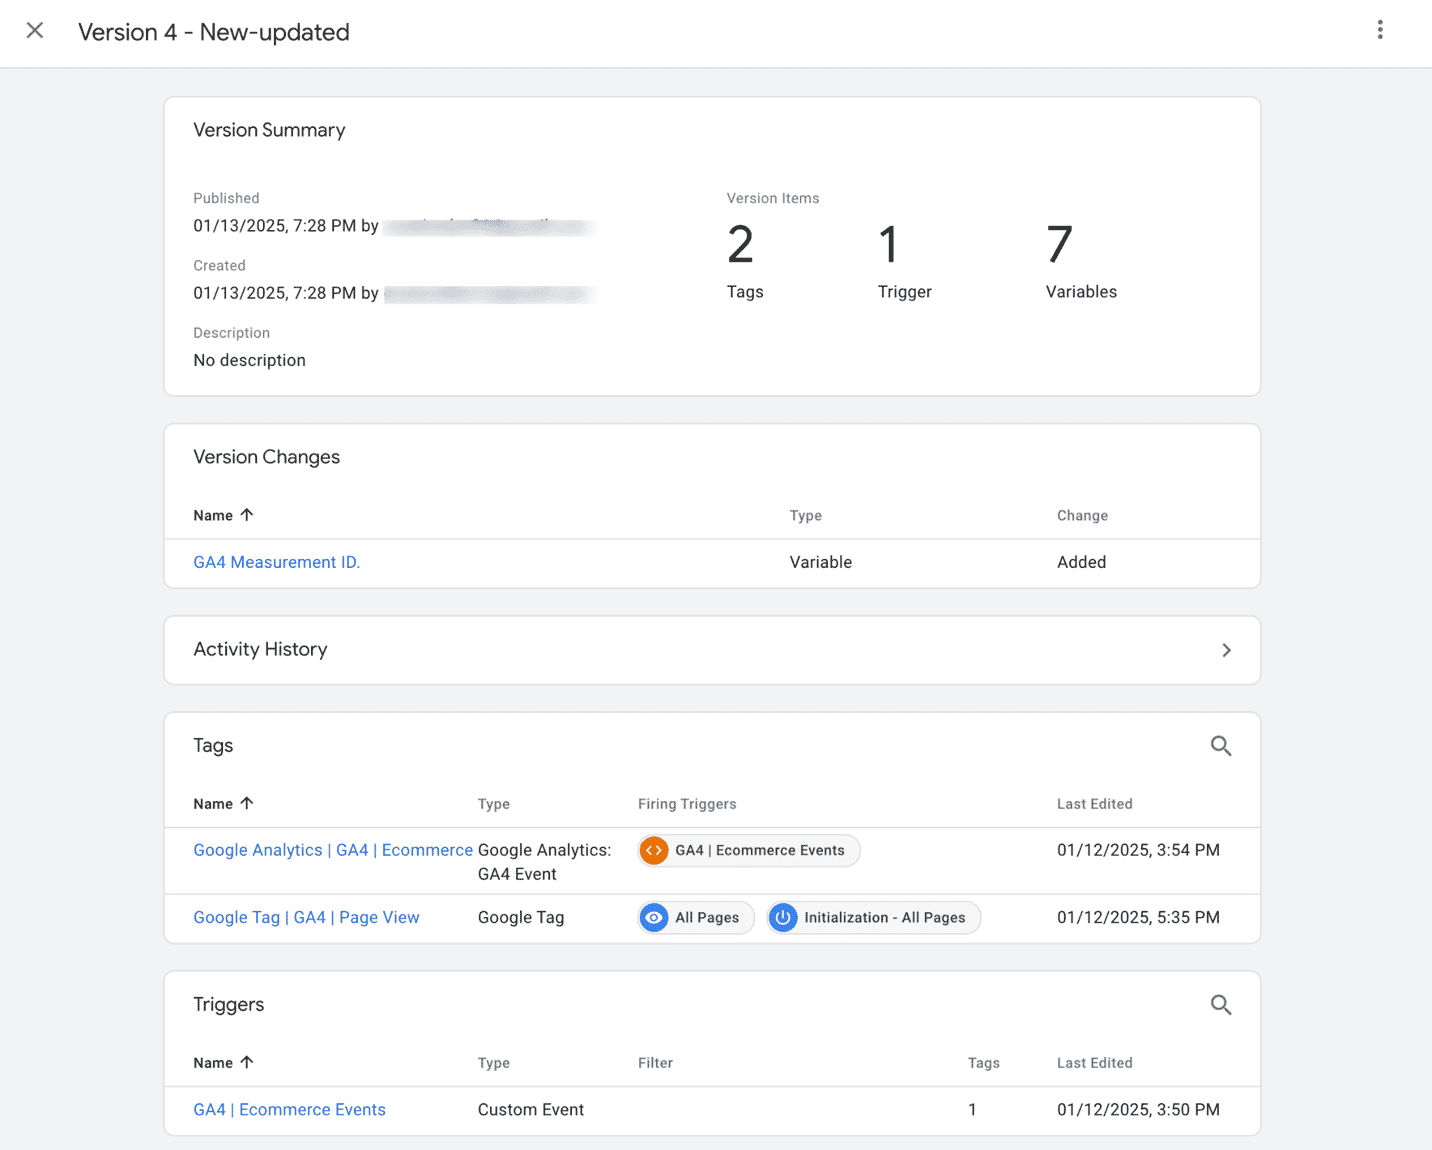
Another great feature of GTM is that you can access all your publish events via the Versions tab.
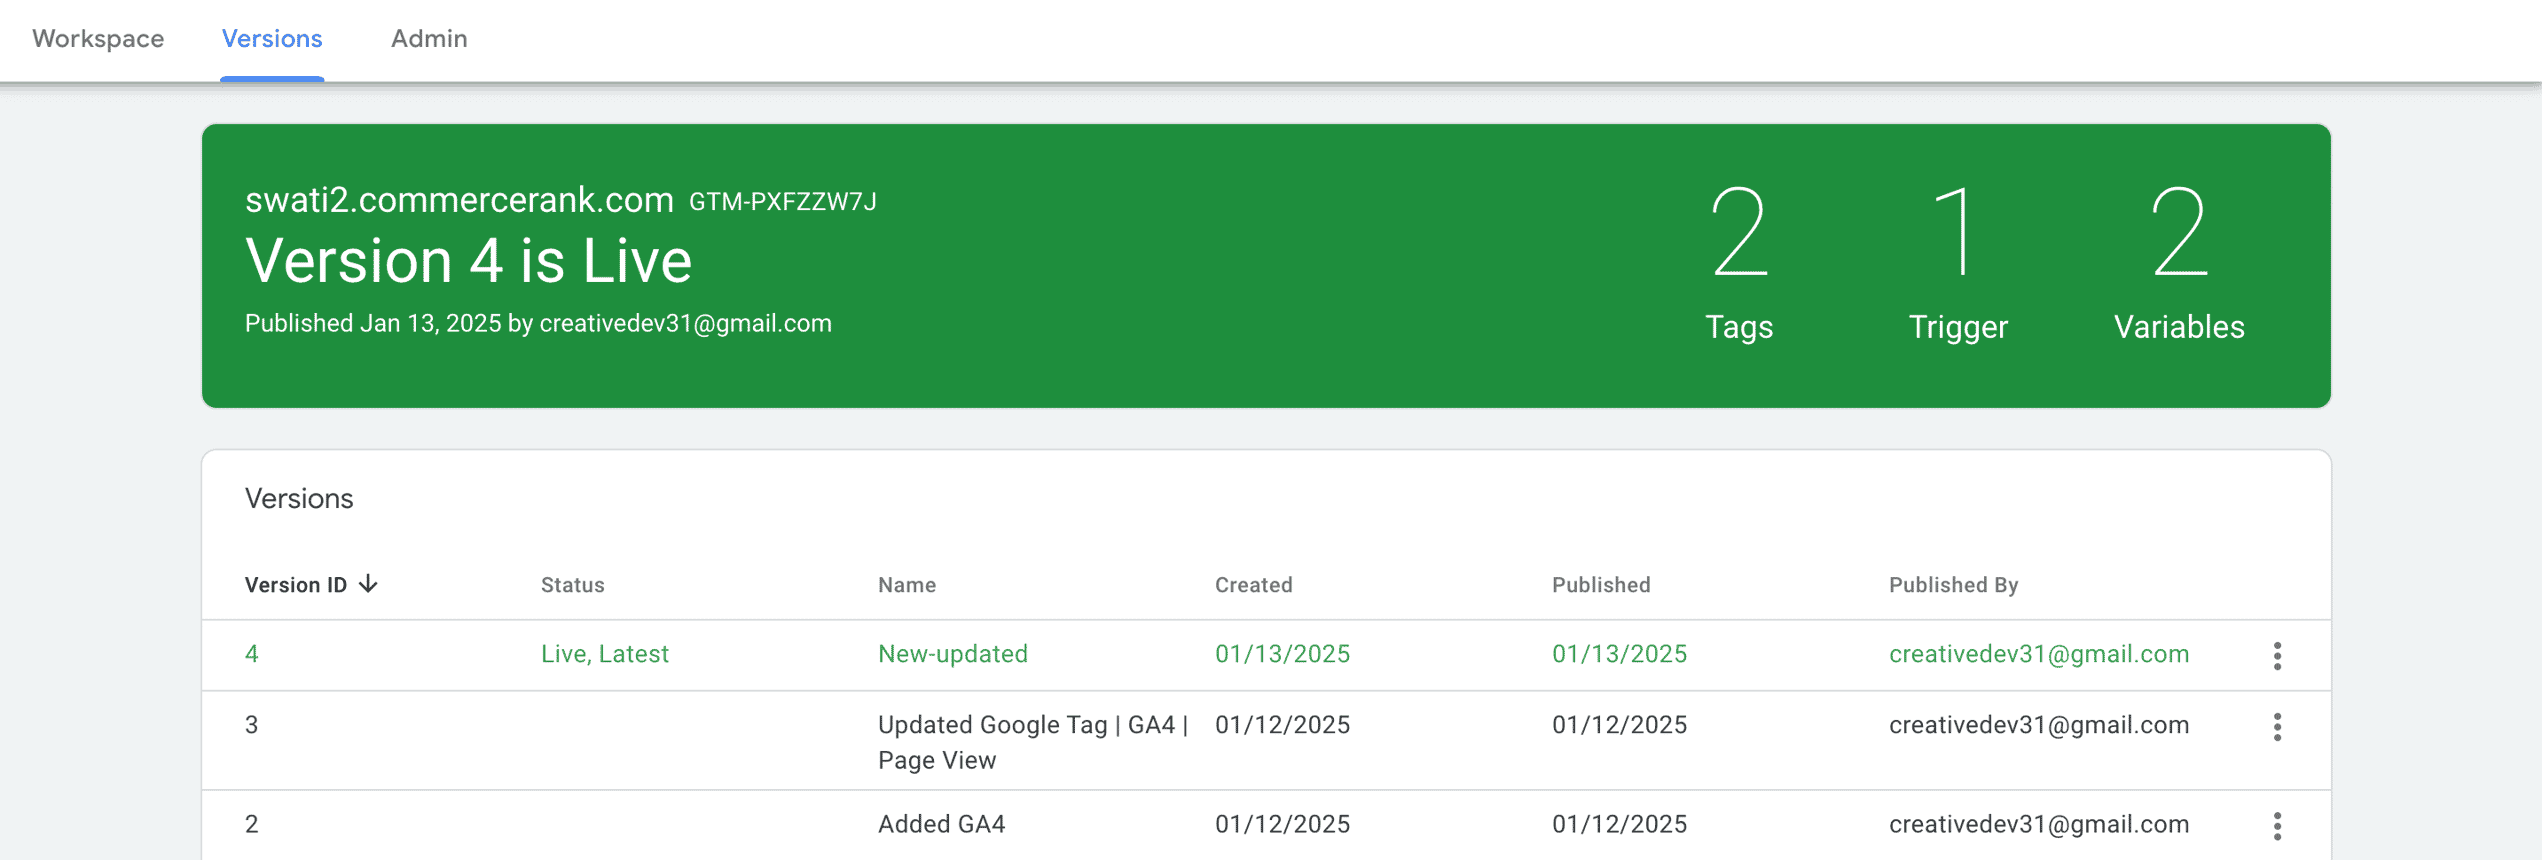
You can event choose to roll back to an earlier version of your workspace if you wish – which is incredibly useful if you end up breaking one of your tags and need to quickly revert to a previous known working state.
So GTM is now capturing all the basics of your website, let’s power on and configure GTM to capture some of the more specific eCommerce events that happen in WooCommerce.
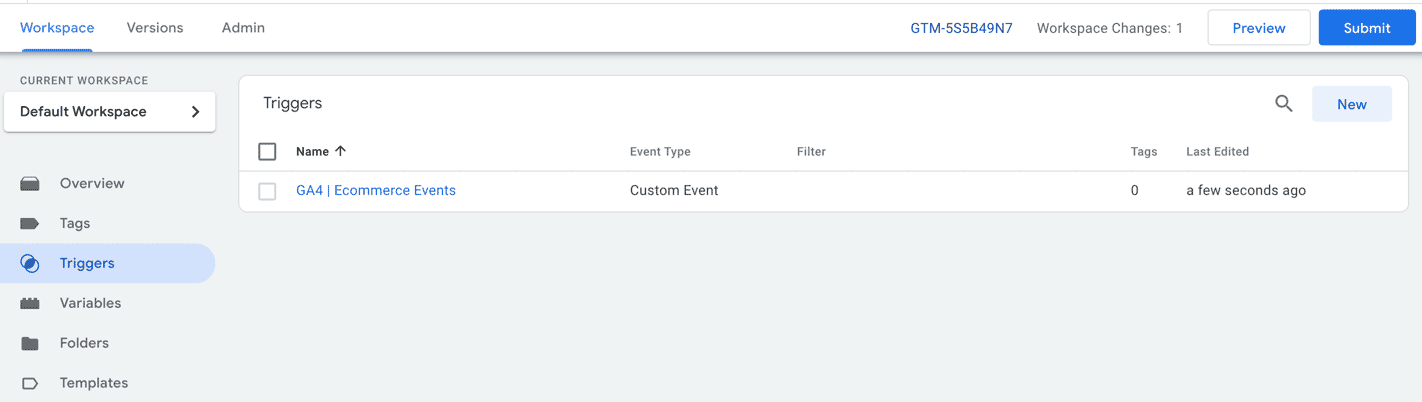
Click on Triggers and click New
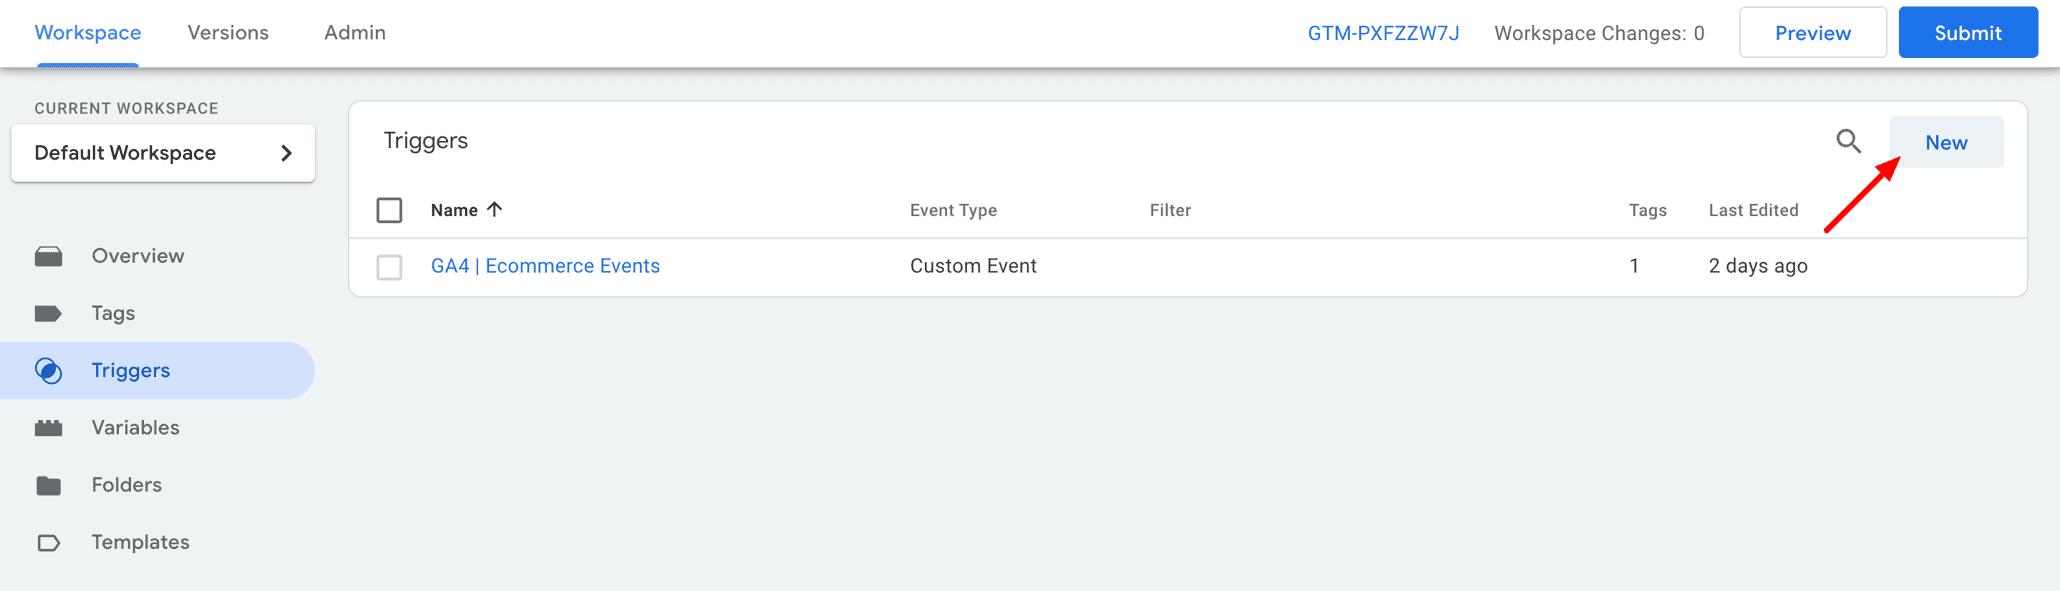
To create a fresh trigger and give it a meaningful name like “GA4 | Ecommerce Events.”
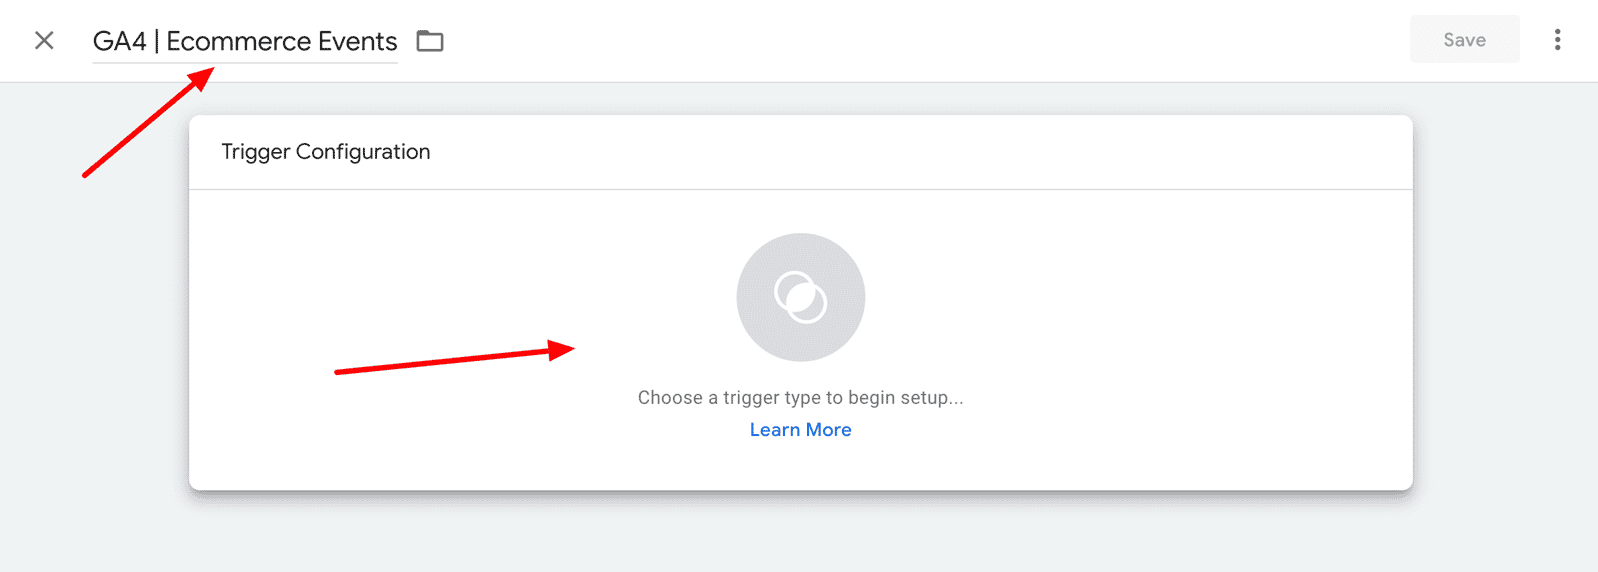
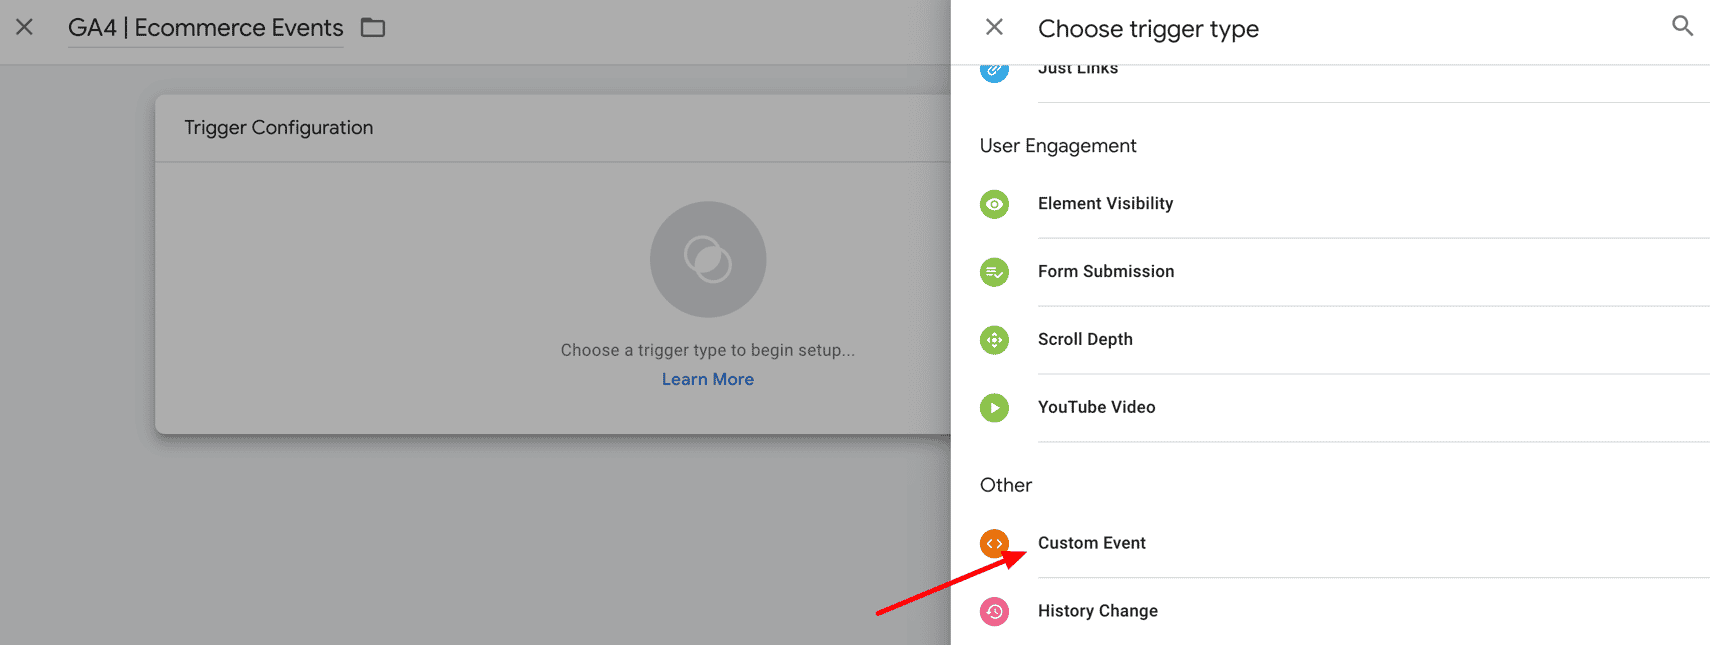
Once you’ve named it, move on to configuring the trigger. Select “Trigger Configuration,” and choose “Custom Events” as the type.
Next, it’s time to define the events you want to track. In the Event Name field, enter the following regular expression:
View_item|view_item_list|select_item|add_to_cart|remove_from_cart|view_cart|begin_checkout|add_payment_info|add_shipping_info|purchaseBe sure to check the option for “Use regex matching” to ensure the trigger recognizes all these events.
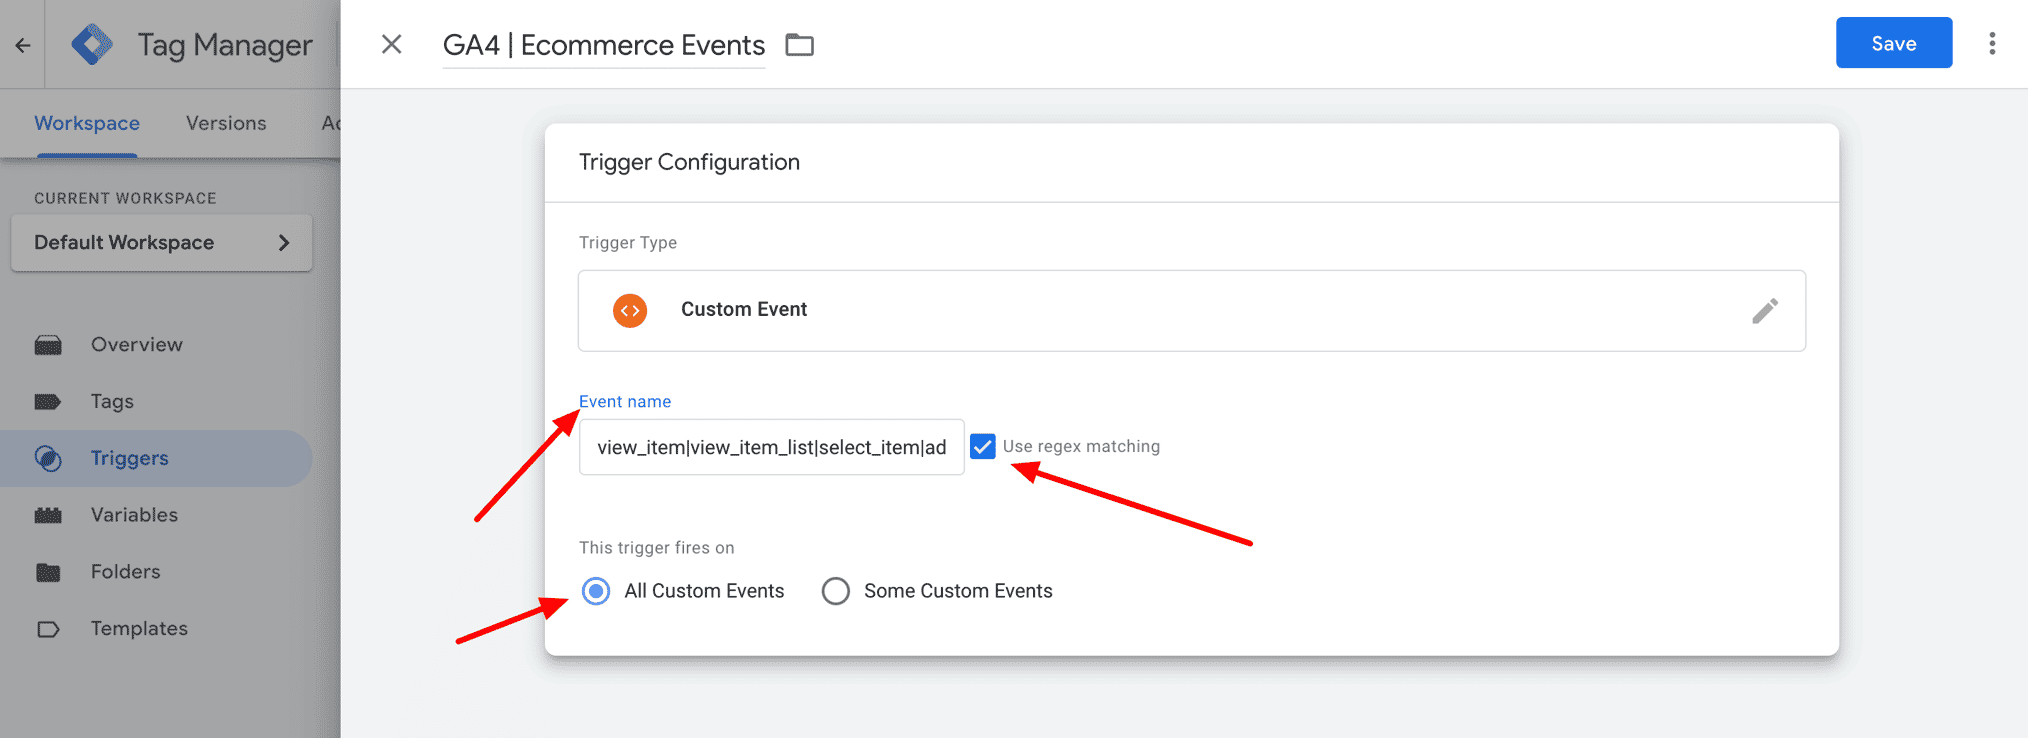
Once everything is set up, click “Save” to finalize your trigger. With that, you’re all set to track eCommerce events seamlessly!
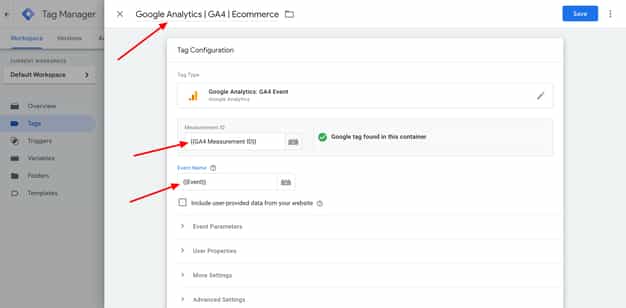
To create a tag for GA4 eCommerce events in Google Tag Manager, start by heading over to the Tags section in your GTM workspace. Once there, click on the “New” button to set up a new tag. Give it a clear and descriptive name, like “Google Analytics | GA4 | eCommerce,” so you can easily identify it later.
Next, you’ll move on to configuring the tag. Click on Tag Configuration and select Google Analytics: GA4 Event as the tag type. When prompted to enter the Measurement ID, click on the variable icon and choose the GA4 Measurement ID variable you’ve already set up.
Now, for the event name, do the same: click the variable icon and pick the default Event variable.
To finalize your GA4 eCommerce tag setup, go to the More Settings section within the tag configuration. Under the Ecommerce options, enable the “Send ecommerce data” feature. Once that’s activated, ensure that “Data layer” is selected as the data source.
This step ensures that the eCommerce data from your website’s data layer is properly captured and sent to Google Analytics.

To complete your GA4 eCommerce tag setup and make it live, follow these final steps.
First, scroll down to the Triggering section of your tag configuration. Click on Add Trigger and select the GA4 | eCommerce Events trigger you created earlier. This step ensures that your tag will fire specifically for eCommerce events.
![]()
Once the trigger is set, click Save to confirm your tag configuration.
![]()
Now it’s time to make it live! Head over to the Submit button in Google Tag Manager, where you can publish your changes. For clarity, name this version something like “Added GA4 Ecommerce Tracking.” Finally, click Publish to apply your updates, and your eCommerce tag is now active and ready to track data!
Part 3 – How to use Google Analytics to measure the growth of your WooCommerce website
Ok so now you know now you’ve chosen you preferred integration method it’s time to make sure you’ve configured Google Analytics correctly for WooCommerce.
If you’ve been brave enough to get GTM setup correctly in Part 2, let’s first make sure your tags and event names are firing correctly and the data is pouring into Google Analytics. (I’m going to assume you’ve already used the GTM Preview window to make sure you can actually see your tags firing first.) I recommend opening up 2 separate windows side by side.
In window one, open your website and start simulating what you want your customers to do. Go to your shop landing page, click on one of your Product Description Pages (PDP’s) and add to cart, go to cart, check and complete a test order.
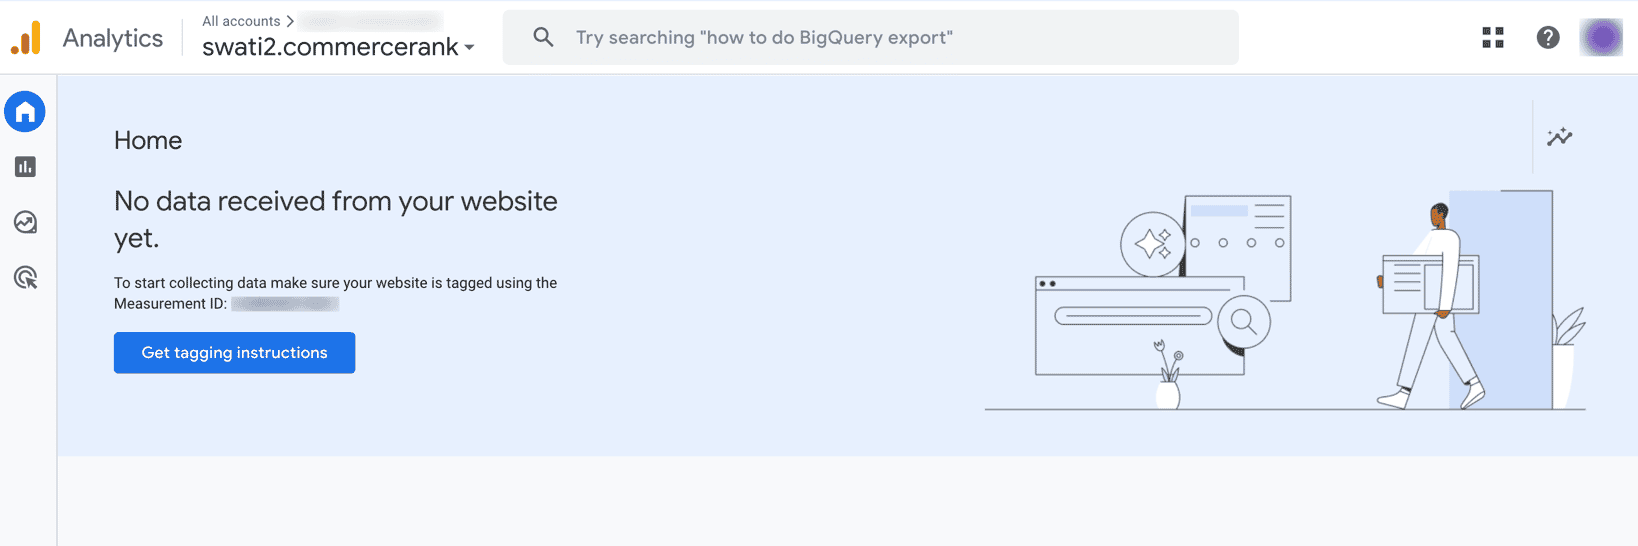
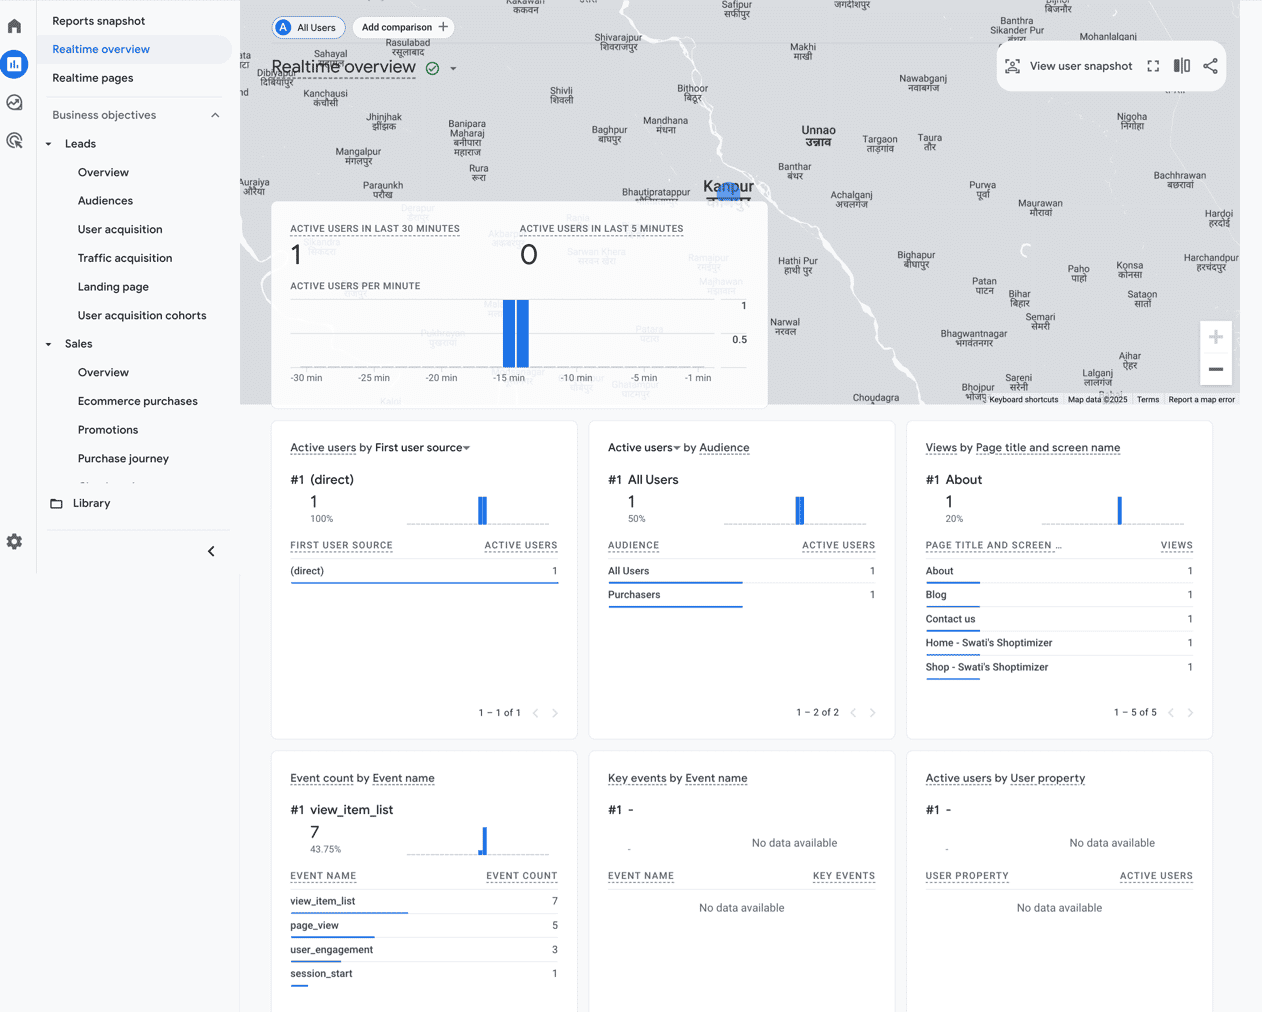
In Window Two, open Google Analytics and go to the Realtime overview. As you simulate actions on your website (viewing products, adding to cart, checking out, and completing a test order), watch for events like view_item, add_to_cart, begin_checkout, and purchase to appear in real-time.
If the events show up as expected with correct details, your setup is working perfectly. If not, revisit your GTM configuration and fix any issues.
If everything is working as expected, congratulations—you’ve successfully set up GTM for Enhanced eCommerce with WooCommerce!
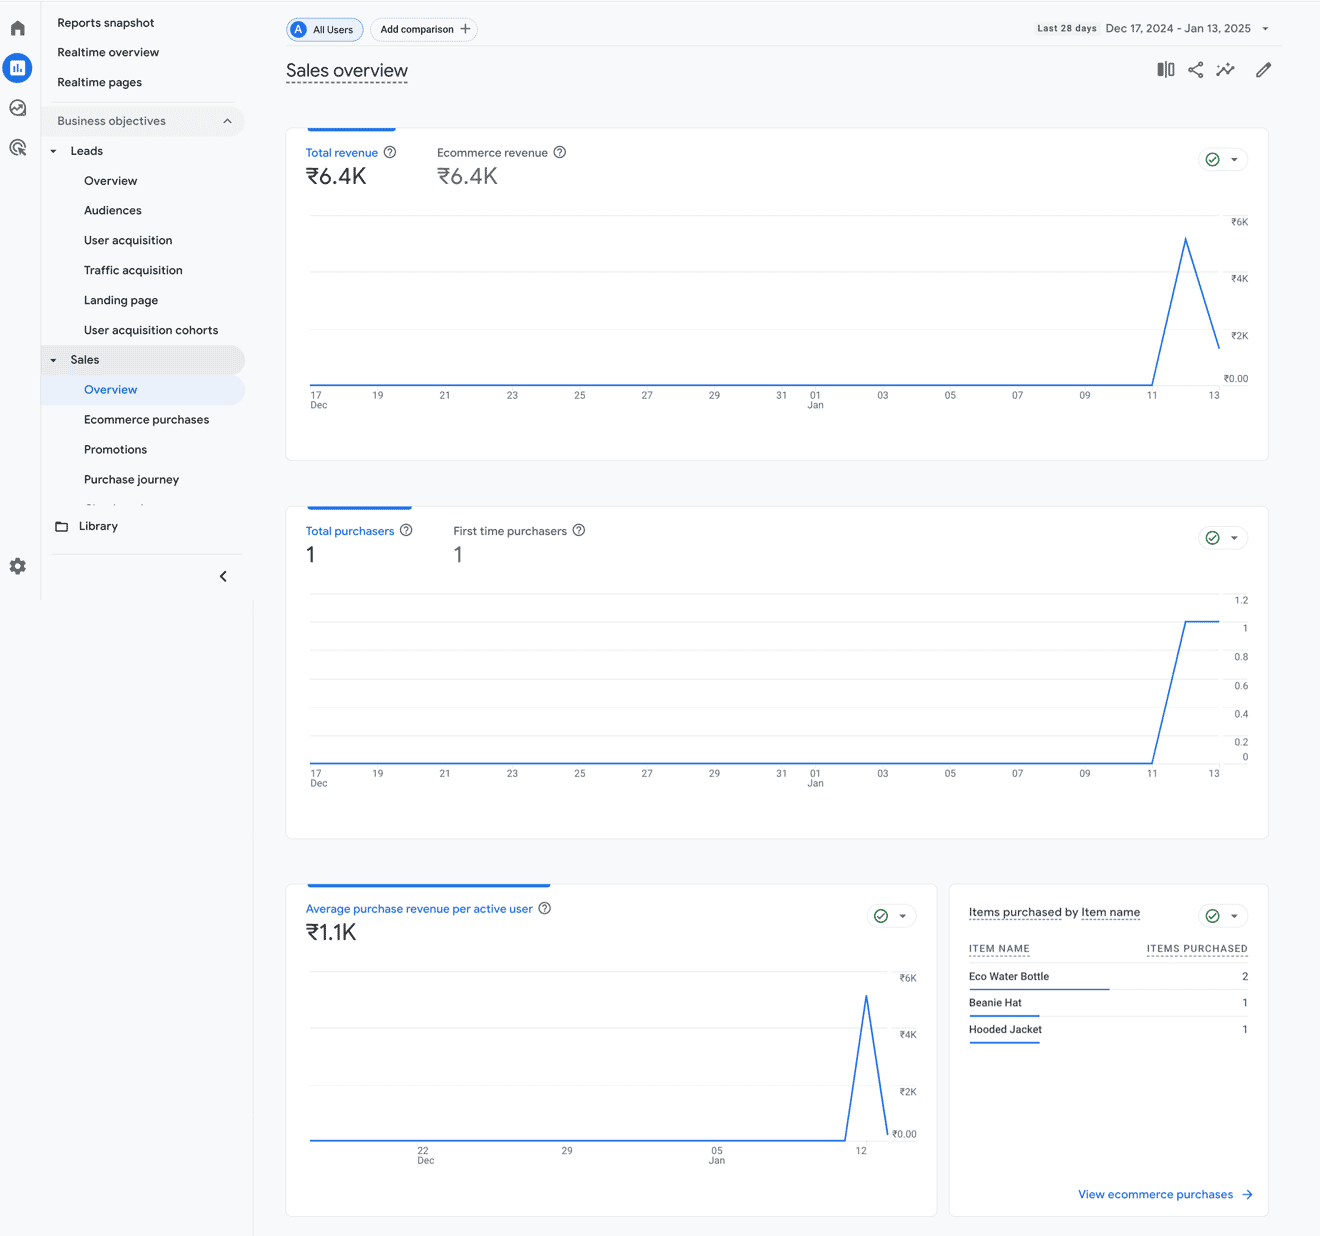
After completing the test order, head to Reports in Google Analytics and navigate to Business Objectives → Sales → Overview. Update the date range to include today (as GA typically doesn’t default to the current date).
Once set, you should see transaction data reflecting your test order. Keep in mind, there might be a slight delay in the data appearing, but in many cases, it shows up almost in real time. If you see the data, you’ve nailed it! 🎉
Since we’re leveraging Enhanced Ecommerce, there’s no need to manually configure goals or conversion events for this data to flow into Google Analytics—how awesome is that? 🎉
Now, head over to Business Objectives → Sales → Ecommerce Purchases to review detailed insights about your transactions. You should see data reflecting your test order.

After that, navigate to Business Objectives → Sales → Purchases Journey to explore the customer’s journey, tracking how users interacted with your store from viewing products to completing purchases. This gives you a clear picture of your eCommerce performance and user behavior!

Boom – no we’re talkin! Now you’ve got the basis to start doing some really cool stuff in Google Analytics to understand your customers better 🙂 You can see above that my Cart Abandonment rate is 0% – how awesome would that be? 🙂 That’s just simply because I’ve just set this account up and submitted some orders immediately as part of my testing – so this is a little bit unrealistic right now – but I expect that to quickly change as we send some traffic to this website in the next few weeks.
Wrapping Up
Peter Drucker famously said, “You can’t manage what you can’t measure.” This couldn’t be more true for eCommerce. Many fail because they don’t truly understand what their customers do on their site. While advanced metrics like Lifetime Customer Value (LTV), Customer Acquisition Cost (CAC), or churn are important, success begins with mastering the basics: traffic, product page views, cart sessions, checkout abandonment, and conversion rates.
As an eCommerce website owner, you’ll need to dig deep into these fundamentals. Understand how your conversion rate stacks up against similar websites and, more importantly, why it’s better or worse. But all of that analysis means nothing if your data isn’t accurate.
Today, you’ve set up a rock-solid analytics platform—a crucial first step in building a data-driven approach to grow your business. Now, you’re equipped with the tools to measure, analyze, and optimize.
Good luck, and here’s to your eCommerce success! 🚀


Hi,
First of all, thanks for this “manual”. Although I’ve read and followed original “how to” couldn’t make Analytics track transactions. Now, thanks to you, it is finally working (at least it counts my test transactions :)). Now, I have a question, if I may. I am not sure if I understood it properly. We created a trigger called “Google Analytics – EEC Events” with event name beginning with gtm4wp. Then we created tag “Google Analytics – EEC Events”, BUT we didn’t choose any trigger in this tag. Is it the way it is suppose to be or was I suppose to choose “Google Analytics – EEC Events” trigger ?
I had the same question! I’m pretty sure we were supposed to add the “Google Analytics – EEC Events” to the Google Analytics – EEC Events tag. It works for me.
You’re absolutely right, the author of this excellent article just forget that detail 😀
In this post https://www.commercegurus.com/guides/speed-up-woocommerce/# you mentioned that we can use CAOS to serve Google Analytics from the local server. How does the CAOS method compare with Google Tag Manager?
Thank you so much from a technophobe. Even I managed it as you explained it so clearly. Much appreciated.
Great article! Yes, I agree with other comments that there was 1 important step missing. The New “Google Analytics – EEC Events” Tag should have the new trigger “Google Analytics – EEC Events” I put that as a trigger and it works. Besides that., all good! thank you!
Does the WooCommerce analytics plug-in cover up the WordPress analytics part of the site or do you need two plugins? Like the Google Site Kit plugin and WooCommerce analytics plugin.
Hi there,
Google Analytics – EEC Events doestn’t get fired.
Has anyone run into the same problem?
I think it has something to do with the category?
Does anyone know how to solve this problem?
Thanks in advance!
Hi!! same to me! It doesn’t trigger the tag . I don’t what could happen 🙁
The important thing to do is to change the date of the overview. By default the timeframe goes until “yesterday”
Thank you so much for this tutorial. It helped me a lot to get started.
Thanks for this. Would you consider updating this for 2024 where the screens are completely different everywhere?
Thanks a lot
This article is now out-of-date. It refers to Universal Analytics that has been discontinued, plus the settings in GTM4WP are now different to these screenshots. Furthermore I found that implementing GTM via the GTM4WP plugin triggers the following error…
“Tag not placed correctly
Your tag may be installed too low in the page, which can impact performance.”
An update to this article would be welcome, plus the inclusion of how to integrate a CMP that is compatible with Consent Mode Version 2.
What about PixelYourSite plugin? It looks like a very complete plugin.
Great Update, Colm,
One beef I’m happing with GA4 is that it doesn’t deal with privacy measures good enough. I see a lot of analytics account that don’t reflect the reality any more when used with Safari browsers or so.
I’ve so far stayed away from server side tracking because of the costs involved with commercial plugins.
It would be great if you could keep your eyes open and let us know as soon as you see a similar solution as GTM4WP for server site tracking.
Cheers,
Edward
Hi Edward, good to hear from you!
Re: server side tracking – we have implemented Stape for a client which is working very well so far. It might be a topic for a future article.