Today we take a look at How to Update WooCommerce Properly so you don’t end up breaking your online store.
How far too many WooCommerce store owners manage WooCommerce updates.
Our WooCommerce Themes are installed and tens of thousands of WooCommerce stores around the world so we’ve a pretty good view of how a lot of people manage WooCommerce updates – quite simply – they don’t.
If your online store is run on WooCommerce, there’s a very good chance that you’ve experienced the following scenario:
You’ve been running WooCommerce for some time and things have been going great.
- Every so often you install a few new WooCommerce extensions to do some new things on your store. A new popup extension here, a new discount code extension there. Before you know it you’ve got a dozen or so WooCommerce extensions that you’ve come to rely on to help your business grow.
- You hear WordPress and WooCommerce experts stress how important it is to keep your themes and plugins up to date so make a good habit out of updating things frequently. Perhaps you even setup automatic updates for your extensions and plugins.
- Most of the time these updates work just fine and your online store keeps running like you expect.
- But, every now and again, all hell breaks lose! Worse yet, you might not even have found out what’s happened for some time. You might first find out via an irate customer who can’t place an order on your site – or paid the wrong amount – or couldn’t pay with Paypal – any number of issues could have kicked off without you knowing because you were asleep or simply busy running your business.
- You then have to go into emergency mode and frantically start trying to figure out what the hell went wrong and how you can get things fixed quickly to stop losing business.
- After spending some time looking around WordPress and WooCommerce you might figure out that you just updated to the latest version of WooCommerce.
- But you’ve updated WooCommerce in the past and never had an issue, why would things suddenly go haywire now?
- You contact your theme author, extension developers and frantically reach out to the WooCommerce support team over on the forums, but all the while your blood pressure is continuing to go off the charts as you lose orders and get angry customers.
- WooCommerce support says it’s not a WooCommerce issue. Your issue must be one of your extensions. But which one? Perhaps it’s more than one? You might be using some less well known extensions that haven’t been updated to support this newest WooCommerce updates. Perhaps your theme is overriding a WooCommerce template that has just been updated. Is the theme author still around and actively supporting the theme?
- Some time passes. Sometimes days (or weeks!) and you eventually figure out a fix of some sort or some good samaritan over on the forums helps you find a solution.
- Things settle down while you assess the damage to your business.
If this sounds like something that’s happened to you – you’re in good company – it’s probably happened to just about everyone who runs a WooCommerce store at some point or another. What’s worse is we see the same people end up in the same awful, stressful, business destroying cycle of doom every year – and sometimes multiple times a year.
It’s also one of the big reasons why people get frustrated with WooCommerce and jump ship to a hosted platform like Shopify. No longer having to worry about plugin/extension updates destroying your online business is a very compelling reason to ditch WooCommerce for a lot of people.
It doesn’t help matters that unlike major WordPress updates which are generally very smooth and non-breaking, WooCommerce updates over the past few years have generally not been managed very well. (But credit where credit is due – a TON of work has been the past 12 months to change that).
While WooCommerce runs a great development blog where you can keep up to date on all the upcoming changes in new WooCommerce releases, the reality is that most WooCommerce store owners are not paying attention to what is changing in WooCommerce until AFTER they’ve hit the update button and start experiencing problems.
But it doesn’t have to be like this!
There are a ton of things that can be done to make sure your online store never has another major period of disruption related to a WooCommerce update and most of these are not difficult to do. If you run a serious online business with WooCommerce that generates thousands of dollars every day or week then these are not nice to haves – you need to get serious about how you manage WooCommerce updates.
The best way to manage WooCommerce updates
After making lots of mistakes ourselves over the years, here’s our 10 step plan for managing WooCommerce updates.
Step 1 – Stop treating WooCommerce as just another plugin
The first step is to change your own mindset. Of course WooCommerce technically IS a WordPress plugin. But it’s no ordinary plugin. It’s a vast, highly sophisticated plugin with it’s own API’s, custom tables and complex and often inter-dependencies with other WooCommerce extensions. So the first thing you need to do is stop treating WooCommerce the same way as you treat some simple contact form plugin. If a social sharing plugin breaks on update it’s not going to kill your business. If WooCommerce breaks on update you might be putting people out of job.
Start treating all WooCommerce updates as high risk events that need careful planning rather than simply clicking the update plugin link.
Step 2 – Stop automatically updating WooCommerce
WooCommerce themselves will often flag a release as being a minor update. I don’t care.Ignore this.
You know how many times we’ve seen ‘minor updates’ become burning dumpster trucks with WooCommerce updates?
My simple rule of thumb is to NEVER update to the first version of a major release of WooCommerce.

The established pattern at this point is that there will almost certainly be one or two additional minor/patch updates in the first few days after a major release. WooCommerce has moved to Semantic Versioning which means that in theory an upgrade from say 9.2 to 9.3 SHOULD be a minor update. From past experience I’ve learned to only treat patch versions (i.e. an update from 9.2.5 to 9.2.6) as true minor updates. I’m hoping over time that minor updates are indeed just minor updates but in practice it’s definitely still not the case.
NEVER EVER update a live WooCommerce store first
A very simple rule of thumb to solve most of your WooCommerce woes is to never ever update your main live WooCommerce store first. It takes a bit of time to develop this habit – and it will take up more of your time on an ongoing basis – but it will most likely save your business numerous times over.
If you use a plugin like Easy Updates Manager (which I LOVE), WooCommerce is the one plugin I recommend you DON’T set to be automatically updated.
Step 3 – Setup a WooCommerce Staging Environment
You need to test every single update in a safe sandboxed environment away from your live store.
We typically refer to this as a staging version of your website. A staging environment shouldn’t be considered a disposable test environment. Far from it. It should be considered a “dress rehearsal” version of your website with identical data, identical plugins and so on. If your staging environment no longer aligns closely with your live website its value as a safe place to test changes before we make them on our live website is lost. In that scenario, a staging version can no longer be a reliable indicator of what will happen to our live website when we run plugin updates.
Tools like InstaWP offer comprehensive staging features that make it easy to create and manage accurate replicas of your live site. For WooCommerce stores, InstaWP’s staging environments ensure that plugin updates and other changes are thoroughly vetted, helping to avoid any disruptions to your live store.
You could also set up a staging site locally, using for example the excellent DevKinsta, or you could set it up on a live server.
Here’s how I typically setup a WooCommerce staging website:
Create a staging subdomain
If your main store is www.commercerank.com, you should create a subdomain like staging.commercerank.com instead of setting it up as www.commercerank.com/staging. Some people might suggest adding a staging site inside your main store’s directory as a subfolder, but that’s not a good idea.
When the staging version is inside your live store, any issue or error in the staging site can affect your live website. If your store has a lot of images and videos, placing a full copy inside a subfolder doubles your website size, which can cause problems with backups and slow down performance.
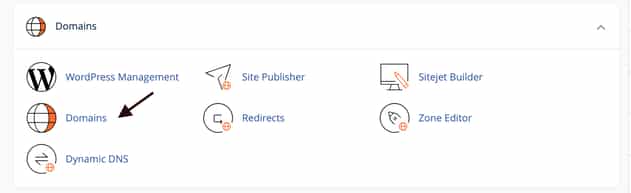
Using a subdomain is a much safer and more efficient option. In the new cPanel, the Subdomains option has been replaced with the Domains section. To create a subdomain, log in to cPanel, go to Domains,
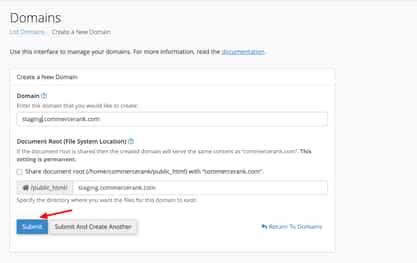
and click on Create a New Domain

Enter your subdomain (e.g., staging.commercerank.com), and make sure the document root is correctly set. Click Submit.
and once you see the success message,
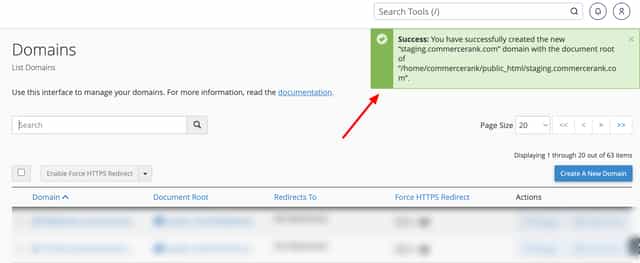
your staging subdomain is ready.
Copy your live store to staging
There a ton of different ways to copy your live store to your staging subdomain. Here are some of the most common:
Method 1: Use a plugin like WP Staging – I recommend you avoid using this plugin. In short, it creates the staging version of your website inside your live website. I’m completely opposed to that approach for the reasons mentioned earlier. You need to keep your live and staging versions 100% separate – no exceptions. A good alternative to WP Staging is the Duplicator plugin. While it can struggle with larger WooCommerce websites it generally works very well for smaller stores.
Method 2: Do it manually – this is the most reliable way to do it – although it’s generally the hardest/slowest. If you’re site isn’t that big, you can easily zip your entire site via cPanel as follows:
NOTE: Make sure you have a backup of your live site before going further!
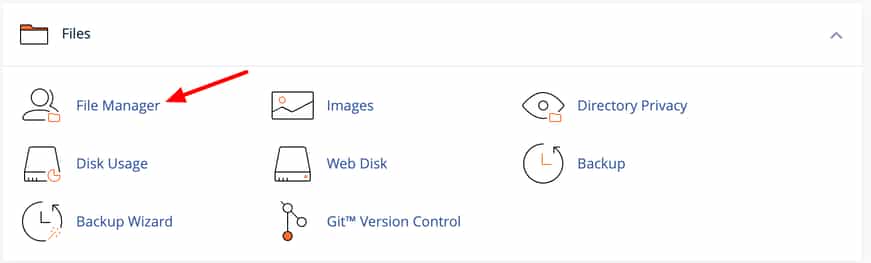
1.) Copy your WP files by doing to cPanel > File Manager
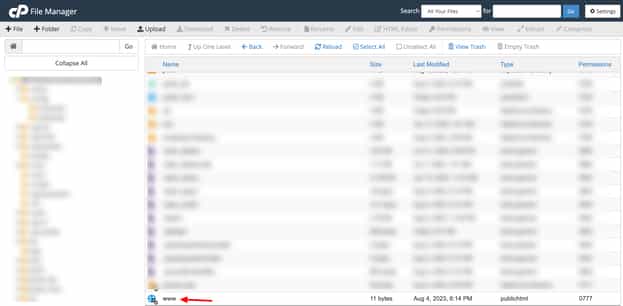
Find the root your live website. If you’ve just got one website this will usually be /home/commercerank/www or /home/commercerank/public_html
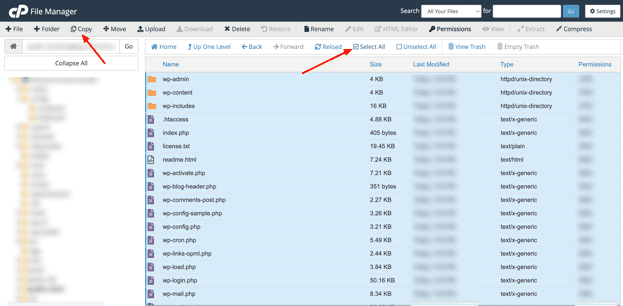
Next, select all inside your main web root and click Copy
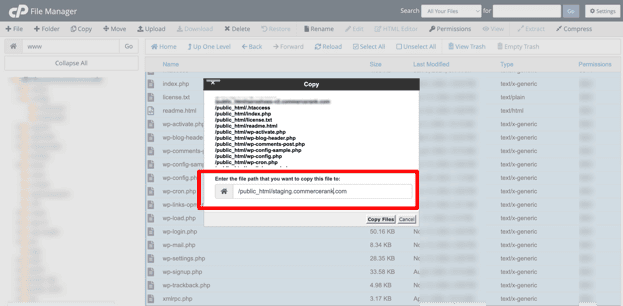
You’ll be prompted to enter where everything should be copied to – enter the path to the staging subdomain you created. In our example this is /home/commercerank/public_html/staging.commercerank.com – but yours might be different – again if you’re unsure, ask your hosting company.
Next, go ahead and set up a new database for your staging store. Go to cPanel -> Manage My Database.
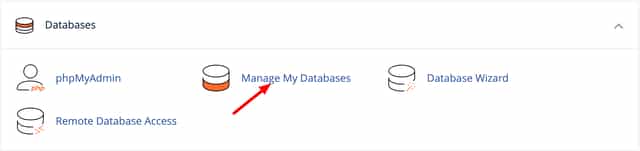
pick a name for your staging database and create it
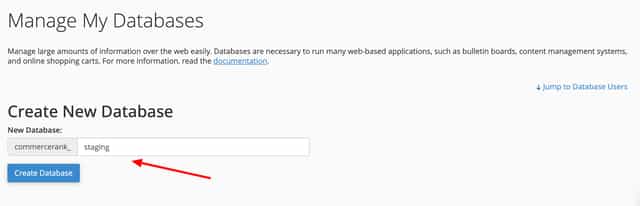
Once you see the success message, hit “Go Back” to return.
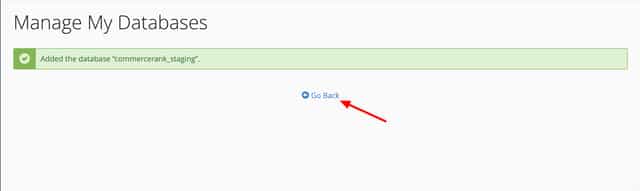
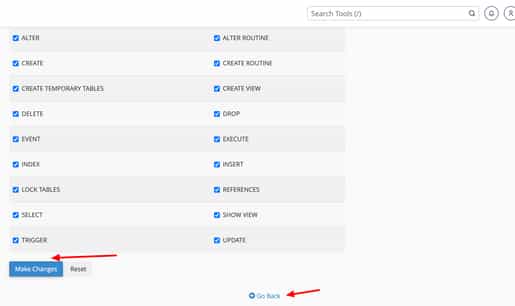
Now, on the right side, you’ll spot “Jump to Database Users”—click that and set up a username and password for this database.
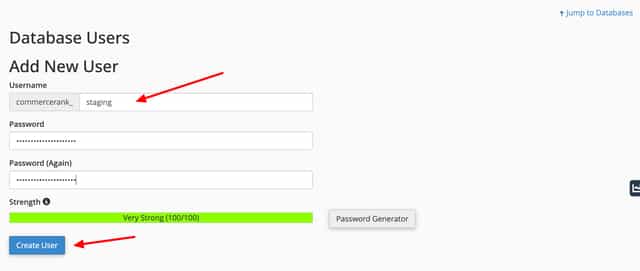
Great! Now, let’s connect the dots. Scroll down to “Add User to Database,” choose the user and database you just created, and hit “Add.” Don’t forget to check “All Privileges” before clicking “Make Changes.” This ensures full access and completes the setup.
And that’s it—your database is now fully ready to roll! 🚀
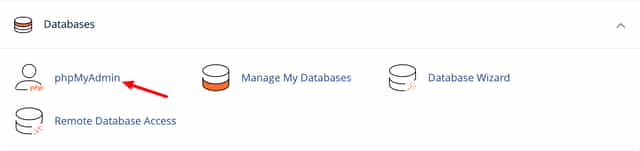
Next, go to cPanel > phpMyAdmin.
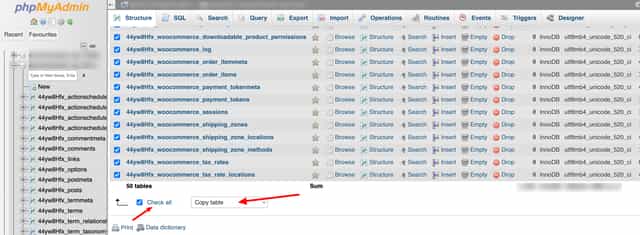
Find your live WordPress database, select all tables, and choose “Copy table” from the action dropdown.
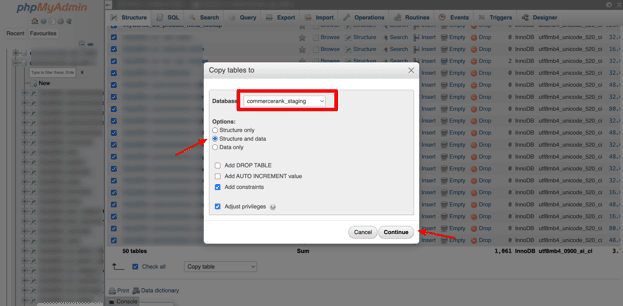
Once you do you’ll be asked where you want to copy your tables to. Select your staging database.
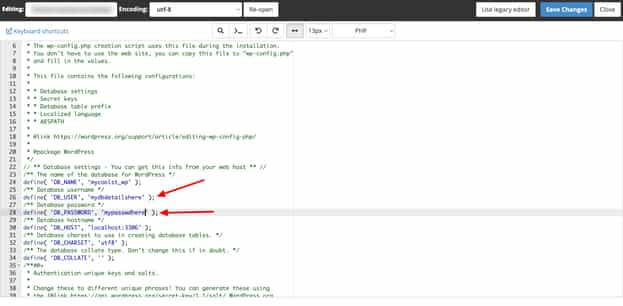
Now, open the wp-config.php file in your staging site and update the database details—this includes the DB name, DB user, and DB password.
For security reasons, avoid using your website name in the database name. Instead, go for something unique and unpredictable (for example, I used mycoolst_wp as a random name). This helps keep your database less predictable and adds an extra layer of security. 🔒🚀
It’s nearly there now!
The final step you need to take is to Search and Replace your Site url in your database from (in this example) www.commercerank.com to staging.commercerank.com. Again there are lots of ways to do this. One way you shouldn’t do this is to simply search/replace a dump of your database in a .sql file. Many records in the WordPress database rely on serialized values. When you simply search/replace a domain in a .sql file you’ll end up losing some important WP site settings particularly if your staging subdomain is a different length that your live domain.
If your host supports WP-CLI it’s very easy to do this with the search-replace command. In our example we would run the following:
wp search-replace 'https://www.commercerank.com' 'https://staging.commercerank.com'If you don’t have access to WP-CLI then I recommend the following method.
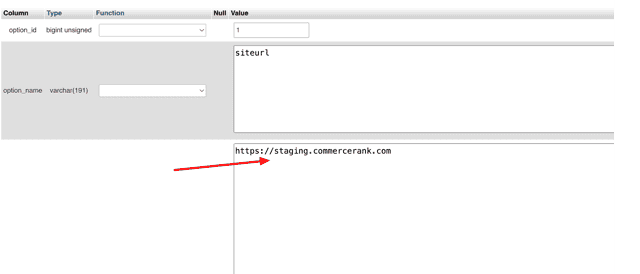
Head back over to phpMyAdmin and select the wp_options table. We’re going to edit 2 records. Your siteurl and home records.
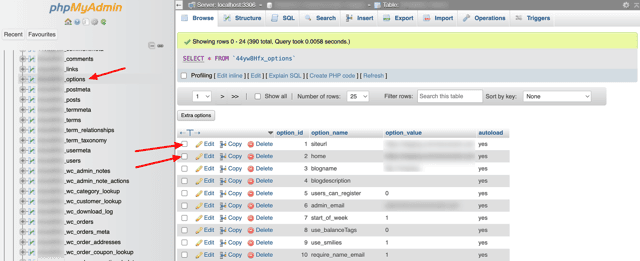
Go ahead and change both from www.commercerank.com to staging.commercerank.com
NOTE: Pay attention to your full url. If you’re not using SSL (and you really should be!) then make sure you keep http rather than adding https – and vice versa.
If you are using SSL, you will need to create a new certificate for your subdomain (assuming you’re not already using a wildcard SSL). Ask your host about the best way to do this if you’re unsure. For me, I use Let’s Encrypt to do this in a couple of seconds over on SiteGround.
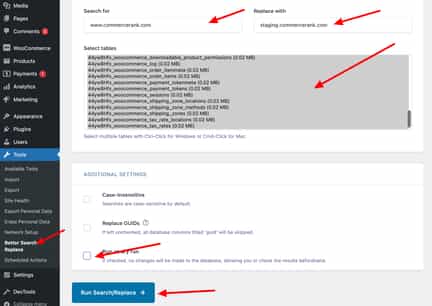
Finally, login to your new staging version at your WP login screen and install the Better Search Replace plugin. This plugin will allow you to easily and safely search-replace the rest of your staging WP database.
And that’s it! Your staging store is now a 100% isolated and fully functional clone of your live store. Some people like to switch payment gateways to test/sandbox mode on staging sites. I don’t recommend that. You should be able to process a live transaction from your staging site. Remember our staging site is most valuable to us when it’s as close as possible to our live site.
Method 3: Use a high quality WordPress host that provides support for staging websites
If Method 2 sounds like too much work to you, you might be better off switching to a WordPress host who provides the ability to create staging websites on demand such as SiteGround.
Other excellent hosts who provide full support for rapid creation of staging sites include:
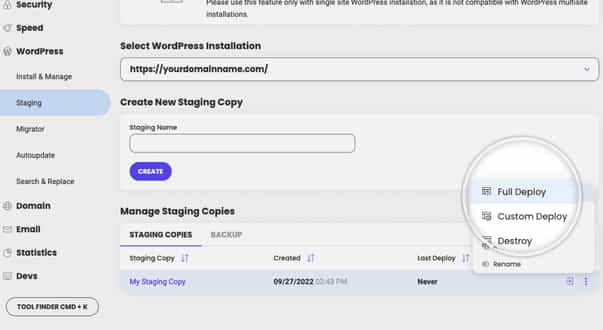
What I like most about the SiteGround staging site feature is that it includes a “Full Deploy” feature which can be very very useful a little bit later on.
Finally, I recommend you password protect your new staging website using .htaccess to keep prying eyes out and to stop search engines from indexing your staging content.
So now we’ve got a Staging Store up and running. How do we put it to work for us?
Step 4 – Start following the WooCommerce development blog
The best way to stay ahead of WooCommerce updates (and avoid any unpleasant surprises) is to actively follow the WooCommerce development blog. Even if you’re not a designer or developer, this is incredibly useful.
The blog posts are usually easy to understand and give you a heads-up well in advance about major changes coming in future WooCommerce versions. This way, you can prepare ahead of time, update your themes and extensions accordingly, and ensure your store keeps running smoothly—no last-minute chaos! 🚀
Step 5 – Get ready for major WooCommerce releases
The WooCommerce team usually rolls out one or two major updates each year. In recent years, these big updates have often come early in the year.
When you see a major release on the horizon, it’s a good idea to reach out to the developers of any third-party themes or extensions you use. Ask them about compatibility with the new WooCommerce version.
Reliable developers will already be aware of the update and should be able to give you a clear timeline for support. If they seem clueless or can’t provide a solid answer, consider this a red flag—it might be time to look for better-supported alternatives! 🚀
Step 6 – Update WooCommerce on Staging
Once the new WooCommerce version is officially released (keep an eye on the WooCommerce development blog—you’ll likely get an email notification), it’s time to roll up your sleeves and update WooCommerce on your staging site.
Go ahead and click that “Update Plugin” link! 🚀 After that, update any third-party WooCommerce extensions and themes you’re using.
Sometimes, there’s a delay between the release of the new WooCommerce version and updates for your extensions or themes. That’s completely normal. In the meantime, let your live store continue running the older version of WooCommerce. Yes, waiting can be frustrating, but it’s a small price to pay to keep your live store running smoothly without unnecessary disruptions.
Once everything is updated, it’s time to test thoroughly and ensure everything works as expected.
Step 7 – Execute Tests
This is where all your hard work setting up a staging store pays off. Now you’ve got the latest and greatest version of WooCommerce up and running in an isolated, safe environment you can spend time testing everything without tearing your hair out in a panic.
Before running tests you should enable WP_DEBUG_LOG to ensure any underlying code errors are captured in your debug logs – which will be especially useful later when reporting bugs.
My recommendation is to document 2 sets of tests:
- Frontend customer tests
- Basic visual smoke tests – does everything load correctly and look the same as my live site?
- Can I browse the shop landing/categories page?
- Can I browse to individual category pages?
- Can I browse single product pages?
- Does the product search work?
- Functional tests
- Can I add and remove products from the cart?
- Can I complete a purchase?
- Do all transaction values match live?
- Product prices
- Shipping prices
- Do all transaction values match live?
- Does the cart and checkout experience match the live experience?
- Does My Account still work the same as live?
- Test order history, updating personal information, viewing order history.
- Basic visual smoke tests – does everything load correctly and look the same as my live site?
- Backend WooCommerce admin tests
- Orders
- Can I process orders as normal? Go through each different step in the order fulfilment process.
- Does Order/Customer search still work.
- Products
- Are stock values being adjusted correctly when orders are submitted?
- Can I still manage products as per live – what things have changed in the newest WC version and how do they impact my products?
- Orders
- WooCommerce Settings
- Are there any changes to settings that I need to be aware of before I go live?
Testing might not be the most exciting part of your workflow, but when your store is raking in serious revenue, skipping it is not an option. 🛠️💰
A well-documented set of test cases makes life easier every time an update rolls in. If you’re a WooCommerce pro, consider using WooCommerce End-to-End Testing to automate key parts of the process—it’ll save you time and headaches.
For frontend testing, don’t forget: run tests in a clean browser session (no stored cookies, no login history). This ensures you’re replicating a real customer’s experience accurately. After all, you want to catch issues before they do! 🔍🚀
Step 8 – Fix issues on Staging
It’s almost certain you will run into some issues on staging – I’m always suspicious when I find NO issues 🙂
When you find a bug or something that is not quite right you’ll need to figure out who is responsible for the bug. If you’re not a technical user there’s no easy way of figuring this out. What I typically recommend is following our troubleshooting steps to find the root cause of the issue.
Even with methodical troubleshooting it’s not always possible to find the culprit of a bug. When reporting bugs to a developer, it’s vital to provide as much data as possible on the issue:
- Exact steps along with screenshots, error messages and so on. Make sure you write bug reports that developers will love you for.
- Your WooCommerce System Status Report
- If appropriate, provide them with access to see the issue on your staging environment.
What happens after that point is going to be down to how responsive the relevant developers are, which is why it’s important to only use WooCommerce themes and extensions from developers who have a solid reputation for providing long term support for WooCommerce.
At this point you’ll likely need to rinse and repeat testing and updating in your staging environment.
Eventually you should reach a place where you’re happy with your staging environment so it’s time to deploy to live.
Step 9 – Deploy from staging to live
If you’re running a busy eCommerce store, your database is constantly evolving—new orders, customer data, stock updates, and more. This makes pushing changes from staging to live a bit trickier compared to a static website where content rarely changes.
Now that your staging site is fully tested, it’s time to decide how to deploy it to live without disrupting your store. You’ve got a few options:
Option 1 – Manual deployment
This is often the simplest method of deployment. Simply repeat the steps you took on staging 🙂 For smaller WC updates where it’s just one minor WC update or a minor extension update – a quick manual update and test cycle on staging followed by a manual update and test cycle on live will work just as well as any other method.
Option 2 – Push from Staging to Live
For more complex staging instances it might not be feasible to manually update everything manually. In this scenario, you should consider setting up a process for pushing changes from staging to live. When we talk about pushing changes to staging to live we mean setting up a technical process to ‘push’ any code changes over from your staging site to production. The challenge with WordPress and WooCommerce is that under no circumstances do we want to LOSE any production data as a result of pushing from staging.
This is one of the weakest aspects of WordPress and WooCommerce right now that larger eCommerce platforms have long ago figured out.
If we could wave a magic wand we’d have a button in our staging site that would automatically push all code and database changes over to our live site but not move any transactional data from staging. This gets particularly tricky when WooCommerce introduces database changes as right now these need to be triggered manually once you login to WooCommerce after installing a plugin update.
There are a few plugins and services that are starting to emerge to help solve this problem.
With WP Migrate DB Pro you’ll have everything you need to have a best in class code/data push process for your WooCommerce store. It’s still far from perfect and I’d love to see WooCommerce tackle this in core sooner rather than later.
Option 3 – Partial push using Version control
An excellent way of managing pushes from your staging to live is to manage your WooCommerce store via something like Git. We use Git along with GitHub to manage large WooCommerce deployments in a central git repo. Changes are pushed from local development environments to a central staging area. Once deployments are completed we executed automated end to end tests using Jenkins. If those tests all pass we then auto deploy to live by tagging and pushing branches to live. In this scenario we don’t use version control on our database so we’ll still need to login to live post deployment and run any WC data update processes that are required.
Wrapping things up
Managing WooCommerce updates and deployments is one of the biggest challenges of using the platform. Unlike Shopify, where everything is streamlined, WooCommerce requires a hands-on approach to avoid breaking your store. If this guide feels like overkill—trust me, it’s not.
If your WooCommerce store ever scales to millions in revenue, you’ll need a structured update process like the one we’ve outlined. At that level, updates aren’t just a routine task—they’re critical to your store’s stability and security. If this doesn’t sound like something you want to manage, you’ll either need to hire a WooCommerce pro or consider moving to a more managed eCommerce platform.
That said, WooCommerce is constantly evolving, and I expect the ecosystem to introduce better tools and workflows to make staging, testing, and deployment a whole lot smoother in the future. Until then, stay ahead of the curve and manage your updates like a pro! 🚀
Over to you
How do you set up your WooCommerce staging environment? Do you have any pro tips or tricks that make the process smoother? How do you handle WooCommerce testing—manually or with automation?
We’d love to hear your insights! Drop a comment below and share what works best for you. If you have any time-saving hacks for WooCommerce testing, don’t keep them to yourself!
Also, if you’re interested in a deep dive into managing deployments with GitHub, let us know—we’d be happy to break it down in more detail. Let’s make WooCommerce better together! 🚀💡


 WooCommerce vs. Shopify
 CommerceKit Now Works with Any WooCommerce Theme
 Shopify Speed Optimization: Boost Sales with a Faster Store
 Opensource eCommerce – 21+ Completely Free Platforms in 2020
Hi Colm!
Thank you for a thoroughly written guide. Really appreciate it. I run an agency who specialises in WooCommerce at http://www.humanweb.no and I second your opinion on the issues when kicking the database back to live. For a non-guru like me, its nerve-wrecking.
Are you familiar with the VersionPress project. They have come a long way in database migrations and merging the last year.
Cheers!
André G
Hi, I am in the process of developing an online store with WooCommerce and have come across this in my WP dashboard:
WooCommerce data update – We need to update your store’s database to the latest version.
Is it safe for me to go head and press the update button, as I have seen some comments on the web that say they have encountered problem after doing so. My current WooCommerce version: 3.4.4
Could you please advise me.
I’d typically ensure that you have a backup of your WooCommerce database saved first before clicking that button. A good WooCommerce-optimized host should be running daily if not hourly backups so that everything can be restored should an issue arise. I’d contact them first to see if that’s the case.
Thank you for all the info!
It seems that only WP Staging Pro can create a staging site on a separate host.
This may be worth to be mentioned.
Otherwise, a great article.
Worked like a charm, thank you!
Hi Colm,
I’ve got the situation you wrote about. After some time of smooth work I updated to 3.8.0
Now I have a message: No shipping method has been selected
When trying to check out for all my products, in spite that they are digital and no shipment is specified.
In woocommerce settings I have switched off shipping and shipping calculations in WooCommerce/Settings/General.
I have tried switching off all plugins except woo and changing my theme.
Also restored database several days back.
Nothing helped.
What do you think I can do next? Completely remove and reinstall WooCommerce?
Hope you have an advice.
Thank you
Hi Vadim, try contacting WooCommerce directly and see if they’ve seen this issue before.
Thanks for the great article!
Are there any changes to make this easier with core WC since you wrote it?
Our particular issue is that one client store has a major structural and design overhaul every 1-2 years. Do you imagine this would change the way you go about things? We’ve just had a nightmare of asking the client to make content changes to the site on invisible pages on the live, in the old theme. Switching was … painful.
We built staging to support this use case on WooCart where we host only WooCommerce stores.
For a basic user it looks very simple: create staging, do changes and then click publish. Our system downloads orders/customers and publishes the new version.
We do this by incrementing IDs when staging is created, then download the new orders/customers from the live site before publishing. The only issue we found is with custom plugins that change the database on production while staging is running. We add custom integrations for those (common ones are affiliate plugins, eBay and other marketplace syncing plugins).
I’d love for you to add us as one of the solutions to your blog post. 🙂
Dejan
Very nice article!I’m not a developer, but (apparently a tenacious) full-time self-building webshop-owner. There is 2 things that I miss in your article, it might be an idea to add those, else people might found out the hard way.
1. Before using the staging website as the actual website, you should download the orders from the old live version of the store. And import them into the live going staging version. So the old orders will be in the administrative system and new orders will have a different and newer order number.
2. Importing the orders might even not be possible, depending on what updating the Woocommerce, other plugins & fixing things do to the tables of WordPress. Especially the wp_posts table, as Woocommerce uses this as the table to store the rising order numbers. (in my ignorance I would say, this is amazingly stupid to use an existing WordPress table for the order numbers).
If fixing the Woocommer update will add rows and rising numbers to the wp_post table in the staging website. Generated orders in your ‘old’ live version will use the same rising numbers in your wp_post table. So importing these (exported) orders later on will not be possible as the have the same order number in the wp_post table or only with new generated order numbers, in case you need to make a note for the administration (this part I forgot). These order numbers are probably used in your shipping administration.
Maybe going live with the staging website is not even possible as I do not know new WordPress But from staging to going live is not always possible, as Woocommerce uses the wp_posts table for it’s orders.