A pretty common request for WooCommerce sites is the need to include additional field inputs on the single product page and output them on the front-end. I’m going to explain how to do this using the excellent Advanced Custom Fields plugin (free version).
There will be a little bit of coding involved but don’t worry, it’s all very straightforward. And there’s the added satisfaction of knowing you can now extend WooCommerce in a powerful way.
I’ll explain a number of different use-cases with examples for each. I’ll be using our Shoptimizer WooCommerce theme but the code snippets should work for any WooCommerce theme.
Let’s get started!
Step 1: Install the Advanced Custom Fields (ACF) plugin
Firstly, download and activate the free version of the Advanced Custom Fields plugin. You can do this within the Plugins section of WordPress if you search for it. Once done, go into the new Custom Fields area in your WordPress dashboard to set one up.
Step 2: Add a custom field group
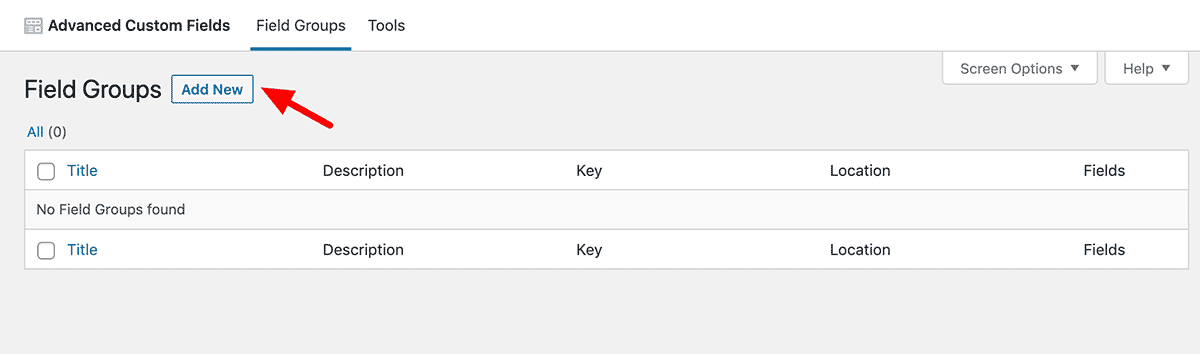
Within the Custom Fields area click on the Add New button to create a new field group. This is where things get interesting.
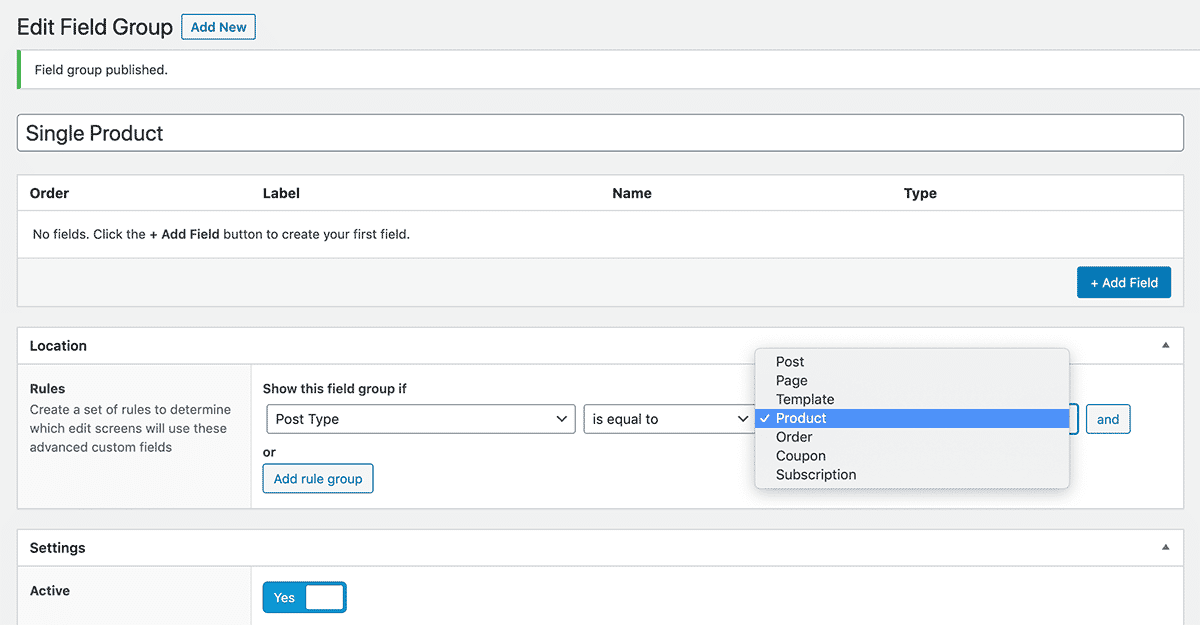
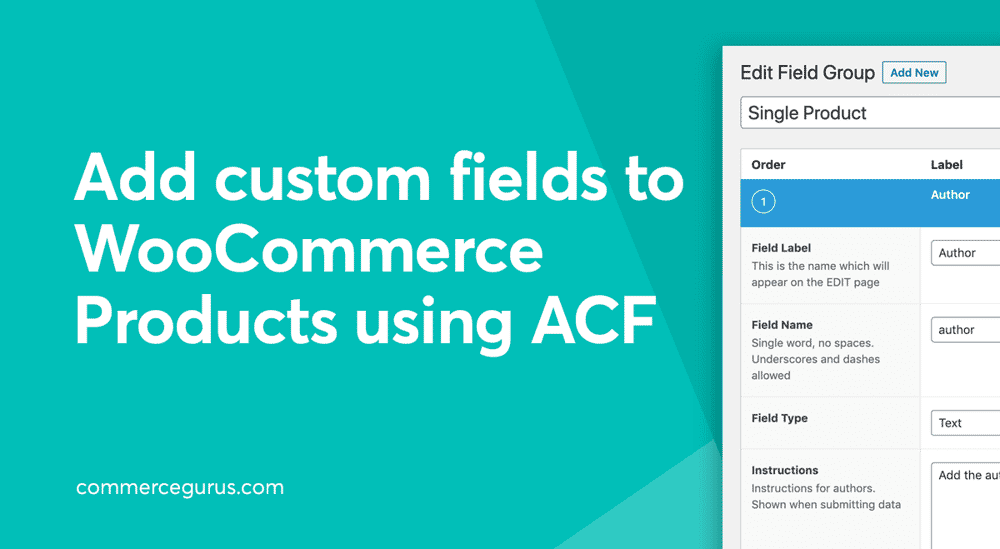
We’ll name this field group Single Product (it can be anything). We’ll also change the Location rules to show this when the post type is equal to a Product. Save it at this stage.
3. Create a custom field
So, this sets up our structure. Next, we’ll need to actually include a field. So click the Add Field button.
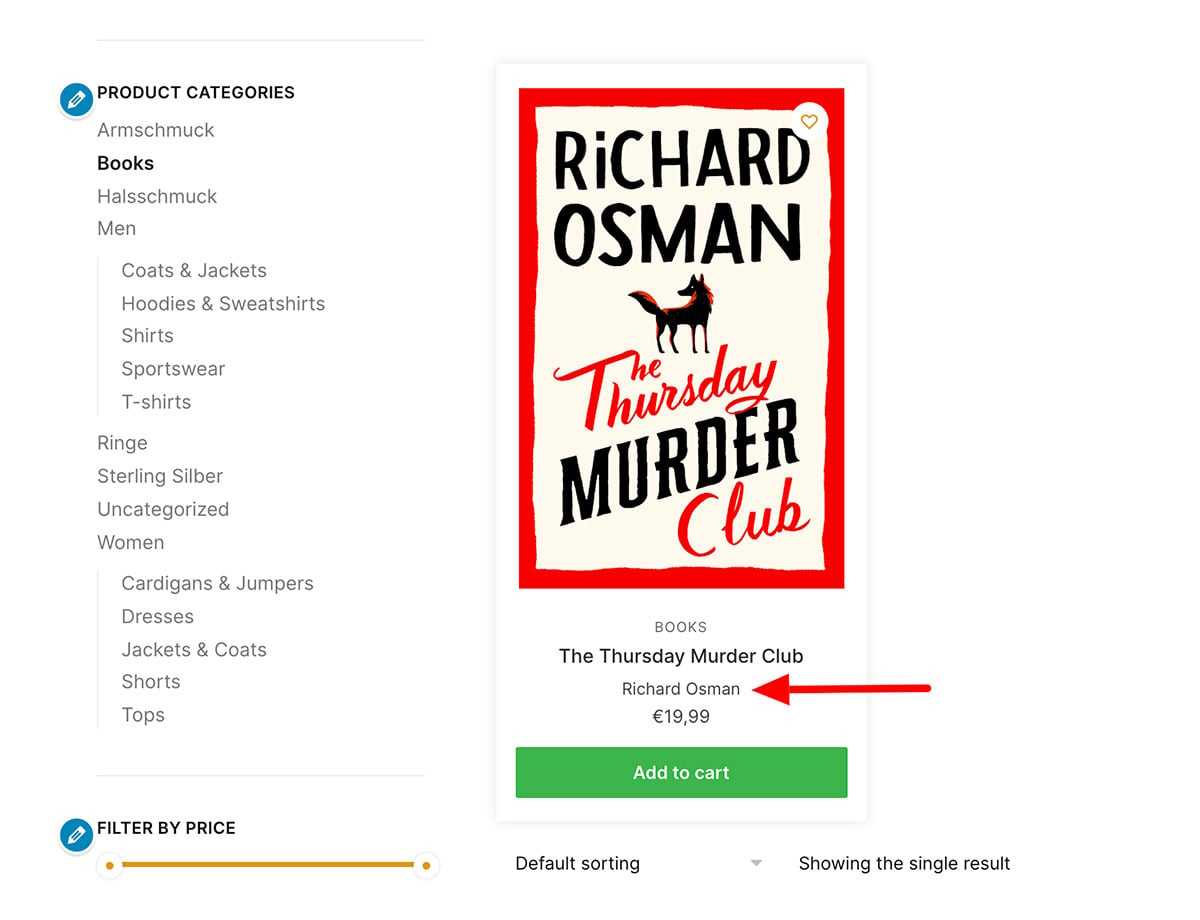
For this example, let’s say we’re an online book shop and want to include a new Author field which we want to display above the title on the product page. Remember, this is just a demonstration of what you can do. You can change it from author to anything you like.
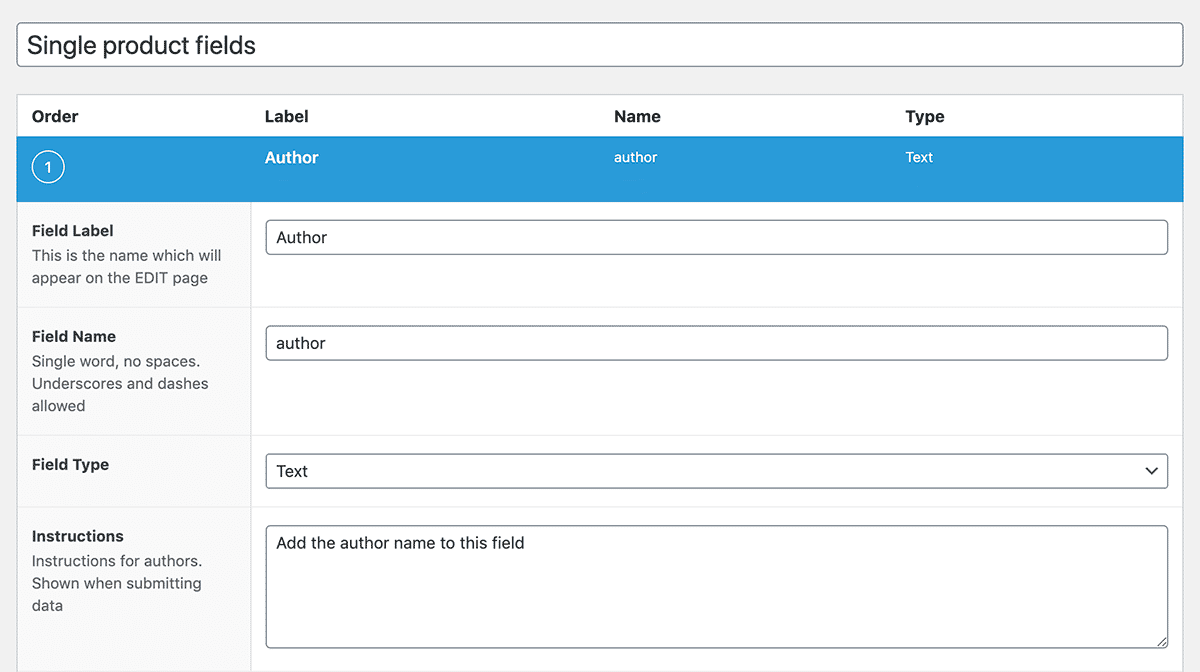
You can see we now have an Author field created. The field name is simply author – this is important as we’ll be using this shortly. The field type is just a simple Text input also. You can include instructions if you like.
4. Edit a product
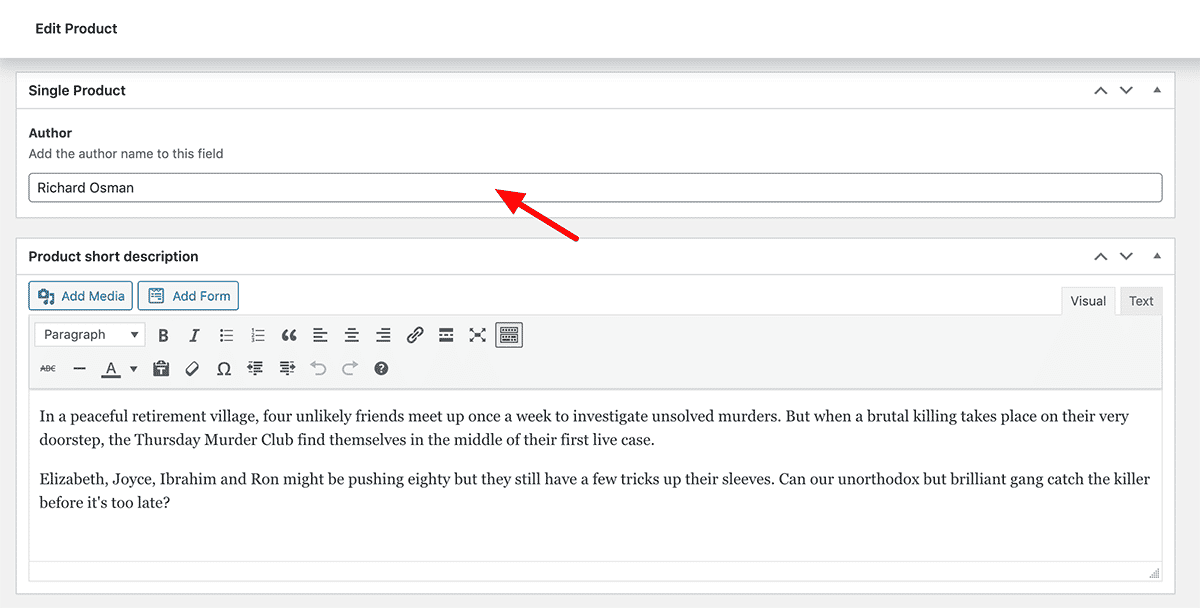
Now that an author field has been created, let’s edit a product. Within the editor you should see our new Author text input. Success! This is a good start.
You can add some content to the field and save your product but this new text field won’t be outputted on your site yet.
We’ll look at that next. Are you ready to look at some simple code? I thought so.
5. Display our custom field on the product page
So before we start on the code, a word about where to put this. You should always put custom code in one of two places.
Use a child theme’s functions.php file
We have already prepared a child theme for Shoptimizer you can download and install.
A child theme is uploaded similar to any theme – within Appearance > Themes > Add New. You can add custom code within the functions.php of the child theme. A quick way to do this is within WordPress itself, within the Theme Editor. Appearance > Theme Editor.
Ensure that your child theme is selected and you’re not accidentally editing the parent theme.
Or, use the Code Snippets plugin
Another plugin you say? Well I like the Code Snippets plugin. We use it ourselves on CommerceGurus. It’s a great place to put custom code snippets which you can activate and deactivate whenever you like without any risk that you accidentally break your store.
Create the custom function
To output our new Author field on the single product page, you can use the following code.
add_action( 'woocommerce_single_product_summary', 'shoptimizer_custom_author_field', 3 );

function shoptimizer_custom_author_field() { ?>

<?php if(get_field('author')) { ?>
	<div class="cg-author"><?php the_field('author'); ?></div>
<?php }
}
It’s fairly simple. Let’s look at this line by line.
add_action( 'woocommerce_single_product_summary', 'shoptimizer_custom_author_field', 3 );We’ve created a new function called shoptimizer_custom_author_field (you can name it anything) and are hooking it into the woocommerce_single_product_summary part of the single product page at position 3.
Where did we get this woocommerce_single_product_summary hook title?
There is an excellent visual guide from Business Bloomer to Single Product hooks which displays all the hooks you can use and what positions they currently occupy. Plus, you can read more about WooCommerce Hooks in our guide.
These are the standard WooCommerce hook positions used for the title, rating, price and introduction text. Note the numbers after each one, these designate the order of the elements.
add_action( 'woocommerce_single_product_summary', 'woocommerce_template_single_title', 5 );
add_action( 'woocommerce_single_product_summary', 'woocommerce_template_single_rating', 10 );
add_action( 'woocommerce_single_product_summary', 'woocommerce_template_single_price', 10 );
add_action( 'woocommerce_single_product_summary', 'woocommerce_template_single_excerpt', 20 );
So the title displays first, then the rating, then the price, then the excerpt text.
Because WooCommerce’s title is in position 5, I’ve made our author custom function position 3, so it will appear before the title.
If we wanted our author text to appear after the title? Yep, you guessed it, you can change the position number to any one of 6, 7, 8, or 9. These will all work.
Let’s look at the rest of the code:
function shoptimizer_custom_author_field() { ?>

<?php if(get_field('author')) { ?>
	<div class="cg-author"><?php the_field('author'); ?></div>
<?php }
}
The rest of the function is a simple check to see to see if a field called author exists. Remember, we named this earlier.
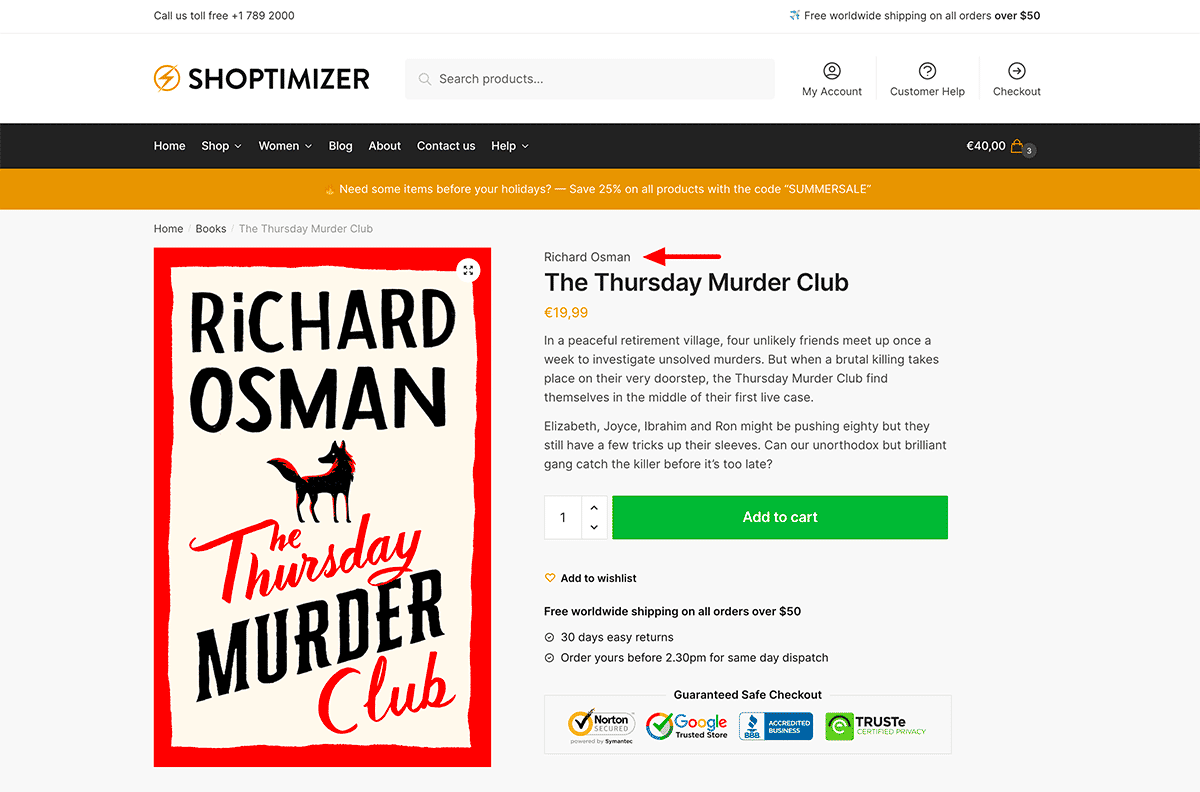
If it finds the field it outputs it wrapped in a div which you can style with custom CSS if you wish.
The result looks like the screenshot below. Hurray!
Adding a custom field under the product image
Let’s include another custom field, this time underneath the product image. We’ll use it for review quotes which are often featured on the back of book covers.
So, let’s go back into the Custom Fields area and create a new field which we’ll call Quotes. The field name is a lowercase quotes.
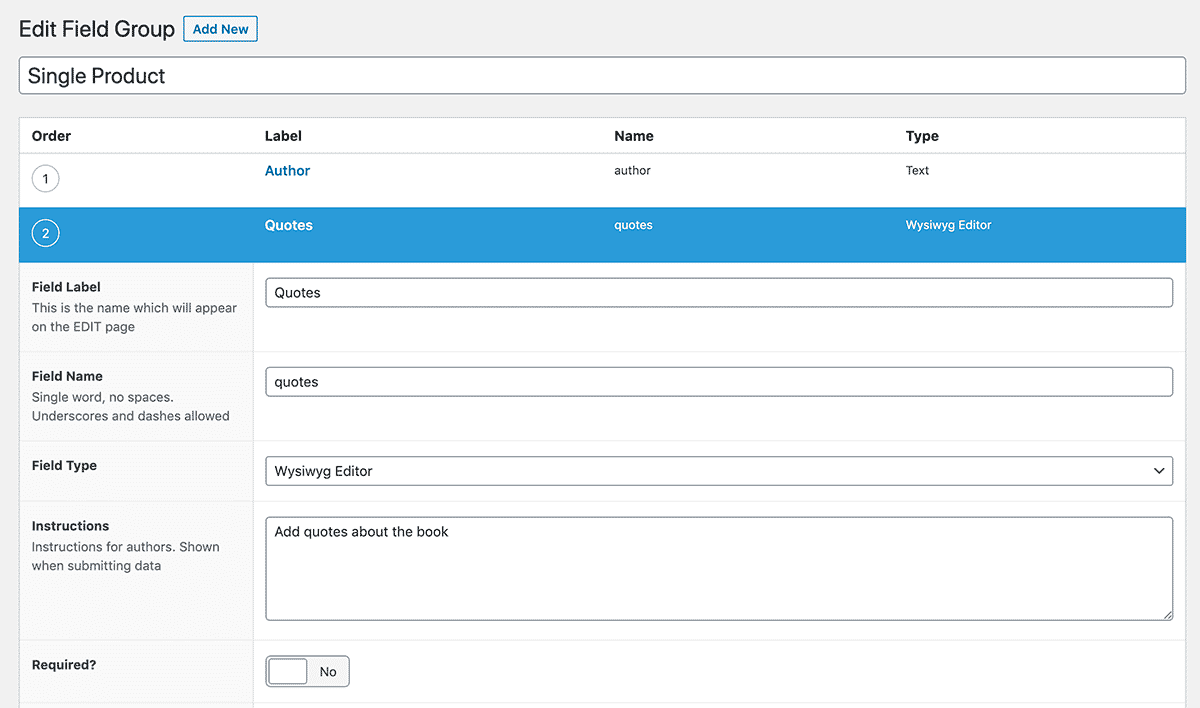
The main difference is that I’ve changed the Field Type to WYSIWYG editor. This will include the full WordPress text editor to allow me to format the content styling.
Now, when I edit a product I’ll see this new field, next to my previously created author text input.
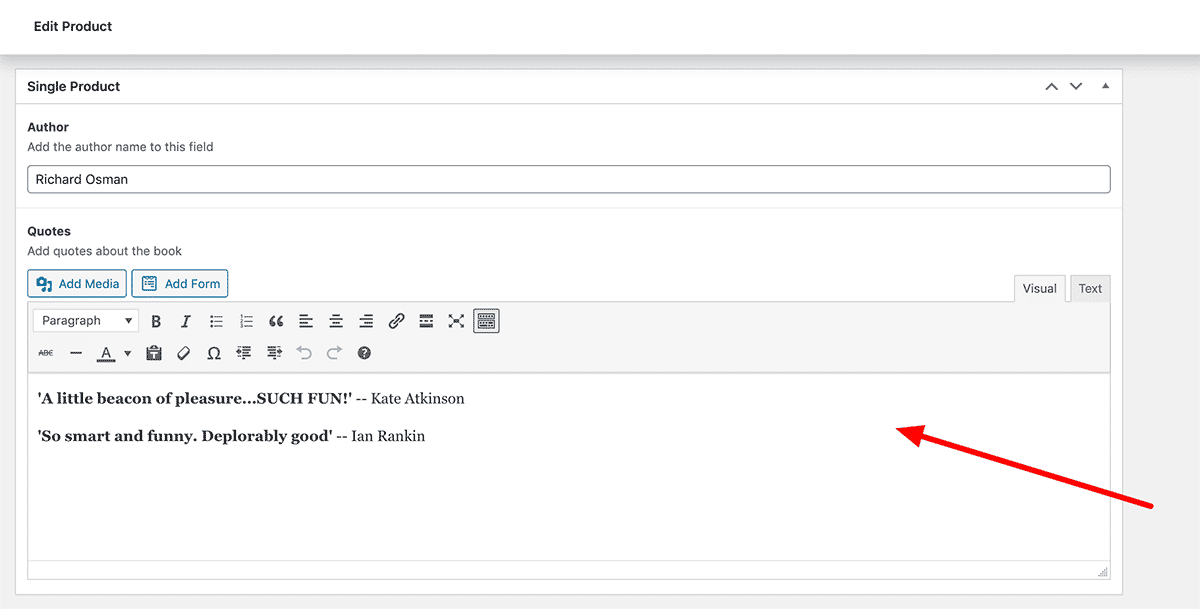
Let’s add some content to this field and save it. It again, won’t display just yet, we’ll need to create a custom function to do so.
The custom code to display this is very similar to what we used for the author text. We can use the following:
add_action( 'woocommerce_product_thumbnails', 'shoptimizer_custom_quotes_field', 30 );

function shoptimizer_custom_quotes_field() { ?>

<?php if(get_field('quotes')) { ?>
	<div class="cg-quotes"><?php the_field('quotes'); ?></div>
<?php }
}
As you can see we’re changed references from author to quotes throughout.
Apart from that, the other most obvious difference is the first line:
add_action( 'woocommerce_product_thumbnails', 'shoptimizer_custom_quotes_field', 30 );We want to place this new custom field underneath the existing product image or gallery. Once again, the Single Product Visual Hooks Guide is very useful.
We can see in the guide that this is the existing action which displays the product image gallery thumbnails:
add_action( 'woocommerce_product_thumbnails', 'woocommerce_show_product_thumbnails', 20 );It’s called woocommerce_show_product_thumbnails. And it is hooked into the woocommerce_products_thumbnails area.
So, we’ll use this same woocommerce_products_thumbnails area to display our own custom hook – but with a priority of 30 – so that it displays underneath.
Finally, we’ll add a couple of lines of custom CSS, targeting the cg-quotes class name which we’ve named our div. It can be put into the Appearance > Customize > Additional CSS area for convenience.
div.product .cg-quotes {
	padding-top: 20px;
	text-align: center;
}
div.product .cg-quotes p {
	margin-bottom: 5px;
}
Let’s look at the result.
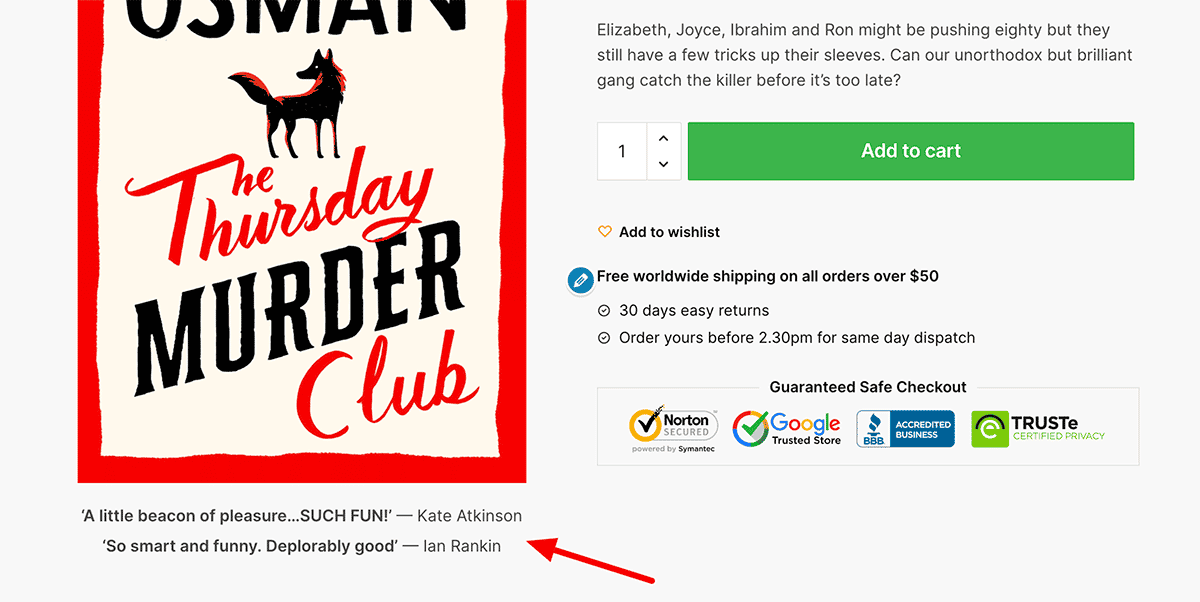
Success! We can see our new quotes field displayed underneath the product gallery. Our custom CSS has centered this and tightened the margins between the paragraphs.
But what if I’m using a product gallery?
While the technique above works fine if you have just a single product image, it won’t work if you’re using the standard WooCommerce gallery. In a strange oversight, WooCommerce’s gallery does not use the woocommerce_products_thumbnails hook area. There isn’t really any method to include content under the gallery, unless you overwrite the product-image.php template.
But! If you are canny enough to be using Shoptimizer and our own superb product gallery, as part of CommerceKit, we have included hooks you can use.
It’s named commercekit_after_gallery and yes, you can also use commercekit_before_gallery too.
Positioning custom fields at the end of the product page
The next thing I’d like to do is a little more complex. I’d like to add an author biography to the bottom of the single product page. That is after the tabs.
The biography will include:
- The author name (we already have that)
- A short bit of text about the author
- A profile photo
Fortunately, our combination of Advanced Custom Fields, a custom function, and a little bit of CSS makes this pretty easy to achieve.
So dive back into your Custom Fields section and add two new fields.
The first, we’ll call Biography and will be a text area. The second we will call Profile Photo. It looks like this:
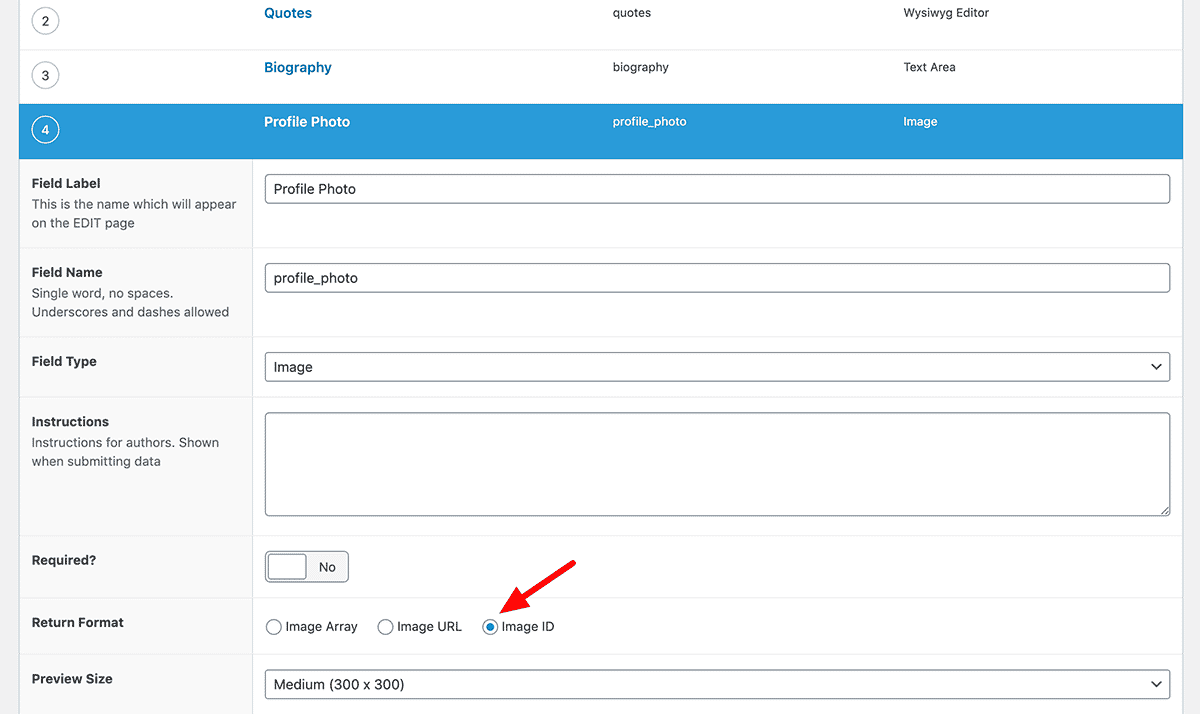
We’re using an image field for this, and you need to ensure that Image ID is selected beside the ‘Return Format’ heading.
Now, when we edit a product we’ll see these two new fields and can include our biography content within them.
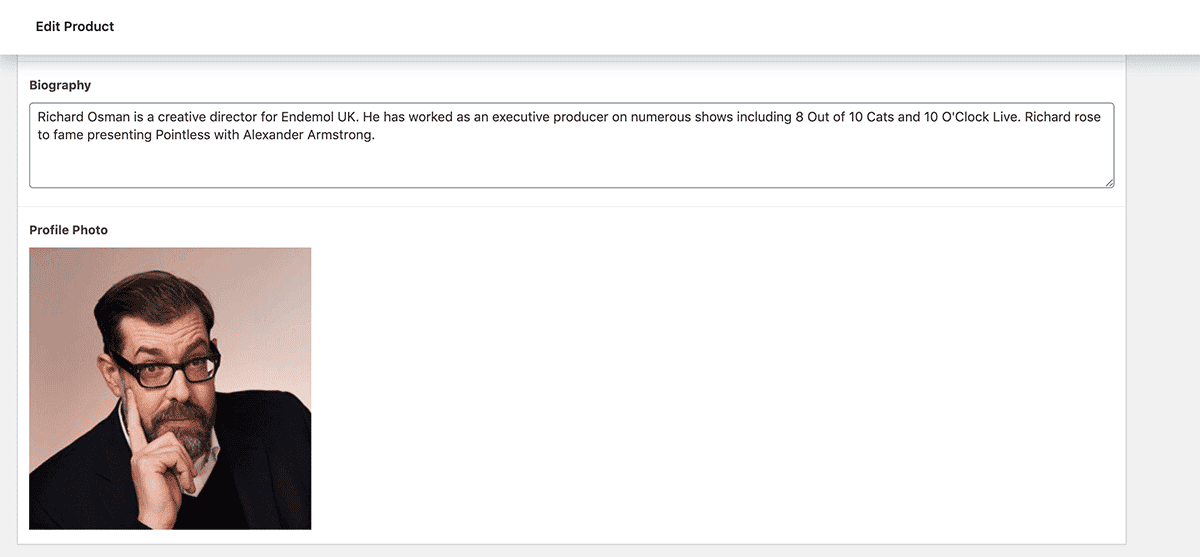
We already have an Author name field from earlier, so that’s everything we need to display a biography section.
The custom function we need is a little more complex as we’ll be incorporating all of these fields as well as some wrapping divs in order to structure the layout.
add_action( 'woocommerce_product_after_tabs', 'shoptimizer_custom_biography', 10 );

function shoptimizer_custom_biography() { ?>

<div class="cg-bio-container">
	<div class="cg-bio-wrapper">

		<h2>About the author</h2>
		<div class="cg-bio-inner">
			<?php
			$bio_image = get_field('profile_photo');
			$size = 'full';
			if( $bio_image ) {
				echo '<div class="cg-bio-image">';
				echo wp_get_attachment_image( $bio_image, $size );
				echo '</div>';
			} ?>

			<div class="cg-bio-text">
				<?php if(get_field('author')) { ?>
					<h3><?php the_field('author'); ?></h3>
				<?php } ?>
					<?php if(get_field('biography')) { ?>
					<p><?php the_field('biography'); ?></p>
				<?php } ?>
			</div><!--/cg-bio-text-->
		</div><!--/cg-bio-inner -->

	</div><!--/cg-bio-wrapper -->
</div><!--/cg-bio-container -->
<?php
}
The first line is of course our hook. Again referencing the Visual hooks guide is the best thing to do as we can see that we should use the woocommerce_product_after_tabs action to place our content after the tabs.
Apart from some wrapping divs the only other new code is used to display our biography profile picture.
We’ll need some more custom CSS to lay this out in a neat fashion and we can use the power of flexbox CSS to do this rather than using floats. It would go into Appearance > Customize > Additional CSS, or the style.css of our child theme.
.cg-bio-container {
	max-width: 1200px;
	padding: 15px;
	margin: 0 auto;
}
.cg-bio-wrapper h2 {
	font-size: 22px;
	margin-bottom: 15px;
	color: #888;
	font-weight: normal;
}
.cg-bio-inner {
	display: flex;
	border: 1px solid #eee;
	padding: 25px;
}
.cg-bio-image {
	max-width: 90px;
	margin-right: 20px;
}
.cg-bio-image img {
	border-radius: 50%;
}
.cg-bio-text h3 {
	margin-bottom: 5px;
}
.cg-bio-text p:last-child {
	margin-bottom: 0;
}
Depending on your theme you may need to adjust this slightly but it’ll hopefully work with most. After all our effort, this is the result:

We have a really nice author biography section after the tabs on our product pages. A great feature for an online bookstore.
Display a custom field on the shop/catalog
So, we’ve successfully added fields to the single product page. How would we include one of these fields on the Shop page within a product ‘card’. Let’s say that we’d like to include our new Author field underneath the product title.
If we’ve already got our existing function in place:
add_action( 'woocommerce_single_product_summary', 'shoptimizer_custom_author_field', 7 );

function shoptimizer_custom_author_field() { ?>

<?php if(get_field('author')) { ?>
	<div class="cg-author"><?php the_field('author'); ?></div>
<?php }
}
Then we only need to include one additional line to this. We’ll need one more add_action to also include this on the Shop page.
This now becomes:
add_action( 'woocommerce_single_product_summary', 'shoptimizer_custom_author_field', 7 );
add_action( 'woocommerce_shop_loop_item_title', 'shoptimizer_custom_author_field', 15 );

function shoptimizer_custom_author_field() { ?>

<?php if(get_field('author')) { ?>
	<div class="cg-author"><?php the_field('author'); ?></div>
<?php }
}
You’ll see a new action on the second line.
We’re applying the same code to display the field but in a new location which is woocommerce_shop_loop_item_title.
WooCommerce has more hooks to govern the position of elements on the shop page. Once again, Business Bloomer has another superb visual hook guide for the Shop page which you can refer to.
Looking at that, you’ll be able to see that on a product ‘card’ the regular title position is this:
add_action( 'woocommerce_shop_loop_item_title', 'woocommerce_template_loop_product_title', 10 );So our new action uses the same woocommerce_shop_loop_item_title hook but will be positioned after it, in position 15.
To add a little bit of extra styling, I’m also adding a few lines of custom CSS. This can go into: Appearance > Customize > Additional CSS.
li.product .cg-author {
	font-size: 13px;
	position: relative;
	clear: both;
}
Now, when you view your Shop or Category page you should see your ACF field displayed in the product card like so.
Bonus! Using ACF to create custom badges
Based upon what we’ve seen so far, it’s now not too difficult to apply custom product badges to products.
It might be as simple as adding a New label to certain items, or text such as Featured, Highly rated for example.
To do this I will need the following:
- A new Custom badge ACF field which will appear when I edit a product.
- A custom hook to display this badge on the catalog pages.
- Another hook to display it on the single product pages.
- Some CSS to make everything look nice.
So I’ll get started by adding my ACF field called Custom Badge. The field type is a simple Text Field.
Now, when I edit a product I’ll see this new field. So add some example text to this within one of your products so you have a working example. I added the label Best seller! in my example.
Next, I’ll need to add my custom function to display this field in two different locations. The catalog and the single product page.
add_action( 'woocommerce_product_thumbnails', 'shoptimizer_custom_badge', 20 );
add_action( 'woocommerce_before_shop_loop_item_title', 'shoptimizer_custom_badge', 6 );

function shoptimizer_custom_badge() { ?>

<?php if(get_field('custom_badge')) { ?>
<div class="cg-badge"><span><?php the_field('custom_badge'); ?></span></div>
<?php }
}
You can see that my shoptimizer_custom_badge function is being added in the two locations.
Finally, we’ll need some custom CSS to make it look nice. This can go into: Appearance > Customize > Additional CSS.
.cg-badge span {
	background: #c97351;
	color: #fff;
	font-size: 12px;
	font-weight: 600;
	padding: 4px 8px;
	border-radius: 3px;
}

li.product .woocommerce-loop-product__link {
	position: relative;
}

/* Catalog */
li.product .cg-badge {
	position: absolute;
	bottom: 10px;
	z-index: 2;
	width: 100%;
}
li.product .product-label {
	z-index: 2;
}

/* Single Product */
.single-product .cg-badge {
	position: absolute;
	top: 10px;
	left: 10px;
}
Now, let’s see the result. The product page looks like this:
The CSS has ensured that it is positioned on top of the featured image. Now, let’s look at the catalog page as you’ll see that it appears there also.
My CSS has positioned it at the bottom of the image, centered. I feel this is the best place for it, as the top section can include a discount label, the wishlist icon and potentially Out of stock text.
Conclusion
We’ve seen that Advanced Custom Fields is a terrific method to extend WooCommerce and add additional fields. This plugin coupled with some simple WooCommerce Hooks can position your new custom fields almost anywhere.
I used an online bookstore example you can of course add any kinds of custom content using these techniques.
Now I’d like to hear from you.
Which of these custom field examples is most useful?
Do you have any great tips on how you are using custom fields on your own store?
Let me know by leaving a comment below right now!
Update! I’ve added an example of using ACF on the product category pages in a new support article for our Shoptimizer WooCommerce theme.


 CommerceGurus heading for WordCamp Europe!
 WooCommerce Gift Card Tutorial: How to Sell Gift Cards at Your Store
 Building the best WooCommerce theme – focus on speed and conversions
 Keep Captiva up to date with the Envato Toolkit
Great guide, Simon.
Now I finally understand what ACF is for 🙂
2 questions remain for me:
1: what is the impact on speed or how do I make sure that I don’t destroy the speed measures you applied in the Shoptimizer theme?
2: when does using WC attributes make more sense? Or is there a case where it’s better to use ACF instead of attributes.
I’m thinking additional fields for Google product schema.
Or additional fields for listing on Amazon.
Hi Edward! ACF shouldn’t affect speed, it’s a very well coded plugin. ACF is very flexible as you have complete control over the output markup – best if you need something very custom.
Nice guide.
I have tried, most fields work well, only the custom field under the product image can’t work if the product has gallery image. The above sample uses a Feature Image without a gallery.
Please help fix, thanks.
Great guide.
I want to use this to show an image on my product page. I tried it with the help of this guide, but the only thing I see is a line of text with the image ID, the URL etc, but not the actual image.
Can you help me with this isse?
This is an excellent guide for ACF. Thanks a lot. Big Fan of the Shoptimizer Template.
Thanks Florian!
very usufull guide, thanks. how display a field’s label and value? e.g. “Author: Richard Osman”
Congrats!!
I have followed the steps to implement custom badges and it works fine.
Only, I have created a rule that only the field appears for a certain tag of my products and I have set the default value “test”.
The problem is that the badge is not displayed until you edit the product and save it, even if you do not make changes to the product.
Is there a way to solve this?
can we add image badge before text on single product and also on shop loop / catalog
Wow thanks! Really well explained 🙂
Thank you so much!
Just what I have been looking for on YT but found it right here
I need it for text and for custom badges
Do you know a guide which explains how to add custom filter for WC
I need to sort products by custom criterias like start date and difficulty
Thank you very much
Mike
Hello,
Thank you so much for this!! Tried using the combination of ACF + display badges but the badge won’t appear on the single product page. Tried with Storefront, no luck. Can you point me to where I’m supposed to look so that it appears on the single product page?
Great. I would need the same for a custom woocommerce archive / category title or text.
how can i setup this?
Merci beaucoup pour ce tutoriel, ça aide énormément pour bien assimiler l’utilisation du ACF avec les Woocommerce Hook…
Hi Simon and thanks for that great tutorial, which helps a lot.
Is there an easy way to use ACF to add a youtube video in an iframe on product page?
This is the BEST guide I have found on the topic. Though, I’m curious how I can apply this technique to a vendor profile using the ‘Woocommerce Product Vendors’ extension.
Thoughts?
Fantastic guide!
I’m wondering though – What can I do to include data from these new fields in woocommerce emails?
For example, if I want to add a product option, and use an ACF field to present the buyer with the option.
If the user selects the options, I now need to alert the vendor that the user has selected the option.
How can I do this?
Hi there, thanks for this great article!
I’m using a custom function to display an ACF text field on the front-end as described in this article. However, I am now getting a warning message from ACF Saying:
“ACF PRO — ACF will soon escape unsafe HTML that is rendered by the_field(). We’ve detected the output of some of your fields will be modified by this change.”
Any ideas as to how to work around this new limitation?
Many thanks for your help!
Hello,
Any ideea if it’s posible to add the ACF field before the price?
Also, any ideea if it’s posible to add a text before the ACF field?
Many thank;s for this tutorial!