If you work with cafes, food trucks or restaurants, they might want to expand to offer take away and delivery-only options. Many such businesses have implemented a food ordering system that allows patrons to place orders using a web browser.
Setting up a food ordering system and offering food deliveries is becoming essential for all sorts of restaurants and eateries, including dine-in restaurants.
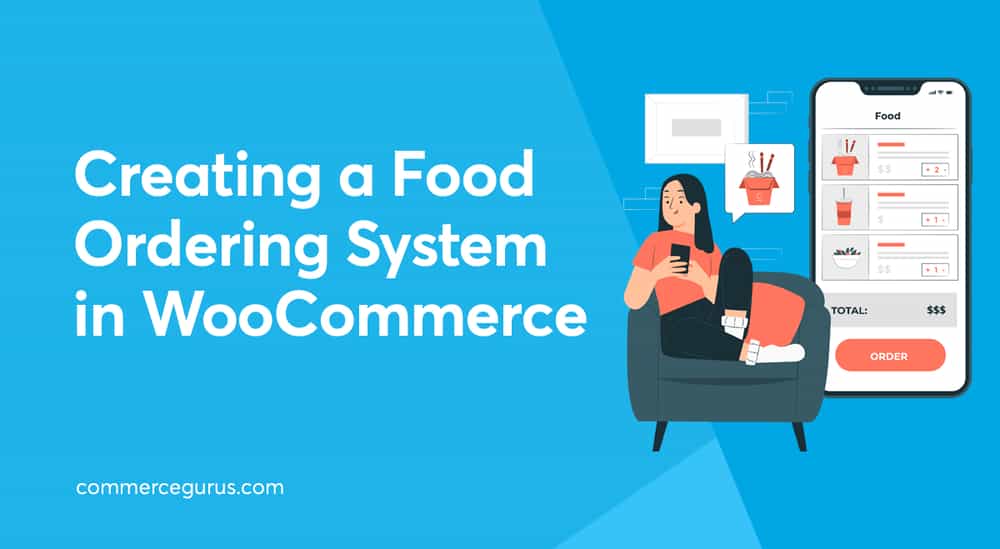
In this article, we’ll show you how you can create your own bespoke food ordering website using WooCommerce and a specialist plugin in a few simple steps.
Let’s put everything into context before we begin.
Why Food Businesses Should Offer Take Away and Delivery Operations
If you’re operating a restaurant or food business and only offer dine-in options, now’s a good time to think about offering take away and delivery options.
There are several reasons why:
For starters, operational restrictions cause many food businesses to switch to take away and delivery-only options to sustain their business. And, for most restaurant owners, this move has been more cost-effective and easier to manage than running dine-in operations.
By offering take away and delivery operations, you can automate various processes such as WooCommerce food ordering. In addition to this, you can sign up with third-party delivery services in your locality to deliver food orders to patrons.
So before getting started with an explainer, this is what we want to be able to create.
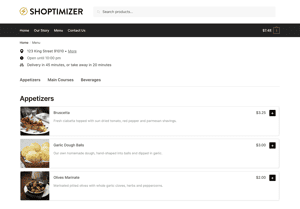
We would like to display each menu item, alongside its image, description and price, divided into any categories we choose. We have kept it simple going with appetizers, main courses, and drinks for now.
Hosted Solutions vs WooCommerce Food Ordering System
Some restaurants have chosen to use hosted solutions like Uber Eats and Deliveroo to stay in business. The problem with hosted solutions like Uber Eats is that they take large commissions. In simple terms, this means you make less profit on each sale which isn’t ideal. Not to mention, you end up competing with established food businesses which means less visibility for your restaurant in listings.
In addition to this, bespoke food ordering systems like Blink and Menufy are incredibly expensive. Blink, for example, will set you back a whopping $450 per year to set up a food ordering system on your website. Other food ordering systems limit the number of online orders you can process each month. UpMenu lets you accept up to 75 online orders per month with their Basic plan which costs $49 per month per location.
For this reason, many food businesses are exploring the option to create their own WooCommerce food ordering system in WordPress.
With an online food ordering system, you own 100% of your online food ordering website and have full control over its design and content. This means that you can put up as many menu items as you’d like or swap them out whenever you want.
And since WooCommerce is incredibly flexible, you can extend its core features the way you want using plugins. For example, you can add online ordering forms, delivery slots, tipping features, and mobile ordering functionality to your online food ordering website.
WooCommerce also gives you tons of payment methods to integrate which means you can offer patrons the option to pay cash on delivery or make payments using their credit cards of an online payment method.
The Solution: WooCommerce Restaurant Ordering
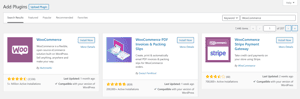
The easiest way to create an online food ordering system in WooCommerce is by using the WooCommerce Restaurant Ordering plugin. It features a design that takes inspiration from major food ordering apps making it intuitive and easy-to-use for patrons.
As the restaurant owner, you can use the plugin to sell all sorts of food items, including foods with variations like pizzas.
Once you install and activate the WooCommerce Restaurant Ordering plugin on your website, it automatically creates a front-end menu-like layout to display selected food items organized by category.
You can choose which food categories to display in the front-end layout and configure order form options. The plugin lets you choose between different layouts that determine how food items appear in the restaurant order form. In addition to this, you can also set restaurant details, delivery information, and opening hours to make it easy for patrons to place orders.
Patrons can scroll down the menu and add food items to their cart by clicking the + icon next to each food item. Food items with variations will open up in a lightbox allowing customers to choose the variation they’d like to order.
How to Create an Online Food Ordering System
Here, we’ll walk you through the step-by-step process of creating an online food ordering system in WordPress. Here’s what you’ll need to follow along:
- WooCommerce
- WooCommerce Restaurant Ordering
- Photos of food items you’d like to add to your menu
Step #1: Configure WooCommerce Settings
The first thing you need to do is to make sure you have a WooCommerce-optimized theme, like Shoptimizer, installed on your WordPress website. This will help you create a speedy user experience that’s designed for conversions.
Once that’s done, install and activate the WooCommerce plugin to your WordPress website. Upon activation, you’ll see the WooCommerce Setup Wizard. This will walk you through the process of adding eCommerce features to your WooCommerce food ordering website.
Here are the WooCommerce settings you should pay attention to:
Payment Methods
The Payment settings let you pick the different payment options you want to offer your customers.
At the bare minimum, you should offer an online payment option such as PayPal or debit/credit cards.
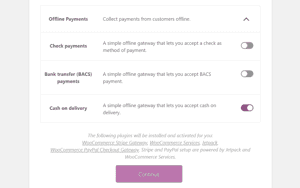
And, if you plan on offering take away, you might also consider offering Cash on delivery.
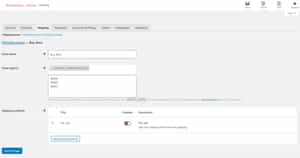
Shipping Zones
If you’re just starting out, you might need to charge patrons for shipping. WooCommerce makes this easy by letting you set up shipping zones. Head over to WooCommerce > Settings > Shipping from the admin panel to set up your shipping zones.
Here are some quick tips:
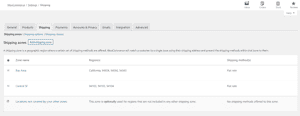
- Delivering food to a single area or locality. If you’re going to be delivering food orders to a single area then you only need to create one shipping zone. You can enable Flat Rate shipping and charge patrons the same delivery costs.
- Delivering food to multiple areas. If you’re going to be delivering food orders to multiple areas then you will need to create multiple shipping zones. This way, you can charge different Flat Rate shipping costs depending on the patron’s area.
How much you charge for delivering food will depend on the third-party food delivery service you choose to work with. Alternatively, if you plan on delivering food orders yourself, you’ll need to work out the costs.
Step #2: Add Food Items as WooCommerce Products
The next step is to create a food menu. For this, you’ll need to add individual food items as WooCommerce products to your online store.
Since you’ll likely be selling different types of food items, it’s a good idea to organize the foods into categories from the get-go. It helps to think of it as a real-world menu. Ask yourself: How would I categorize the menu? What would the different sections be?
For example, if you’re selling fast food, you might create three categories: Appetizers, Main Courses, and Beverages.
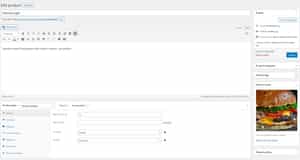
Next, head over to Product > Add New from the WordPress admin panel and enter the following product details for each food item:
- A title which will be the name of the food item.
- A short description.
- Choose the correct product category.
- The product image.
Once that’s done, scroll down to the Product data section and set the price for the food item.

If you want to add a variable food item (like pizza available in different sizes), make sure you use the dropdown to select the Variable product option.
Click the Publish button to continue. Repeat these steps until you’ve added all of the food items as WooCommerce products.
Step #3: Install WooCommerce Restaurant Ordering and Configure Plugin Settings
To display the online food ordering form on the front-end, we’ll need to activate the WooCommerce Restaurant Ordering plugin and configure its settings. To do this, head over to WooCommerce → Settings → Restaurant Ordering from the WordPress dashboard.
Here’s what you need to do:
Restaurant Ordering

Choose the Restaurant Order Page using the dropdown menu. This is the page the restaurant order form will appear on.
Next, select the Categories you want to show in the restaurant order form. Following our example from above, you would select the Appetizers, Main Courses, and Beverages categories. In addition to this, you can also choose to show the restaurant order form on your WooCommerce category pages.
Order form options
Once that’s done, you can select what information to show on the restaurant order page. The WooCommerce Restaurant Ordering plugin lets you show the menu navigation bar, category names, category descriptions, product images, and product descriptions on the front-end.
Next, configure the Layout, Sort products by, Image position settings. The plugin also lets you choose between two Order methods:
- Add items instantly – This is perfect for simple food items that patrons can add to their cart right away.
- Always show a lightbox – This option opens a lightbox for all product types. Use this option if you want to let customers view more information about the product (such as ingredients or nutrition information) or choose options and quantities.
Note: All variable products will open in a lightbox to let customers select options.
We also recommend ticking the Cart confirmation checkbox which shows a confirmation message when patrons add items to their cart.
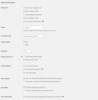
Restaurant details

Enter information about your restaurant. This lets patrons know your restaurant’s name and address which is useful if you’re offering take away. In addition to this, you can use the Delivery/collection info field to enter additional information about how deliveries work.
Opening hours
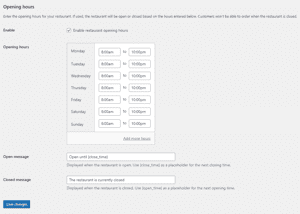
The Opening hours option lets you specify operational hours. Keep in mind that patrons won’t be able to place orders when the restaurant is closed.
Step #4: Display Your Online Food Ordering System on the Front-End
Now, if you go to the page you set as the Restaurant order page, it will look something like this:
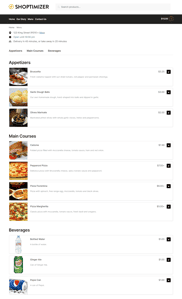
You’ll notice that the restaurant details, opening hours, and menu navigation bar appear at the top of the screen followed by the ordering menu. Patrons can click the + icon to add items to their cart and place their orders.
Variable products (like pizzas) will automatically open in a lightbox that looks something like this:
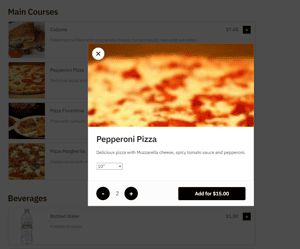
Patrons can select the variation they’d like to buy, set quantities, and click the add to cart button to continue.
Bonus Tips
Here are some bonus tips that will help you improve the user experience your online food ordering system delivers and potentially boost sales:
Tip #1: Tipping
You can use the Name Your Price plugin to accept tips from patrons. The plugin lets you add a suggested price and set the wording. You can then add this is a separate item directly to the one-page order form.
Tip #2: Add Brief Instructions
Consider adding brief instructions explaining how to use the order form directly above the shortcode. For example, you could let patrons know that they can click the + icon to add items to their cart.
Tip #3: Mobile Ordering
Most WooCommerce themes, like Shoptimizer, are fully responsive which means customers can simply access your online food ordering website from a mobile device to place their order. In other words, you don’t have to worry about creating a separate mobile site or developing a mobile app.
Tip #4: Taking Orders for Restaurant Chains
If your business is part of a wide chain, you can use WordPress multisite to create separate sub-websites for individual restaurant chains. This way, you can have different food items on the menu for different restaurant chains.
Conclusion
If you’re in the food business, switching to a take away or delivery-only model is far more cost-effective and sustainable than managing a dine-in restaurant.
Instead of opting for a hosted solution like Uber Eats, you can easily create a bespoke online food ordering system in WooCommerce using the WooCommerce Restaurant Ordering plugin. As a result, you’ll be able to increase sales and generate more profit.
If you’re ready to create your own online food ordering system, we recommend the WooCommerce Restaurant Ordering plugin.
And now, over to you. Do you have any other recommended restaurant ordering tools or plugins that you have experience with? Let us know in the comments section below.


 Kinsta Review – How well does it work for WooCommerce Hosting?
 WooCommerce Email Customizer – The Five Minute Guide
 Best WooCommerce Payment Gateway for WordPress in 2020
The viewers on my weekly livestream for ET have been asking about this specific topic for around 3 weeks now. This one’s at the top of my list of tutorials to share. Just wanted to say thanks for making this one so thorough. 😀
Creating an online food ordering system will help these days as people don’t have any options rather than staying back at home. The spread of the coronavirus has led to shutting down a lot of restaurants and cafes in the town. Thank you for sharing it with us. Keep sharing.
Hi,
do you have a solution for food add-ons? So let customer to add seasonings or enter a note for the individual product (for example to say to remove a seasoning)
Bye