High quality product images are a crucial factor in driving visitor engagement to your WooCommerce store. After looking at the best WooCommerce examples, excellent photography was a common feature. In this guide I’ll be showing you how to create great images within WooCommerce (no blurry ones) which are also optimized for speed. You’ll be able to apply these techniques, whatever the WooCommerce theme you’re using.
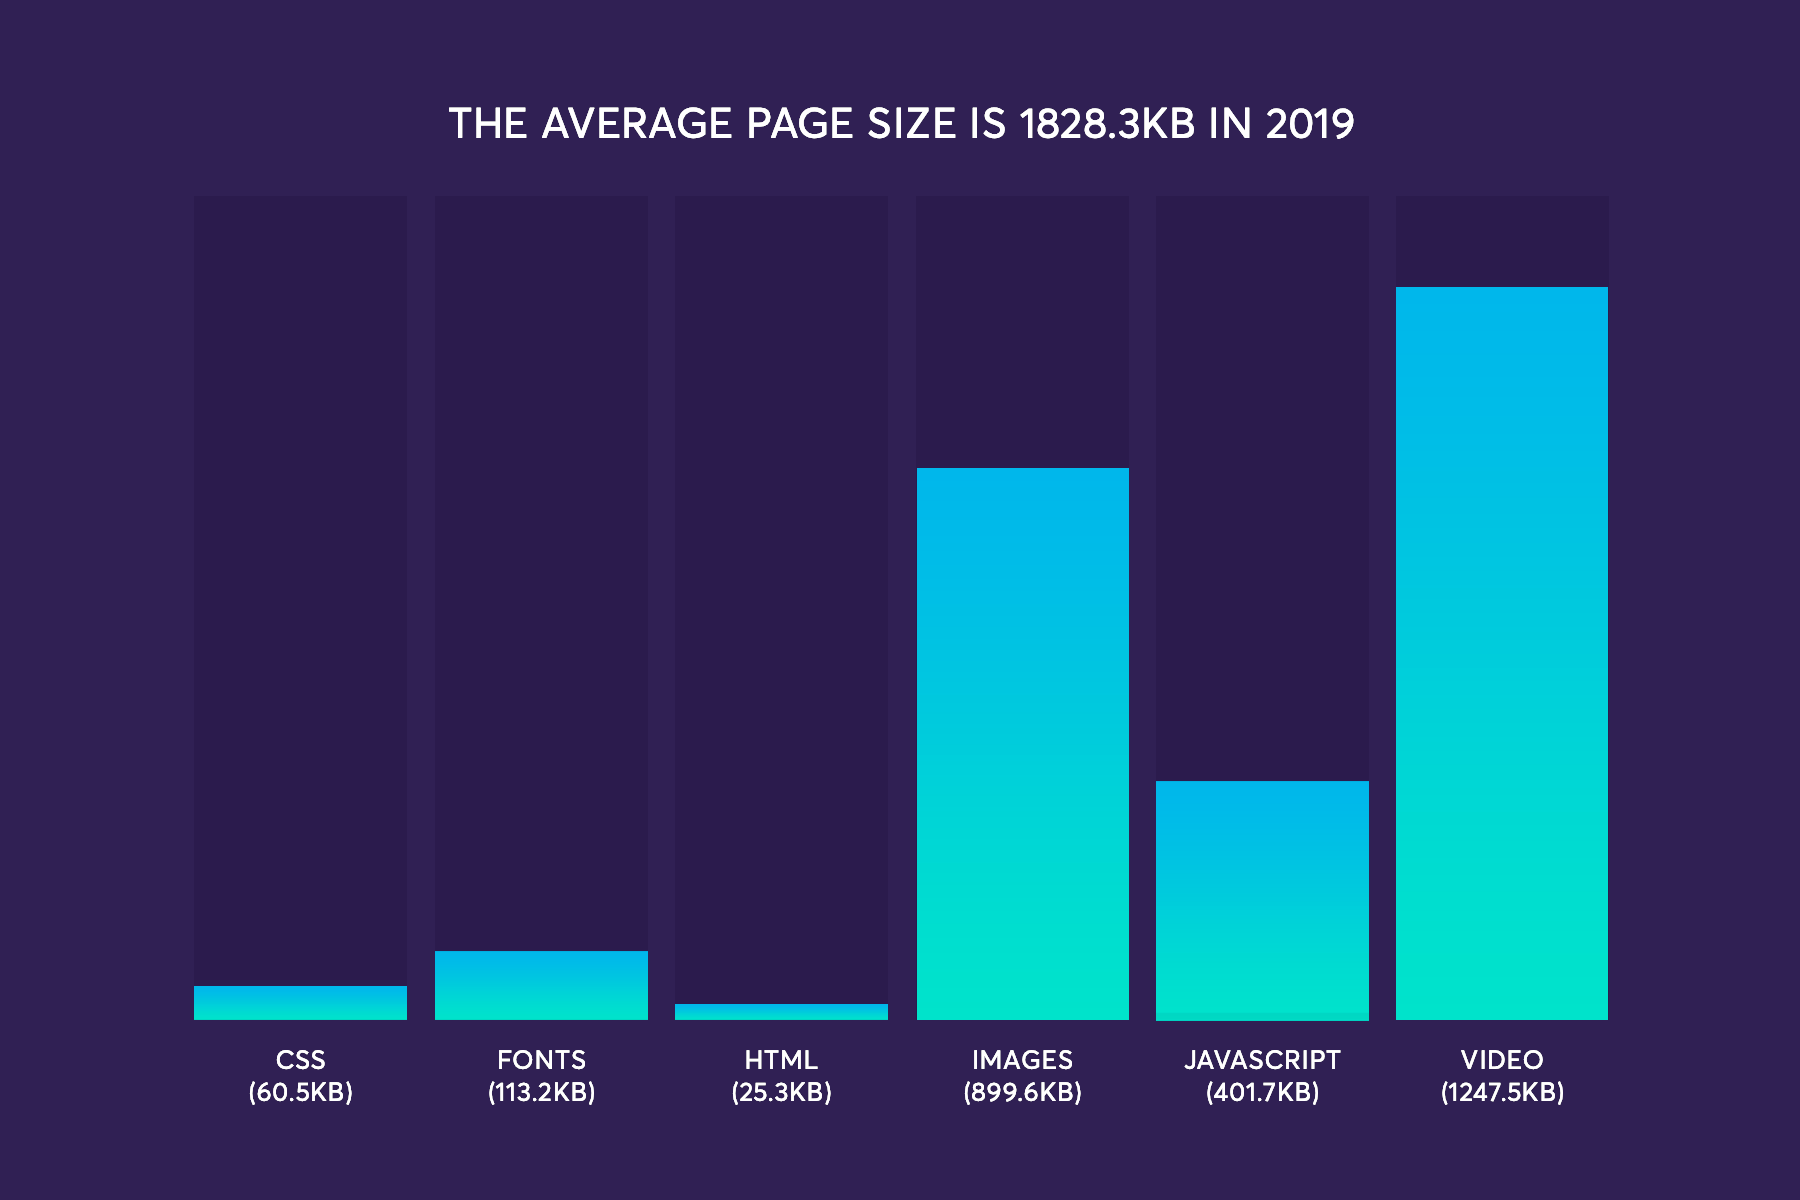
These performance benefits are a hugely important aspect of this. According to the HTTP Archive in 2019, images make up an average 21% of a total page’s weight. Having a fast WooCommerce site is crucial and you can see from the chart below what a big part images and video play in this.
These are the statistics for the average page size in 2019. We’re approaching nearly 2MB in weight due to the support of excessive javascript, images, and video content.
Creating a faster WooCommerce site is a common request when people are looking for WooCommerce support and image sizes and weight are a key component of slow sites. Let’s dive in.
- WooCommerce image settings
- I’m missing image settings in the customizer
- How to I change the product gallery thumbnail size?
- What size images should I upload?
- My process for preparing WooCommerce images
- Optimizing images to ensure they load quicker
- BONUS – Removing the image zoom and lightbox
1. Set the sizes
There was a big change in how images were displayed in the 3.3 release of WooCommerce. WooCommerce image sizes settings were moved into the customizer. Specifically you will find WooCommerce image sizes are set within: Appearance > Customize > WooCommerce > Product Images
Let’s look at the size options you get, using our Shoptimizer WooCommerce theme as the example.
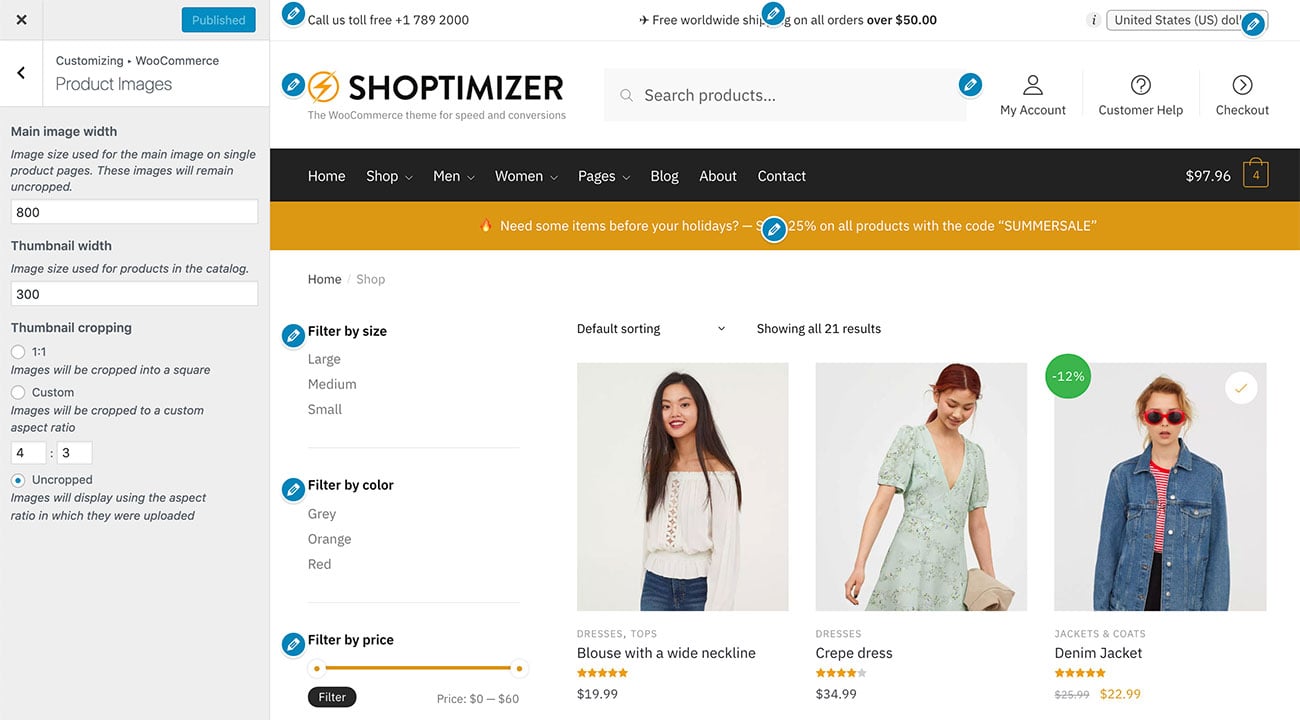
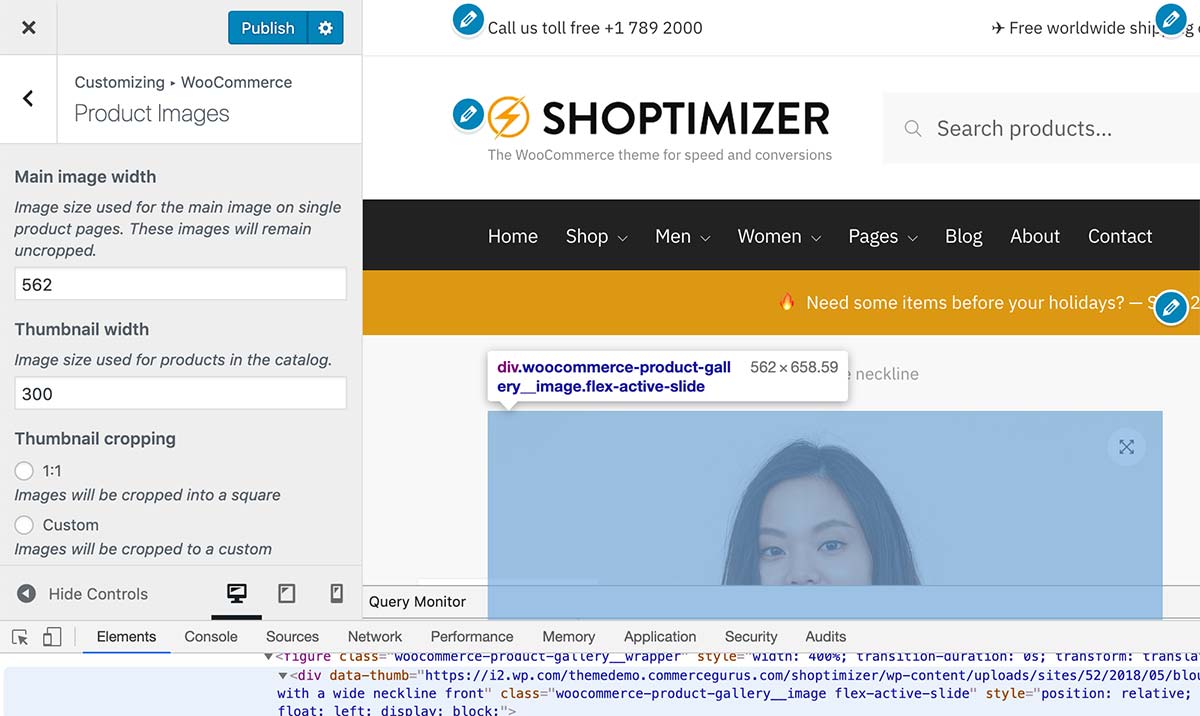
You can control and set a number of key sizes parameters for images in WooCommerce. The sizes you can adjust are: Main image width, Thumbnail width, and Thumbnail cropping.
Let’s set these sizes to be initially 800 and 300. When you change these dimensions sizes, WooCommerce will automatically resizes the images in the background.
The language can be a bit confusing so let’s go through these one-by-one.
Main image width
This controls the width of the product images size on the single product page. You’ll have seen that there is no height setting. That’s because WooCommerce will display the image proportionally according to how it was uploaded. It doesn’t support a height setting because of this, as it’s not needed.
You can use a feature within Chrome to discover the size of the image. Right-click on an image (Control key and click on a Mac) and select Inspect Element.
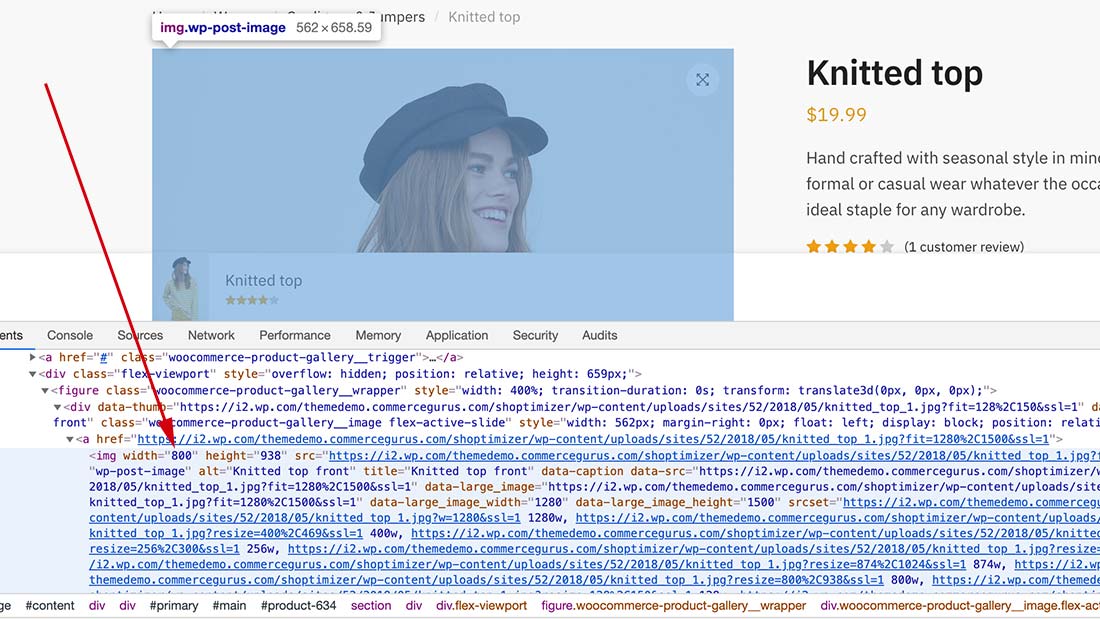
You’ll see the image is 800px as set by our WooCommerce image size settings within the customizer.
Now, you may have spotted that Inspect Element has also revealed the true container size of the image – a width of 562px.
Using the true sizes of images
So, setting the main images width to this size would be better – it’ll reduce the file size and make the page a bit quicker to load. But there is a downside to this. You will lose the zoom feature when you hover over the image as the image will be cut to the precise size of the container.
If you would like to keep this zoom feature in WooCommerce, I’d suggest leaving this size setting at 800. This allows the larger version to appear, with more detail, when hovering.
So it depends if you can live without the zoom functionality in WooCommerce – on some sites this may be fine. If you’re selling items with a lot of detail such as jewellery it may be important to let visitors zoom in on the images to see more details.
Let’s do without the zoom for now and change the width size to be precisely 562.
This width value will be different depending on the WooCommerce theme you’re using and the layout you’ve selected for the product page. If you’re unsure of the width your WooCommerce theme is using, contact your WordPress theme developer for assistance.
After setting the new single image width value, the images won’t change immediately. WooCommerce instigates a background process and resizes the images gradually. Previously you needed to use a plugin such as Regenerate Thumbnails to do this, but these days WooCommerce will do it automatically.
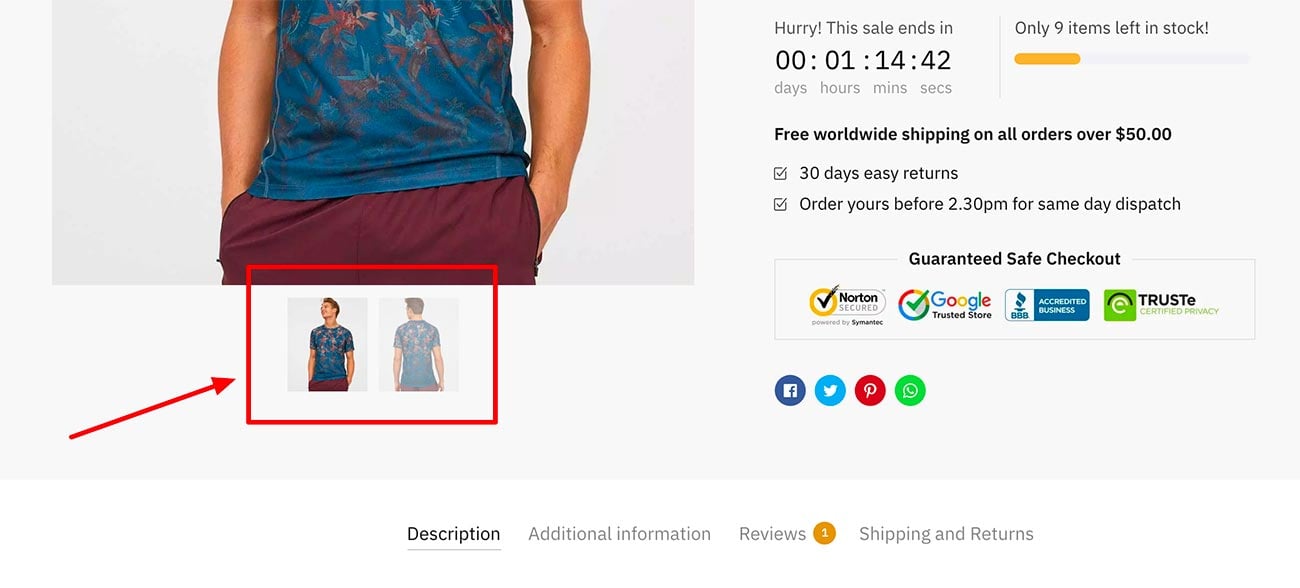
Thumbnail width
This sets the width of the product thumbnail images on the Shop and Category pages. Additionally, it will apply this width for Related products and Upsells (both on a single product page) as well as Cross-sells (on the cart page).
Plus, if you’re using WooCommerce shortcodes to display products elsewhere, such as the homepage, it will also apply to these.
Thumbnail cropping
I’d be wary of using anything but the Uncropped setting as there isn’t really any flexibility around which parts of the images are cropped in WooCommerce. It’s an area I’d love to see developed further in future releases of WooCommerce to support more control of product image sizes.
- 1:1 – will make all of your images hard cropped as square sizes. It’ll cut off the top and bottom of vertical images, which can make many images look imbalanced.
- Custom – you can set a ratio such as 3:4 (that’s width to height) – which will make all images slightly taller than their width.
- Uncropped – I’d recommend going with this, it will maintain the original aspect ratio of your images.
Uncropped will maintain the proportions the images were originally uploaded with. This allows you to have the maximum control over how they look once you upload them consistently. I’ll be going over my process later in this article.
2. I’m missing image settings in the customizer
If you go into the customizer and you’re missing the images settings within: Appearance > Customize > WooCommerce > Product Images then your WooCommerce theme has likely set the dimensions programatically within the code.
Setting these images sizes within the code removes support for them from the customizer.
There may be a reason it was applied in this way, I’d recommend contacting your theme support to find out more. It may be simply a case that you’re running an older WooCommerce theme, and setting the dimensions within the theme was the way things used to be done.
These days, many WooCommerce themes, including Shoptimizer will allow users more control and support over how images are displayed.
3. How to I change the product gallery images size?
You probably noticed that a specific option for the product gallery thumbnails are missing from these customizer options. WooCommerce used to support a dedicated images setting for this in the pre 3.3 release but have since removed it.
If you have set the the thumbnails set to be Uncropped, the thumbnail images will display proportionally to how you originally uploaded them.
If you want more control over the WooCommerce thumbnail image size, you can adjust their dimensions via a filter. You’d add the following code to your child theme’s functions.php file (if you’re using our Shoptimizer theme, we have a child theme here) or by using the Code Snippets plugin.
This will change the width to be 100px and set the height to be 130px.
|
1 2 3 4 5 6 7 8 |
add_filter( 'woocommerce_get_image_size_gallery_thumbnail', 'cg_woocommerce_image_size_gallery_thumbnail', 99 ); function cg_woocommerce_image_size_gallery_thumbnail( $size ) { return array( 'width' => 100, 'height' => 130, 'crop' => 1, ); } |
Once you’ve added this snippet, you’ll need to install and run the Regenerate Thumbnails plugin to resize your WooCommerce gallery thumbnail images. Unlike the catalog and single images, this is not an automated process.
If you’re using our Shoptimizer WooCommerce theme – we include a CSS rule to keep the thumbnail image size at 70px within the CSS. To overrule this and make the width match the dimensions above, add the following to your Additional CSS panel in the customizer.
|
1 2 3 |
div.product .woocommerce-product-gallery .flex-control-thumbs li img { width: inherit; } |
4. What size images should I upload?
As we saw in the settings above, should we just upload images which are set to be 800px in width?
Personally, I upload images slightly larger than this as it allows me more flexibility if I want to change things in the future.
With screen sizes getting wider, you may want to include an additional break-point for larger screens at some point. This would increase the grid width, requiring wider product images also.
I’ve seen some massive WooCommerce catalogs with thousands of products and all of the images were uploaded far too small. I’m talking 250px in width which just don’t look good. So do not make this mistake and upload product images set to be at least 1200px in width.
You can always reduce the size of images that are displayed but you can’t scale them up.
Plus, if you upload larger images, it allows you to the flexibility to utilize the image zoom feature of WooCommerce if you wish.
My process for preparing WooCommerce images to upload
I’m going to quickly go through how I prepare images to upload for a WooCommerce site. My images editor of choice is Photoshop but you can use alternatives such as Sketch or GIMP (free).
1. Create a consistent canvas
Firstly, I create a consistent canvas size. This is key. I don’t want irregular sized product images on my store or rely on WooCommerce’s own sub-par cropping.
I’m creating a canvas which is set to be 1200px in width and 1200px in height. The resolution is set as 72. The color mode is set as RGB which is designed for the web.
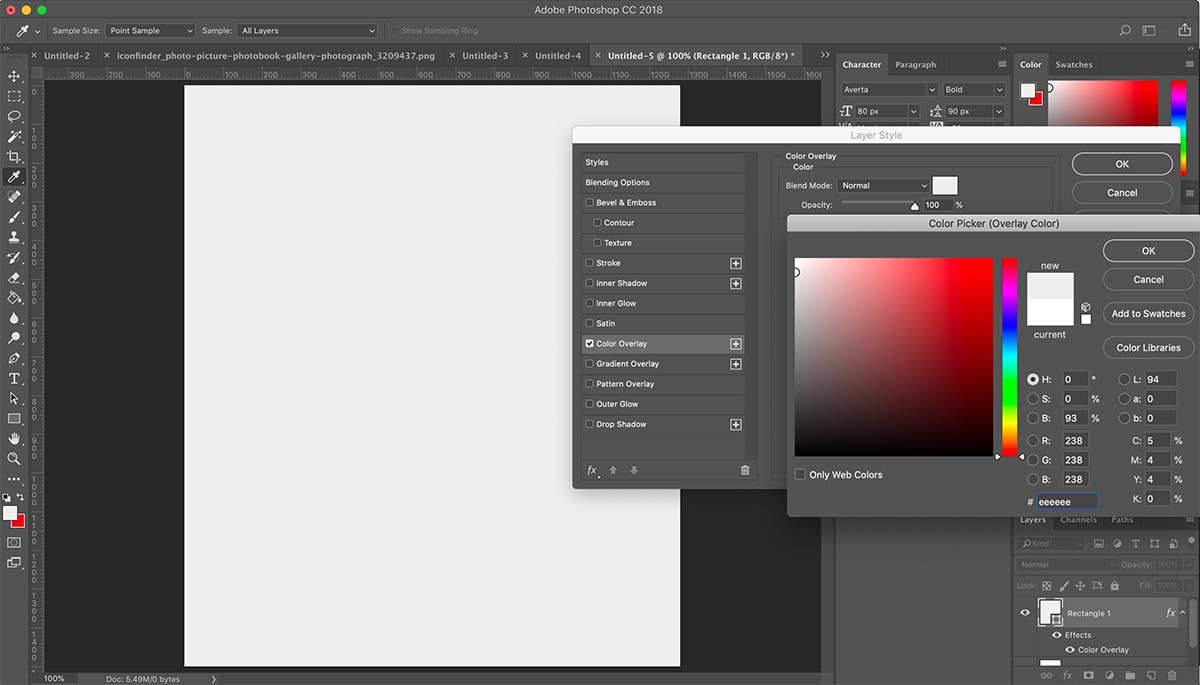
2. Add a light grey background layer
The next thing I do is draw a rectangle layer on the canvas and make it a light grey color – specifically #eeeeee. This creates a natural background for each image and makes them better defined when on a grid.
Next, import the product image you want to use and position it on the canvas. Hold down shift while reducing the corner edges to make sure that the proportions are kept.
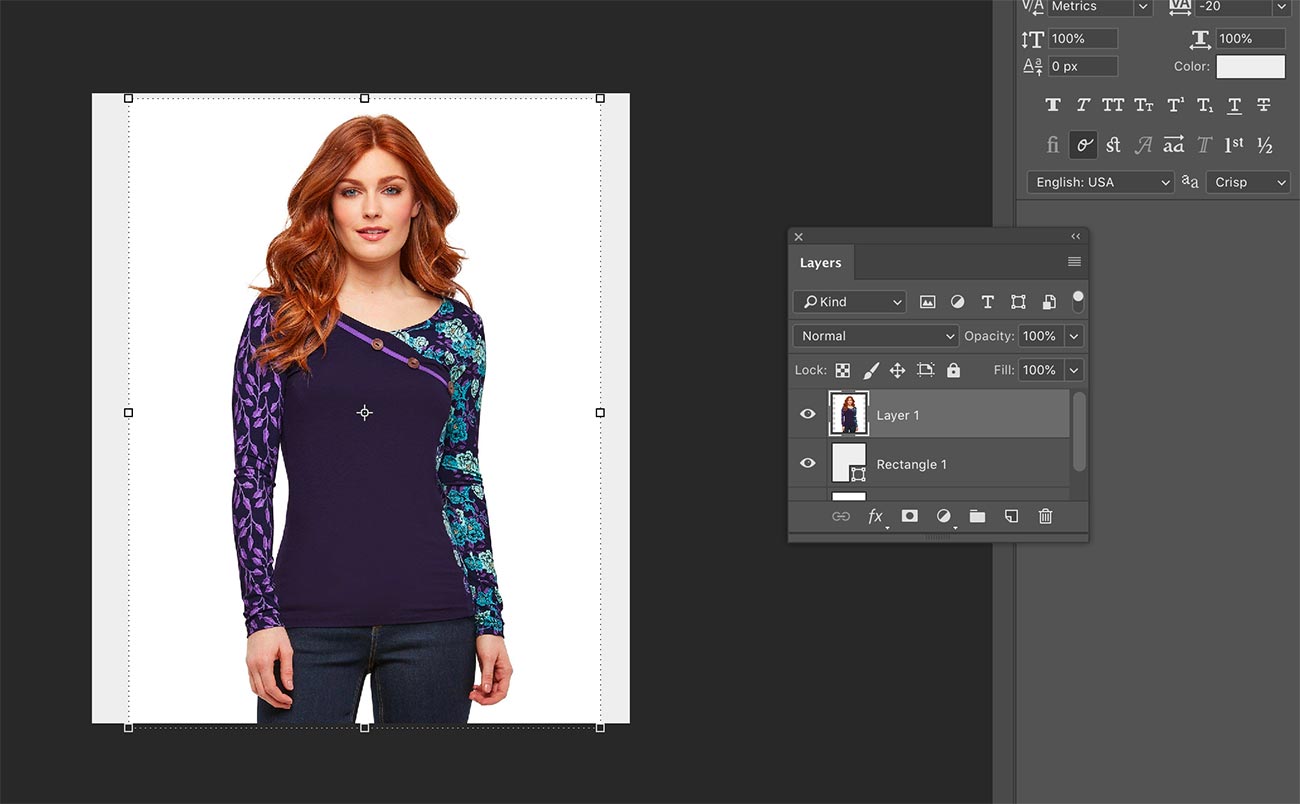
You’ll see that the product layer is above the grey background layer. Also, the image has a white background which doesn’t blend yet with the background color.
3. Change the layer setting to ‘Darken’
Next, with the product image layer selected change the dropdown from Normal to Darken.
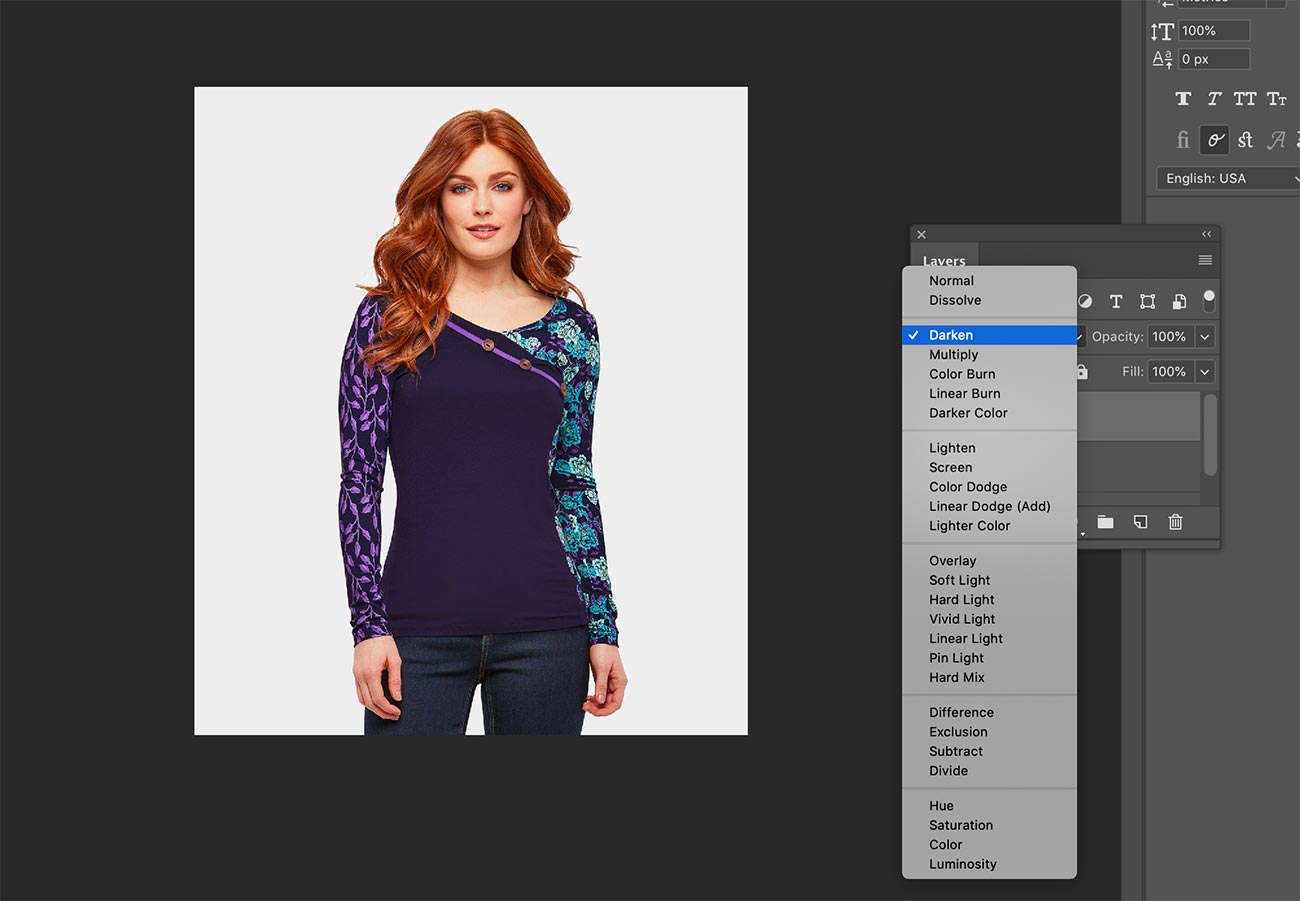
You’ll see that it blends in with the grey layer now and you no longer see its own white background.
4. Export the image as a JPEG and keep the size below 100kb
Our final step is to export the product image. This is via File > Export > Save for Web
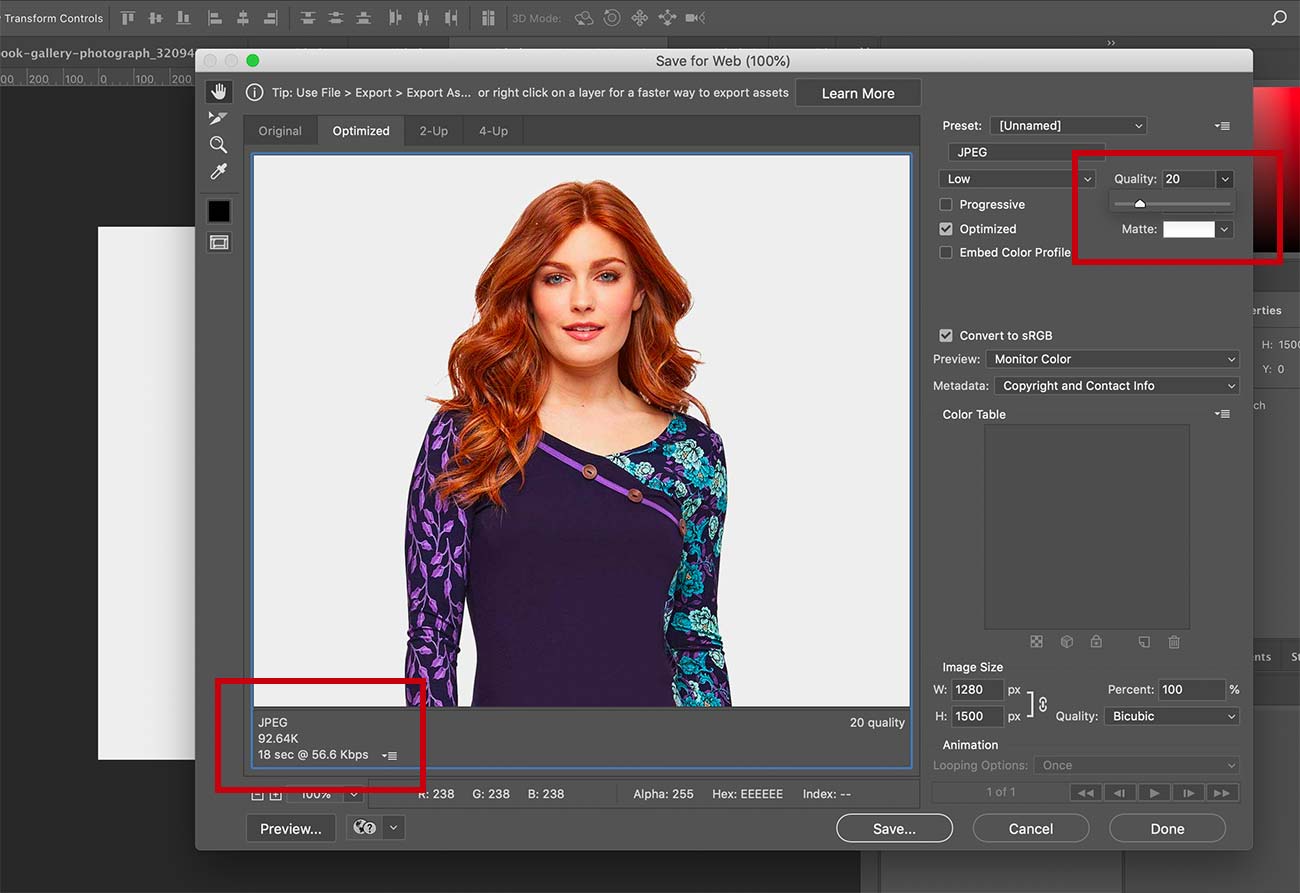
Our goal here is to try and keep the file size below 100kb in size. In most circumstances a JPEG is the best choice. So choose that and reduce the quality slider down until you see the resultant file size drop below 100kb on the bottom left.
On certain items with a lot of detail this may not be possible. But do try and get the size down as close to possible to this figure.
Just repeat this exercise for each product image. Also, try to use file names that make sense and don’t use any spaces or unusual characters. For example using autumn_florals_top_01.jpg will give search engines a much better idea what the image contains.
Optimizing images
If you’ve followed this guide and have exported your product images at around the 100kb file size, then you’ve done a lot of the work already.
There are a number of image optimization services out there where you can shave an extra couple of kilobytes from images such as TinyPNG, and Optimizilla. But the reward from this is minimal and it’s time consuming.
Instead I recommend performing two actions which take only a couple of minutes and applies to every image on your WooCommerce (and indeed a plain WordPress) site immediately. These are:
- Use an images CDN
- Add lazy loading
An images CDN means that the images are no longer loaded from your own server. They use the CDN’s, alleviating the load and providing much faster rendering times.
Lazy loading increases page speed by not downloading any images which are not yet in the user’s viewport. If there are one hundred images further down the page and the user never scrolls to them, the page does not have to wait to load them.
Enabling these features within Jetpack
The easiest and simplest way to do both of these is by using Jetpack. This WordPress plugin gets a lot of haters but if you switch off all modules apart from these two, performance will be excellent. We’ve also tried dozens of lazy loading plugins and have found that Jetpack’s is by far the best we’ve come across.
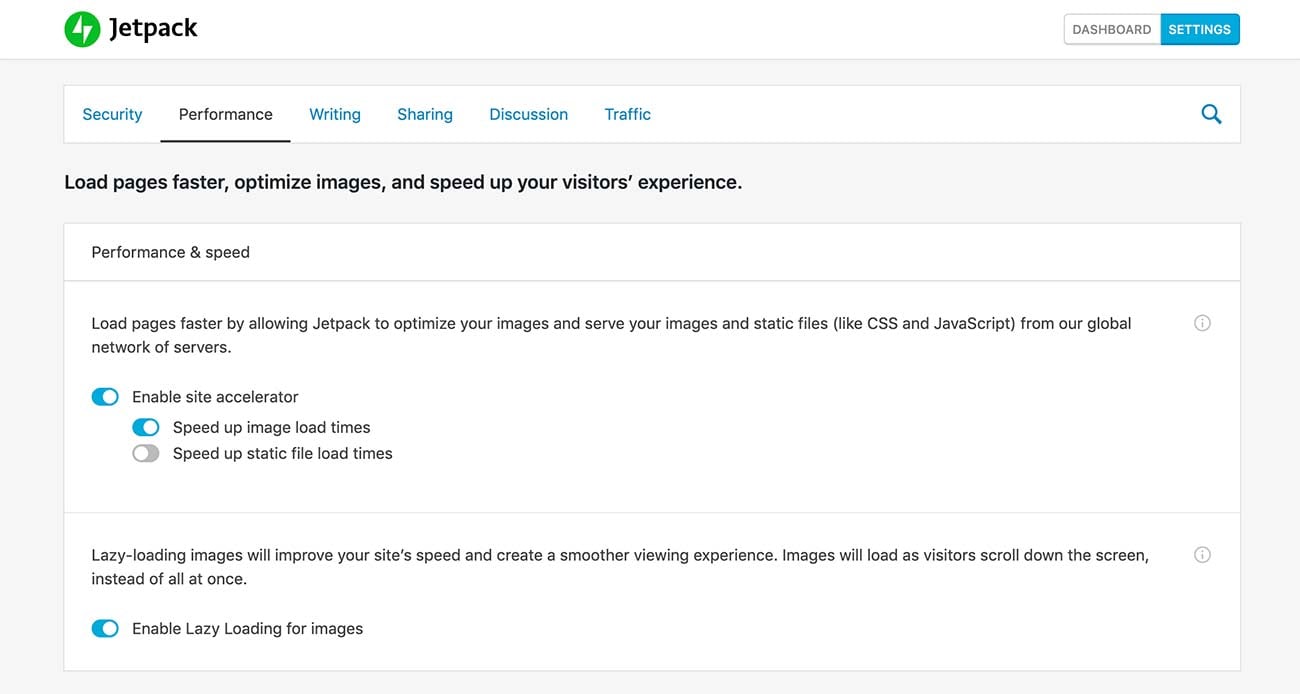
After installing the plugin go to the Settings area and click on the Performance tab. From there you can Speed up image load times and enable lazy loading.
After enabling these settings, take a look at your product image markup using Inspect Element again and you should see two things.
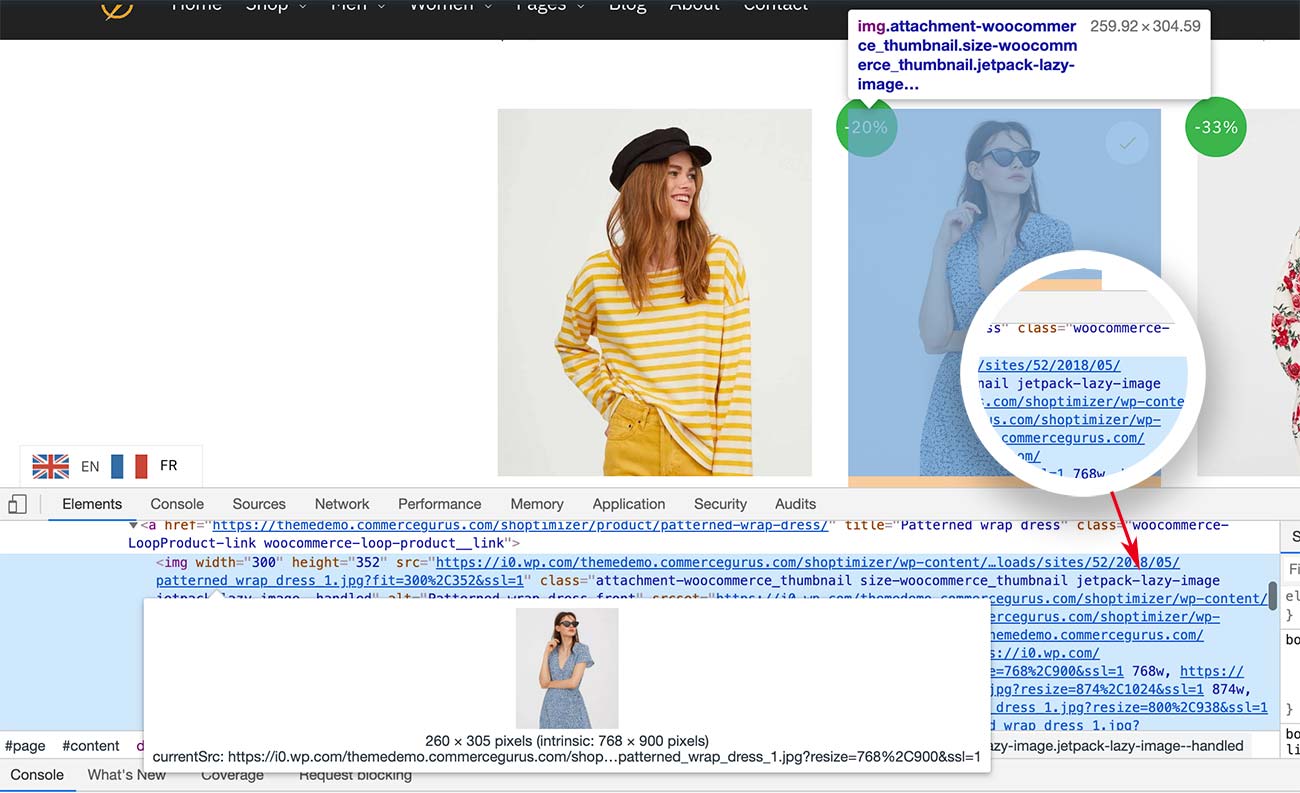
You should see the images are now loaded from a wp.com domain and there is an additional class: jetpack-lazy-image. This means both features have applied correctly.
BONUS – Removing the image zoom and lightbox
One last thing you could do (if you don’t need them) is to remove the WooCommerce lightbox and images zoom features on single products. This reduces the CSS and JS requests on your single product page, providing a small speed increase.
You’d add this function via the Code Snippets plugin or within the functions.php of your child theme.
|
1 2 3 4 5 |
add_action( 'after_setup_theme', 'cg_remove_zoom_lightbox_theme_support', 99 ); function cg_remove_zoom_lightbox_theme_support() { remove_theme_support( 'wc-product-gallery-zoom' ); remove_theme_support( 'wc-product-gallery-lightbox' ); } |
Then, add the follow CSS snippet to: Appearance > Customize > Additional CSS
|
1 2 3 |
.woocommerce div.product div.images .woocommerce-product-gallery__wrapper { pointer-events: none; } |
Over to you!
Now I’d like to hear from you.
Which of these WooCommerce and WordPress images optimization techniques is most useful for you?
Do you have any great tips which would be useful for other readers?
Let me know by leaving a comment below right now.


 Turbocharge your WooCommerce store load times
 Easily customize your WooCommerce product catalog
 Shopify Accessibility: Why WCAG Compliance Matters for Your Store
 ADA Lawsuits Targeting eCommerce Store Websites
Thanks for the tips Simon! I’ve now enabled the Jetpack Images optimizations as you have suggested.
When it comes to images, I usually tend to save them at around 50-60 quality in Photoshop…below that it feels like it’s too pixelated, but maybe it’s just me.
Anyway, great job, really helpful blog posts! 🙂
You’re very welcome Andrea!
Hi Simon,
I just wanted to say thank you for this detailed guide.
I recently switched over to WPCompress for image optimisation and CDN. Their compression seems to sharpen smaller thumbnails which works very well for my products with sometimes intricate designs.
The delivery of images in Australia is super fast. Especially on 3G connection, it makes a difference.
Cheers,
Edward
Great advice regarding WPCompress Edward, thank you!
You say: “You’ll have seen that there is no height setting. That’s because WooCommerce will display the image proportionally according to how it was uploaded. It doesn’t support a height setting because of this, as it’s not needed.” I would propose that this is a somewhat short sighted statement. Perhaps you have a solution for my use case?
We have a wine shop that was recently migrated to woocommerce. Being a wine shop, we have a few hundred existing product images of wine bottles that have a height which is 4-6 times the width. (We also have many images that have a more “standard” ratio) It would be very time consuming and somewhat impractical to manually edit and re-upload all of these.
If the only dimension we can adjust is the max width, then our images could now display 500px wide and 3000px tall. This is unacceptable for an attractive product page. We need to be able to constrain the height to 500px as well, which would then scale the width to approx 85px and make the image look nice.
I have searched google for a good solution with no love. How can this be accomplished?
Hi Jared, maybe give this a go. I’ve tested it locally and it seems to work pretty well. https://wordpress.org/plugins/smart-image-resize/
That looks like a very useful utility going forward. I’ll look into it.
What I ended up doing was using the code inspector in chrome to identify the UI classes that my theme was using for the image and then apply the following custom css
{
object-fit: contain;
width: 100%;
max-height: 500px; !important;
}
If you can’t get the above code to work for single product image zoom, try changing the 99 to 90. Thanks Simon for updated script!
add_action( ‘after_setup_theme’, ‘cg_remove_zoom_lightbox_theme_support’, 90 );
function cg_remove_zoom_lightbox_theme_support() {
remove_theme_support( ‘wc-product-gallery-zoom’ );
remove_theme_support( ‘wc-product-gallery-lightbox’ );
}
Hello Simon. Hope you’re doing well. I have no experience of photoshop or anything related to graphic designing. I am a developer and was stuck with large images for my new project. I was thinking to reduce the size, tried many standalone websites and just stumbled upon this page. Thank you, thank you so much, just not for helping me reduce the size of the images, but giving me my first ever successful experience with Photoshop. Thank you. I will never forget this as I was so scared of learning photoshop while craving to know it so much. Thanks, man. God bless you.
Hey Simon, Thanks for the awesome guidelines with great detail.
Just wondering how you are using .webp images in your theme images as I tried myself WordPress is showing error and not accepting this format. I read about .webpg optimization for the web and it does loads faster than other formats.
Thanks again for the guide.
Take care
Hey Amar! We’re using Jetpack’s images CDN for webp images, it converts automatically.
Super useful article, thank you Simon! I am going to try your idea of uploading large images for flexibility, but setting exact width in customizer, then removing zoom and lightbox. I’ll include a zoomed image in the gallery to compensate, and believe that across the shop this should have a substantial reduction in bandwidth.
Also thanks much for the tip about the thumbnails plugin, I couldn’t figure out why my woo gallery thumbs were not being regenerated by woo.
Hi Simon,
In this article you say that JPEG is the best file format choice. Do you still think that in 2023? Or is WebP a better choice now in your opinion? Thanks
despite my thumnails loading thumbnail sizes on the product page it actually loads the full size picture on the page. Load time is long.
the img src attribute points to the thumbnail but the srcset attribute points to three sizes and the full size image is one of them. How can I fix that?
small thumb but loads full 1800px original image:
srcset=”https://…/uploads/IMG_2067-1800×1200-510×340.jpg 510w, https://…/uploads/IMG_2067-1800×1200-247×165.jpg 247w, https://…/uploads/IMG_2067-1800×1200.jpg 1800w” sizes=”(max-width: 510px) 100vw, 510px”>
other, larger thumbs but faster loading thumbnails have only two definitions. Original file is 3000px:
srcset=”https://…/uploads/IMG_2636-510×340.jpg 510w, https://…/uploads/IMG_2636-247×165.jpg 247w” sizes=”(max-width: 510px) 100vw, 510px”>
I wonder why they actually have two or three for each thumbnail.
My Thumbnail overview consists of 3 sizes though.
The img tag has so many unknown to me attributes like data-large_image, decoding, srcset, sizes, data-o_src, data-o_srcset, data-o_sizes, data-o_data-src,data-o_data-large_image, data-o_data-large_image_width/width. Phewww. I guess the latter are for some seo extensions