If you want to customize how your WooCommerce store looks and/or functions, understanding WooCommerce hooks is going to make your life a whole lot easier. We’ve included two videos at the end which allow you to follow along step-by-step.
Hooks make it easy to insert content or change behavior at specific parts on your store, like the checkout page, shopping cart page, etc. What’s so great about WooCommerce hooks is that they let you do this without needing to edit any of the underlying theme template files.
In this post, we’re going to cover everything hook-related. You’ll learn:
- What hooks are in a general WordPress sense
- How understanding hooks can make your life a whole lot easier
- The WooCommerce hooks that you can use to modify your store
- How to actually use hooks to insert or modify content
- Three real-world examples of WooCommerce hooks in action to spark some inspiration
- Two videos where you can follow along exactly how to do it
By the end of this post, you’ll know more about hooks than this guy:

What are WordPress Hooks in General?
Before we get into the topic of WooCommerce hooks, let’s talk about hooks in a general WordPress sense.
A WordPress hook lets you “hook in” to a specific part of your WordPress site to add new functionality/data or modify your site’s existing behavior.
For example, the wp_head hook is a core WordPress hook that lets you insert scripts or data into the <head></head> section of your site.
Let’s say that you want to add the Google Analytics tracking script to your site.
Rather than using a Google Analytics plugin or manually editing the header template of your child theme, you could just use the aforementioned wp_head hook to easily insert the Google Analytics tracking script at the right location.
Hooks can be both actions and filters:
- Action – these let you do “something” new. For example, inserting your Google Analytics tracking script into the header of your site like I mentioned above.
- Filters – these let you modify the behavior of something that already exists (a variable). For example, you can use a filter to change the text of the add to cart button across your entire store.
WordPress comes with its own set of hooks in the core software. But WordPress themes and plugins, like WooCommerce, can also add their own hooks.
How WordPress Hooks Make Your Life a Lot Easier
As an end-user, the big benefit of WordPress hooks is that they make it a lot easier for you to modify how your site works or insert new content.
Without hooks, you would need to manually edit your child theme’s template files every time you wanted to make a modification to your site’s code.
Not only is this a lot more complicated, but it also means that you’re effectively locked in to that theme. If you ever change themes, you would lose all of the modifications that you made.
Thanks to WordPress hooks, it’s the opposite:
- It’s super easy to insert or modify code because you do not need to work with the underlying theme template file.
- Your changes are portable because all of your hooks will keep working even if you change themes. Excluding any hooks that come directly from your theme – more on these later.
What are WooCommerce Hooks?
WooCommerce hooks are just like regular WordPress hooks, but specifically located to help you customize your WooCommerce store.
For example, you can use hooks to add text or icons to your shopping cart or checkout pages, modify your single product pages, and lots more.
Let’s go through the WooCommerce hooks that you’ll likely have access to…
The WooCommerce Plugin Comes With Its Own Hooks
By default, WooCommerce comes with a lengthy list of hooks. Beyond adding tons of filters to help you modify default WooCommerce functionality, you also get lots of action hooks that let you modify core WooCommerce pages like the:
- Single product page
- Shop archive pages
- Shopping cart page
- Checkout page
If you want to view a full list of all the available filter and action hooks, you can check out the WooCommerce docs here. This list is a bit overwhelming because, as I said, WooCommerce comes with a ton of hooks.
If you’re specifically interested in action hooks to add new content to various parts of your store, I would instead recommend checking out the awesome Visual Hook Series from Rodolfo at Business Bloomer.
Basically, it gives you visual previews so you can understand exactly where each action hook will output its content on the page. Here’s a small sample from Rodolfo’s series:
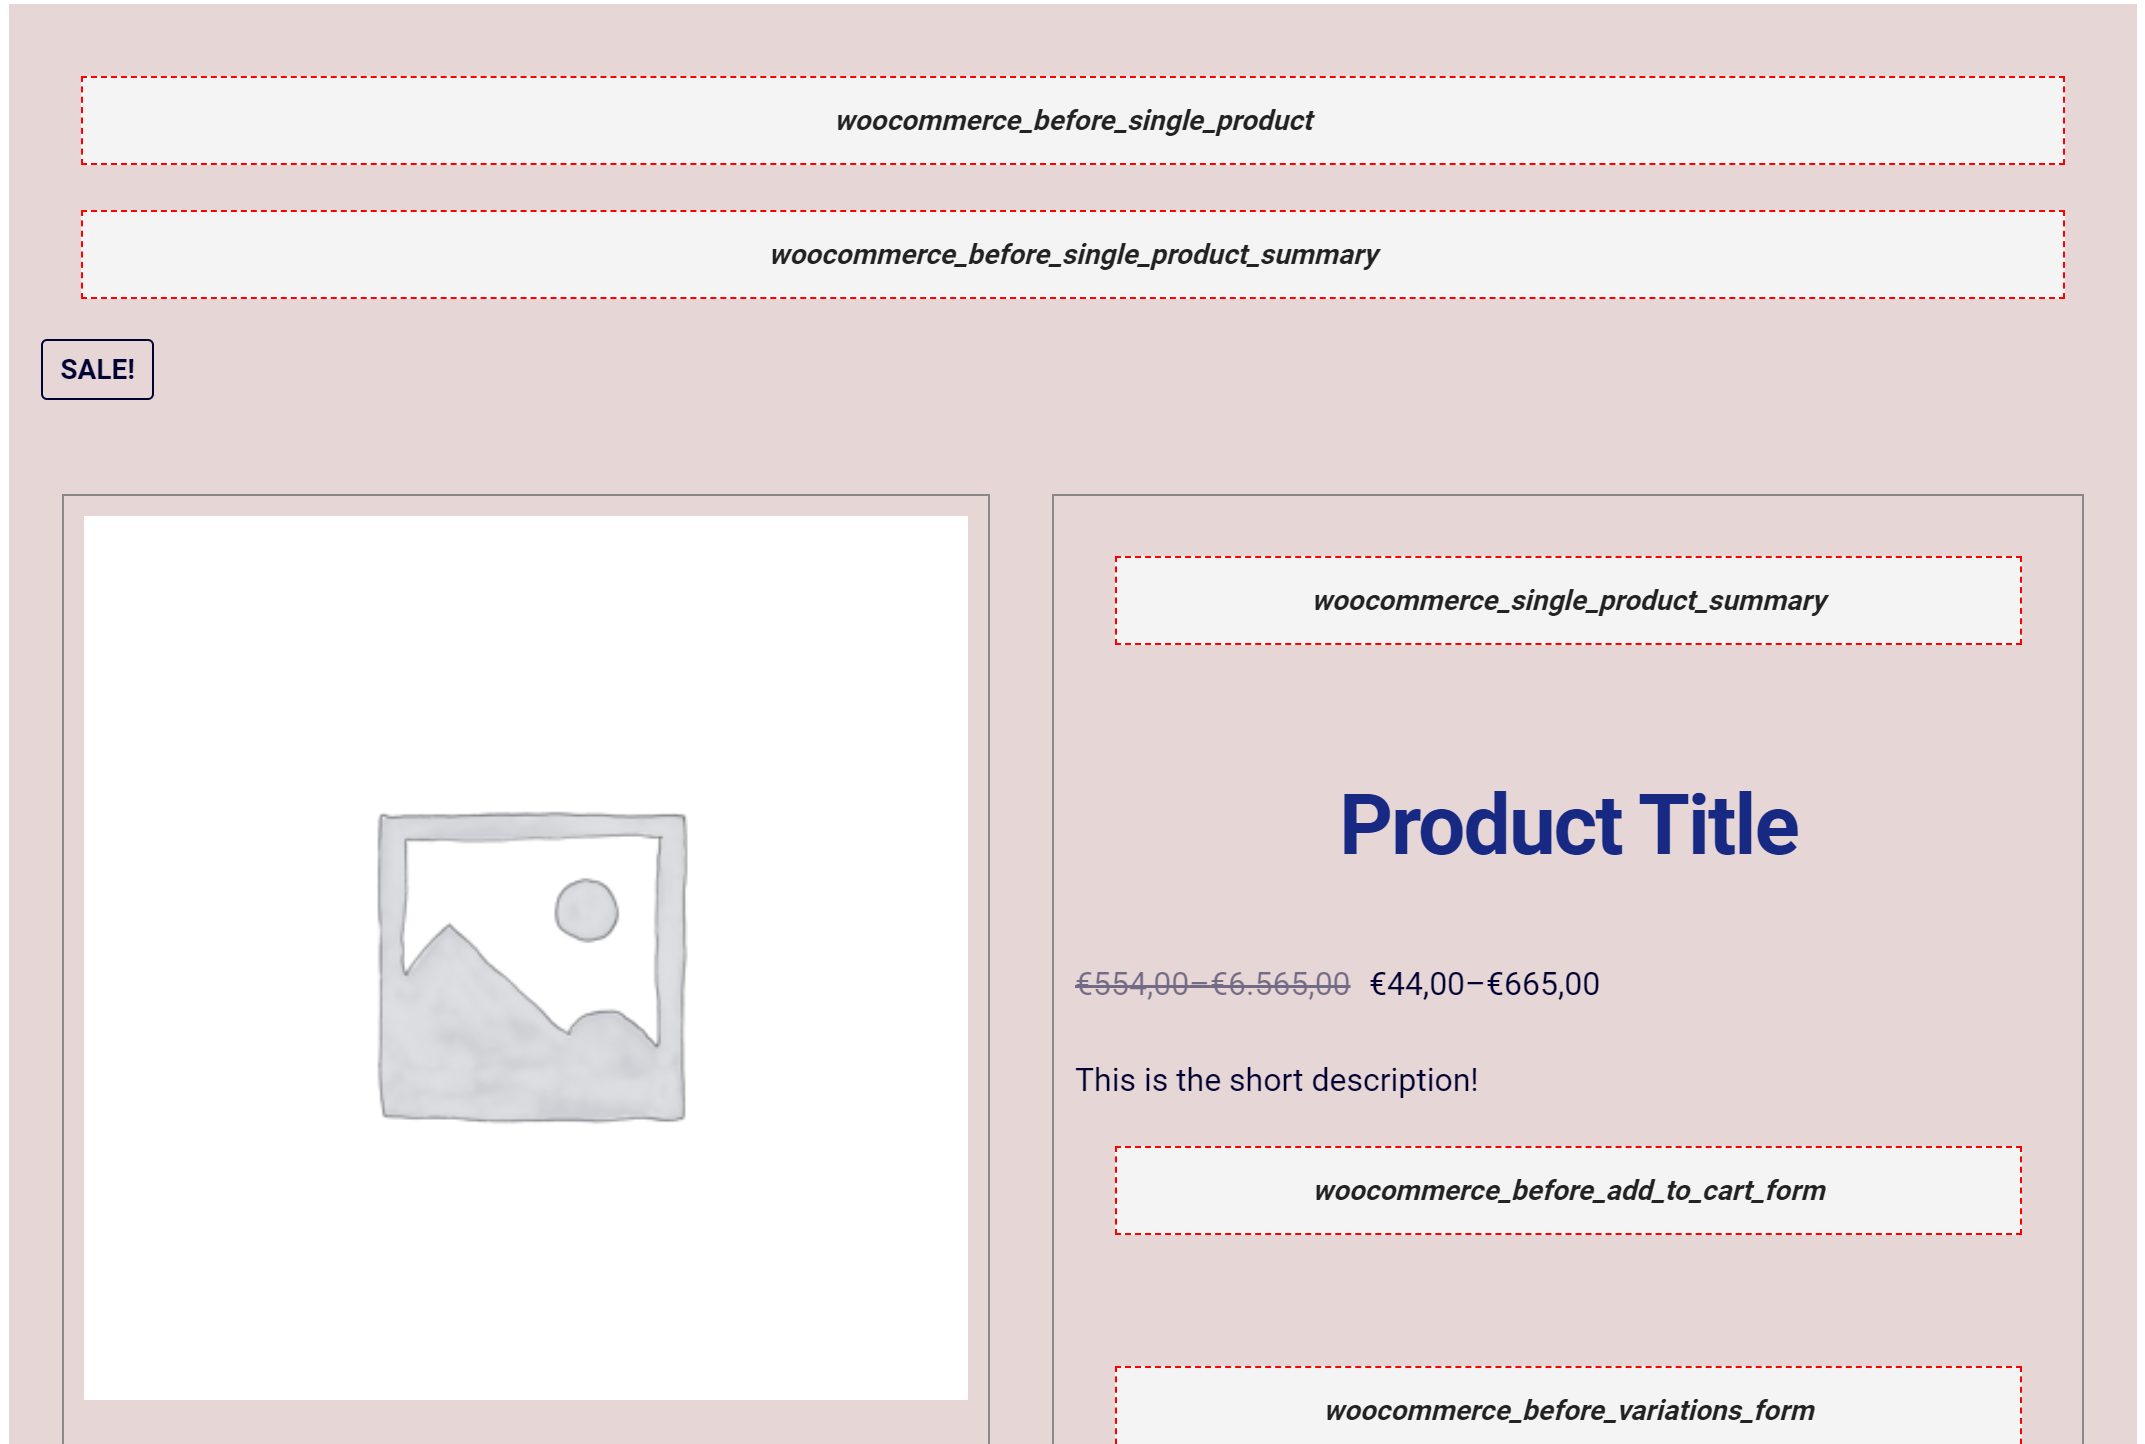
So if you wanted to add new content above the product title on the single product page, you know that you need the woocommerce_single_product_summary hook.
Here are some of Rodolfo’s most relevant guides:
Your WooCommerce Theme Adds New Hook Locations
Beyond the hooks that are included in the core WooCommerce plugin, your chosen WooCommerce theme likely adds its own hooks to give you even more flexibility.
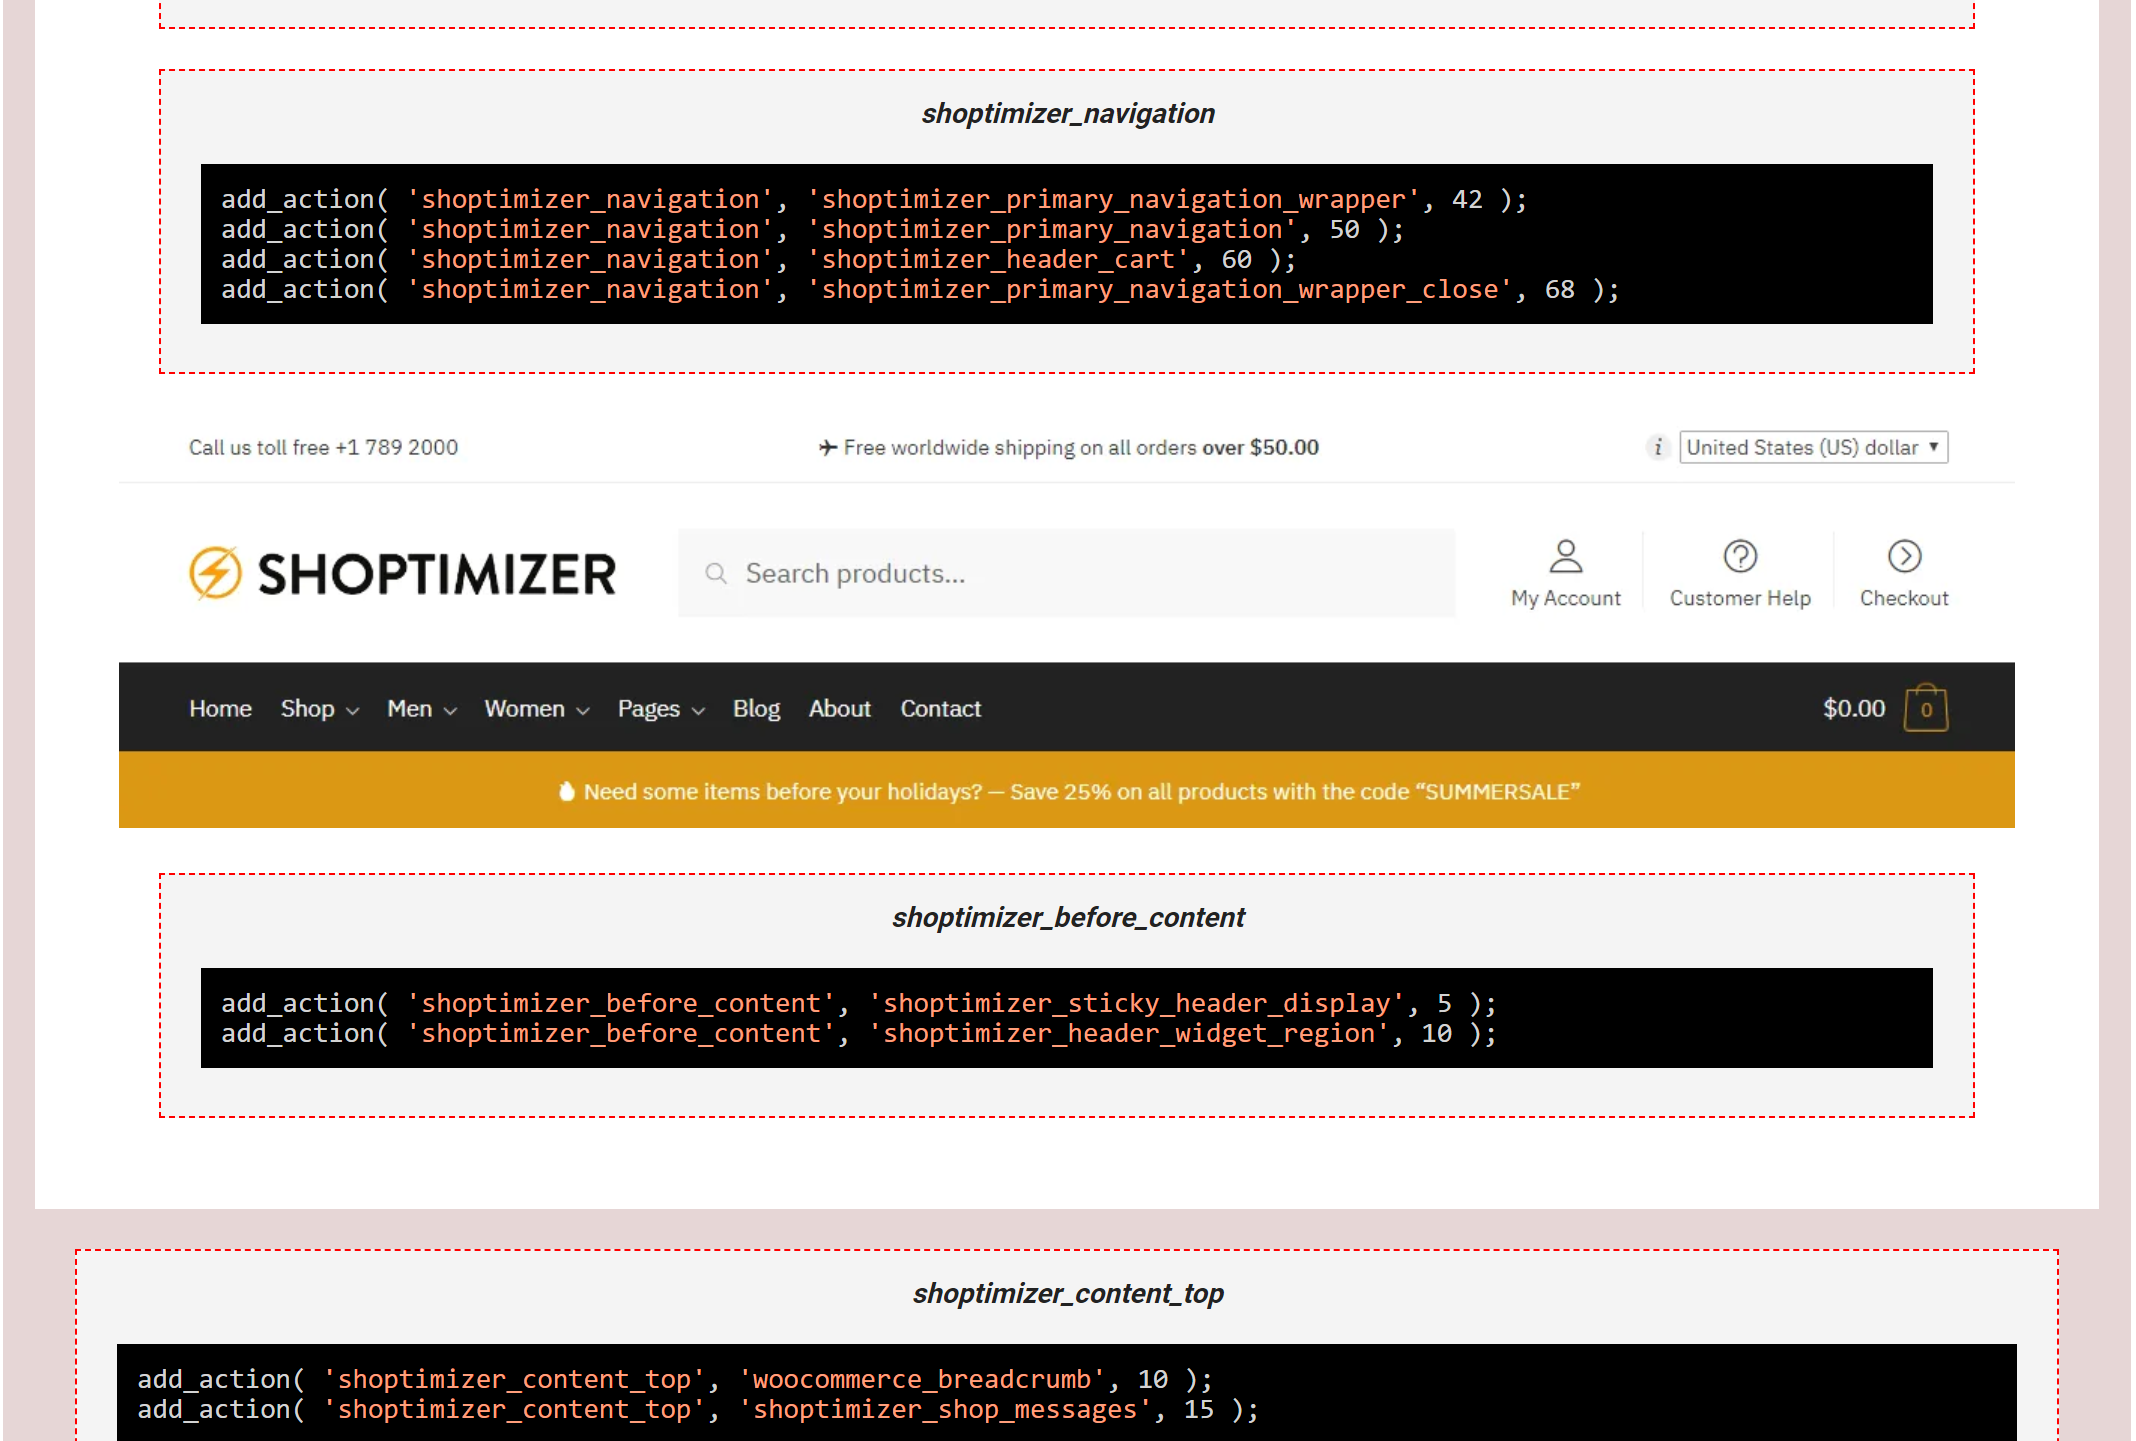
For example, our Shoptimizer WooCommerce theme includes a number of hooks to help you modify its:
- Header
- Footer
- Sidebar
- Pages
- Posts
For example, Shoptimizer lets you easily inject content above your navigation menu or before the content.
Rodolfo at Business Bloomer also put together a visual guide to the Shoptimizer hooks:
How to Use WooCommerce Hooks
To use WooCommerce hooks (or WordPress hooks in general), you’ll need to add code to your site. But again, you do not need to edit the template files themselves – you can add this code all in the same spot.
There are two places you can add this code:
- Your child theme’s functions.php file.
- A code snippet management plugin – I like Code Snippets.
While it’s fine to use your child theme’s functions.php file, I’m going to recommend (and use) the Code Snippets plugin for a few reasons:
- It’s much easier to manage multiple hook snippets because you can give each snippet its own separate entry.
- You can easily enable/disable specific hooks as needed.
- It’s more portable because all of your code snippets will automatically come along even if you change WordPress themes.
To add a new hook with Code Snippets, you…
- Go to Snippets → Add New
- Give your hook a name to help you remember it
- Add the code for your hook in the code editor
- Choose where to run the snippet (when in doubt, you can just Run snippet everywhere)
- Click Save Changes and Activate to make it live
If you want, you can add multiple hooks in the same Code Snippets entry, but I find it more convenient to create separate entries for each hook.
Now, let’s reinforce this knowledge with some real-world examples…
Three Real-World Examples of WooCommerce Hooks
Now that you know what WooCommerce hooks are and how to use them, let’s finish things out with some real-world examples of WooCommerce hooks in action to pull everything together and give you some inspiration.
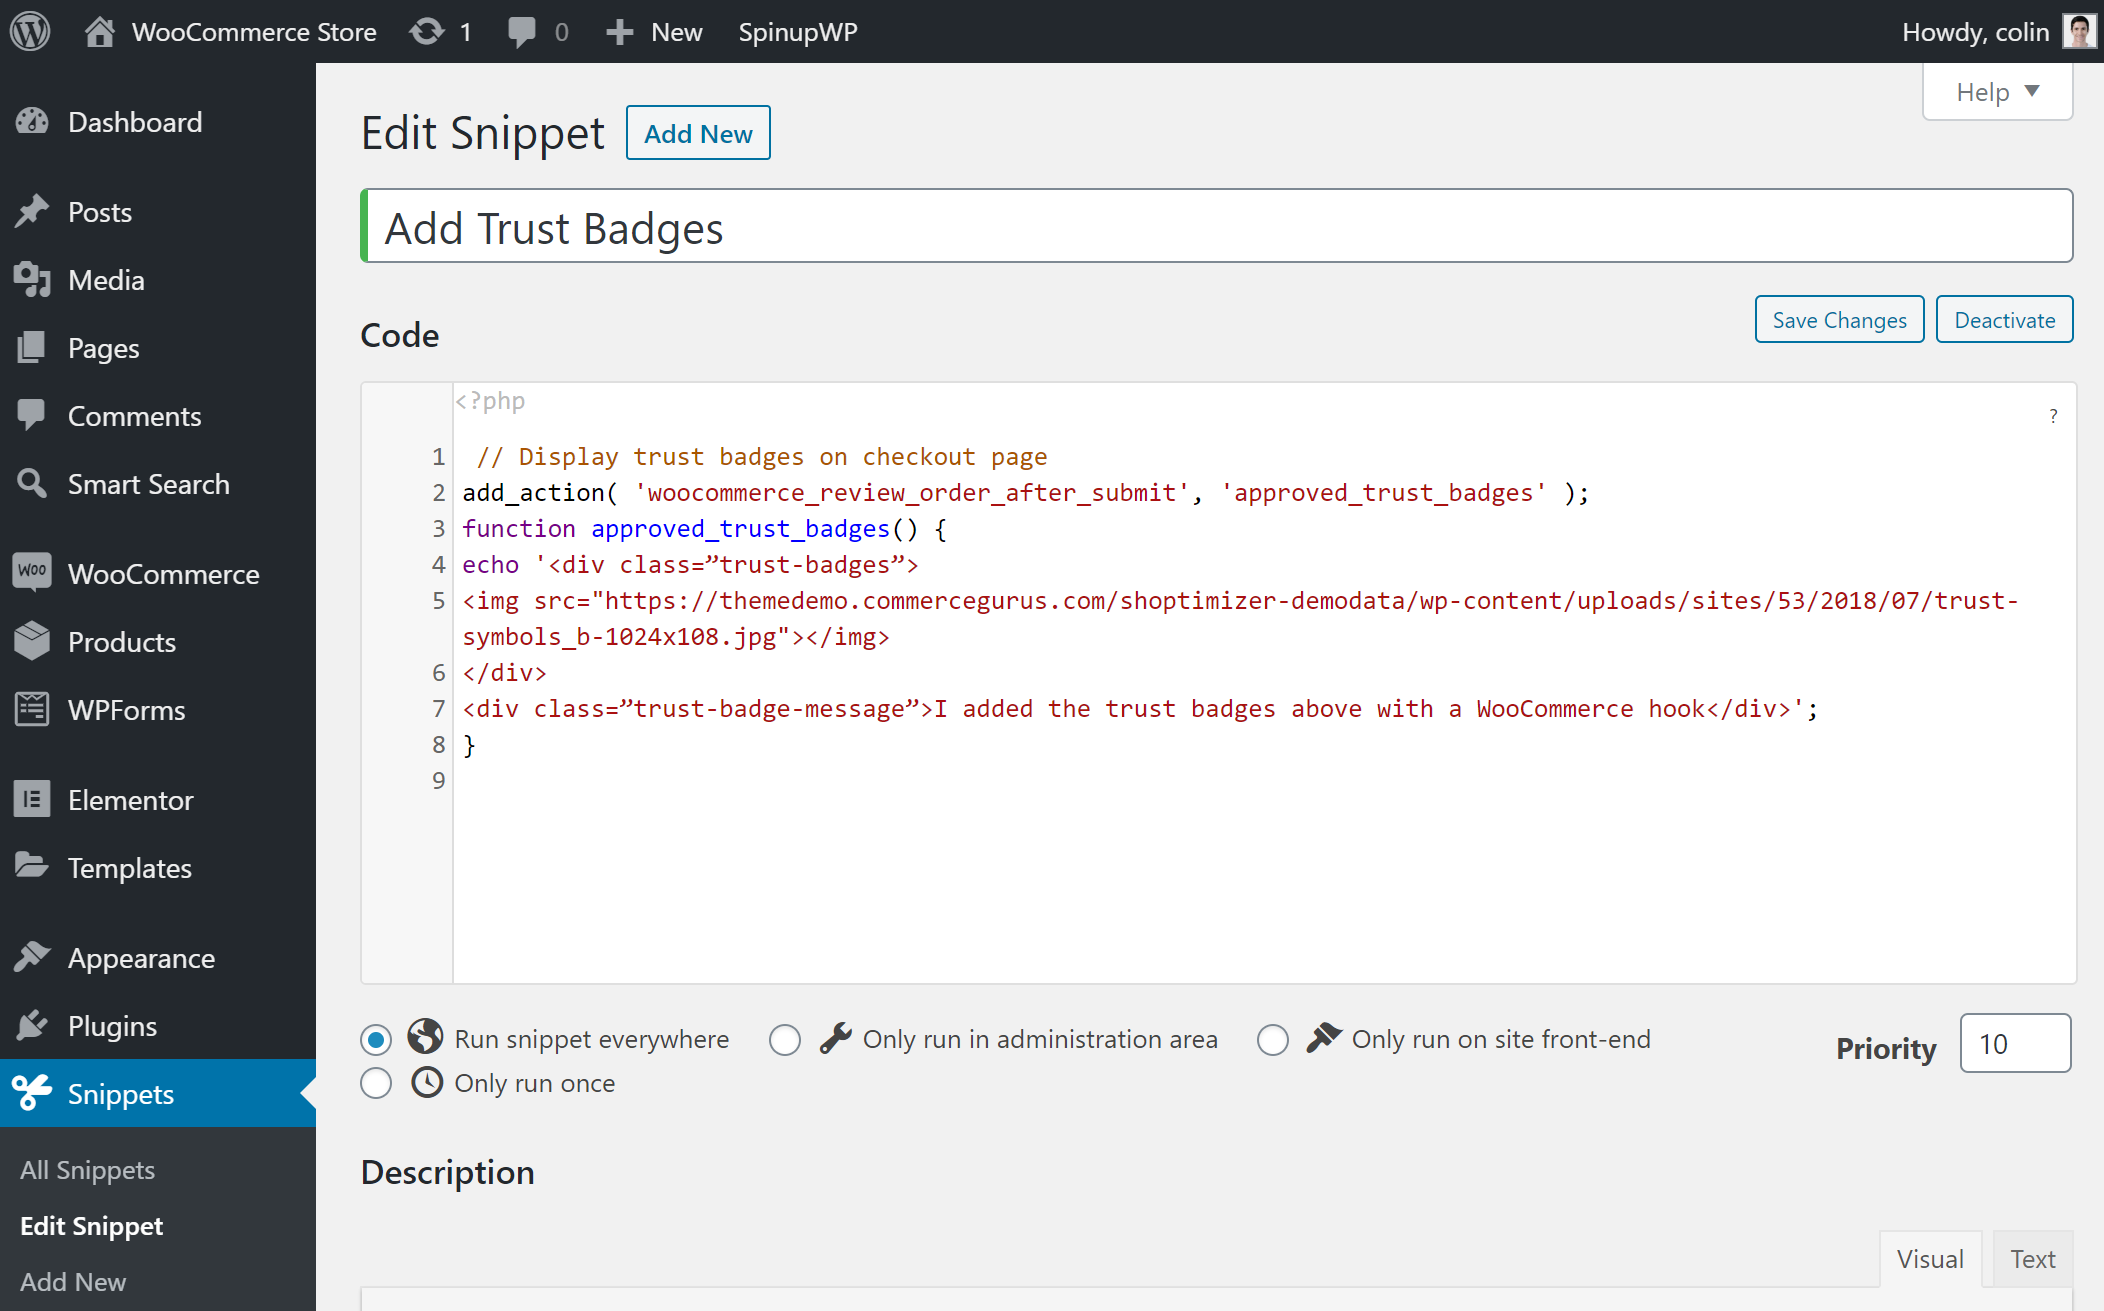
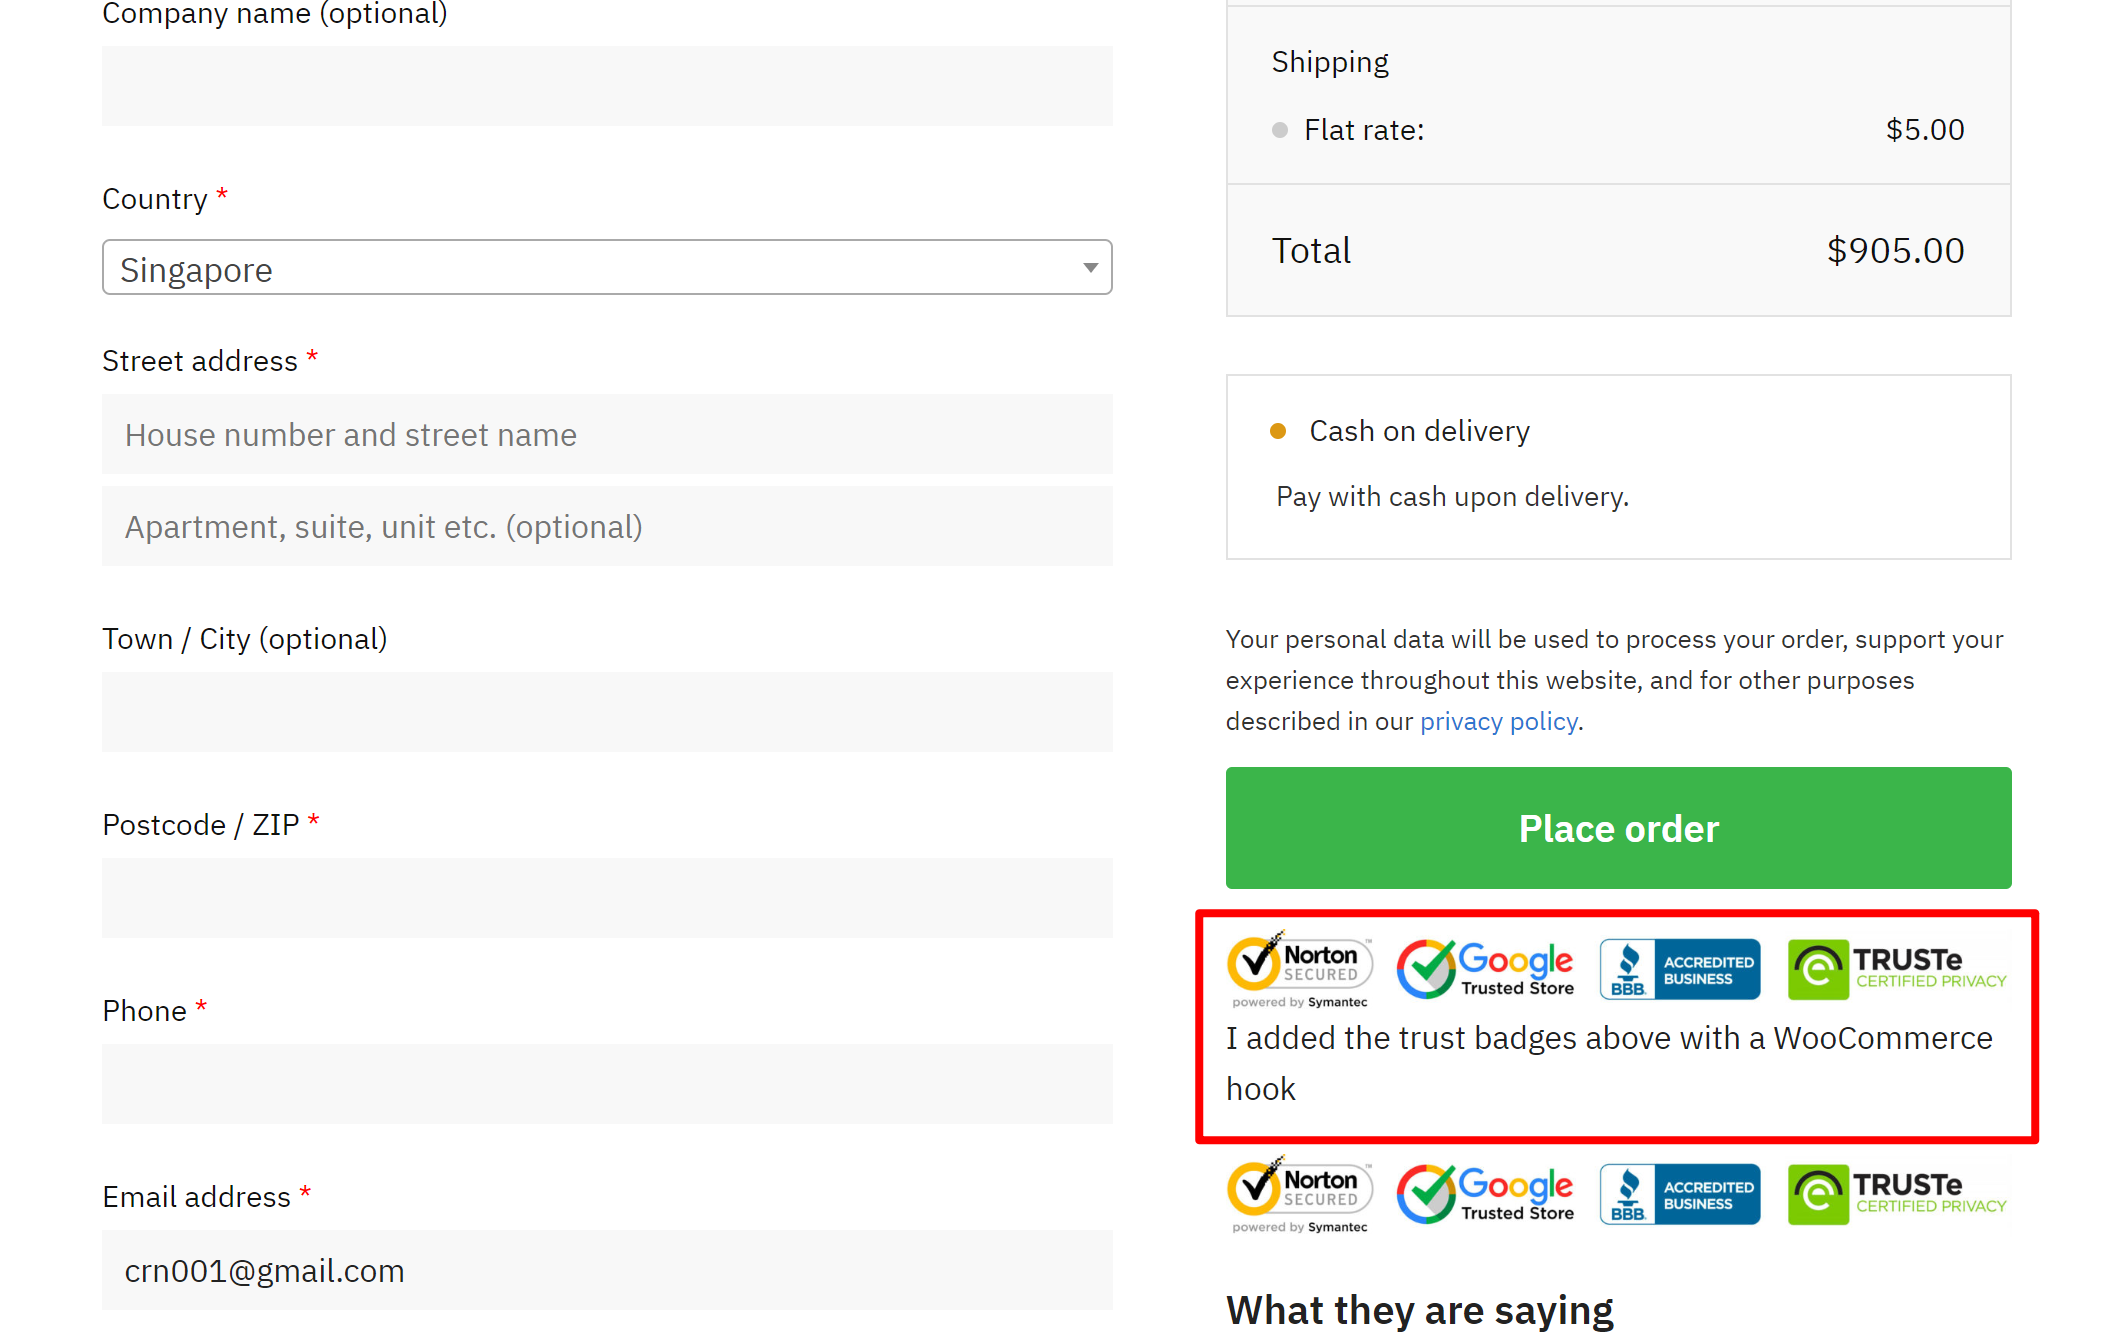
1. Add Trust Logos to the Checkout Page
Displaying trust logos right as a person is going through their purchase is a great way to boost your conversion rates.
While the Shoptimizer theme automatically adds trust badges and testimonials below the Place order button, not all WooCommerce themes offer this out of the box.
If your theme doesn’t come with these conversion-boosting elements, you can use the woocommerce_review_order_after_submit hook to add your own.
For example:
|
1 2 3 4 5 6 7 8 |
// Display trust badges on checkout page add_action( 'woocommerce_review_order_after_submit', 'approved_trust_badges' ); function approved_trust_badges() { echo '<div class="trust-badges"> Add trust badges here </div> <div class="trust-badge-message">I added the trust badges above with a WooCommerce hook</div>'; } |
The first row of trust badges comes from the WooCommerce hook, while the second row is already present in the Shoptimizer theme:
2. Show Credit Card Logos on Cart Page
Questions about available payment methods are a big cause of shopping cart abandonment. To make it easy for shoppers to quickly know which payment methods you support, you can add credit card/PayPal badges on the shopping cart page that indicate which payment methods you support.
To add this immediately below the Proceed to checkout button, you can use the woocommerce_after_cart_totals hook and either images or font icons.
For example:
|
1 2 3 4 5 6 7 8 |
// Display payment methods on shopping cart page add_action( 'woocommerce_after_cart_totals', 'available_payment_methods' ); function available_payment_methods() { echo '<div class="payment-methods-cart-page"> Add credit card logos here </div> <div class="payment-methods-message">We accept the following payment methods</div>'; } |
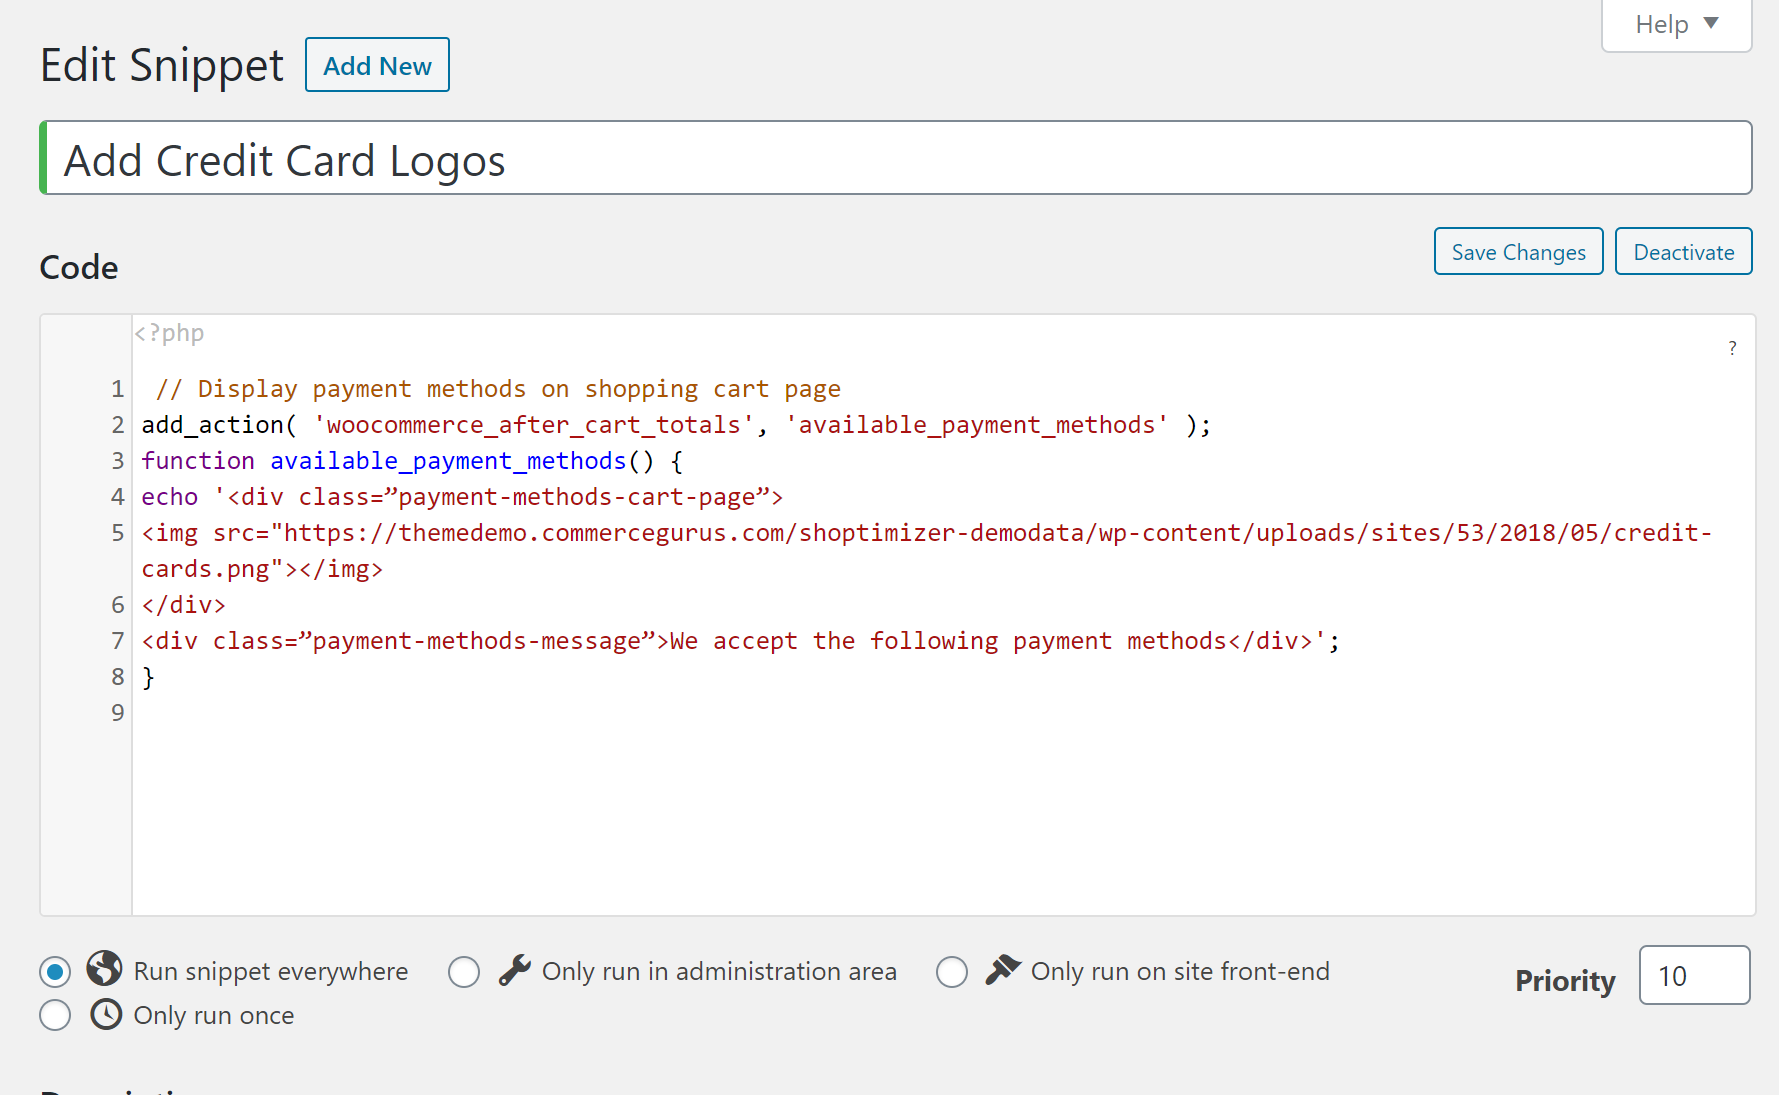
And you can see the credit card logos underneath the Proceed to Checkout button:
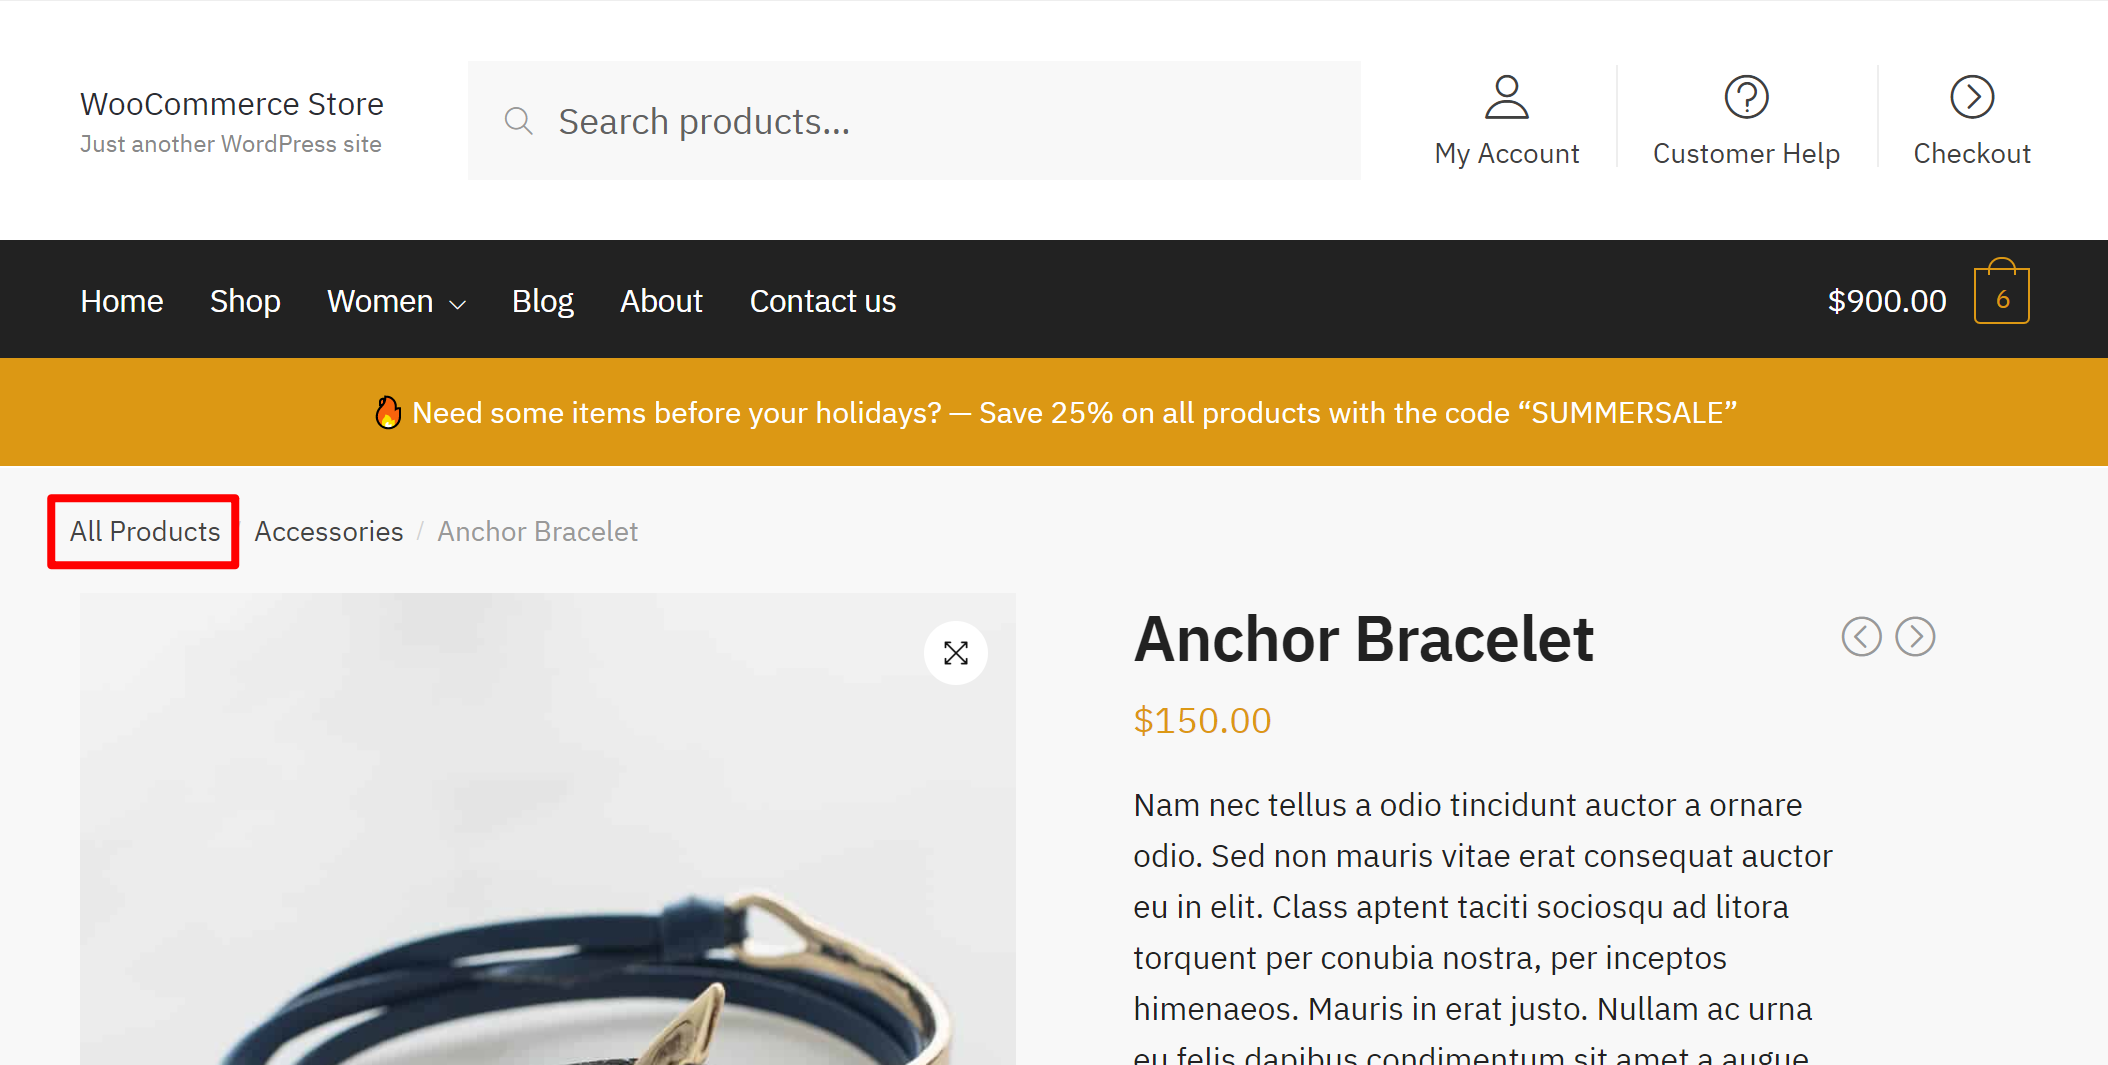
3. Change the WooCommerce Breadcrumb Text
The previous two examples of WooCommerce hooks used action hooks to add new content, but remember that there’s another type of hook – filters.
So here’s an example of using a filter hook to change the text on your store. In this case, it’s the text of the breadcrumbs that appear on the single product page.
Let’s say you want to change the default “Home” to “All Products”:

To change that text, you could use the following filter:
|
1 2 3 4 5 6 7 8 9 |
/** * Change "home" to "all products" in Woo breadcrumbs */ add_filter( 'woocommerce_breadcrumb_defaults', 'wcc_change_breadcrumb_home_text' ); function wcc_change_breadcrumb_home_text( $defaults ) { // Change the breadcrumb home text from 'Home' to 'All Products' $defaults['home'] = 'All Products'; return $defaults; }<code></code> |
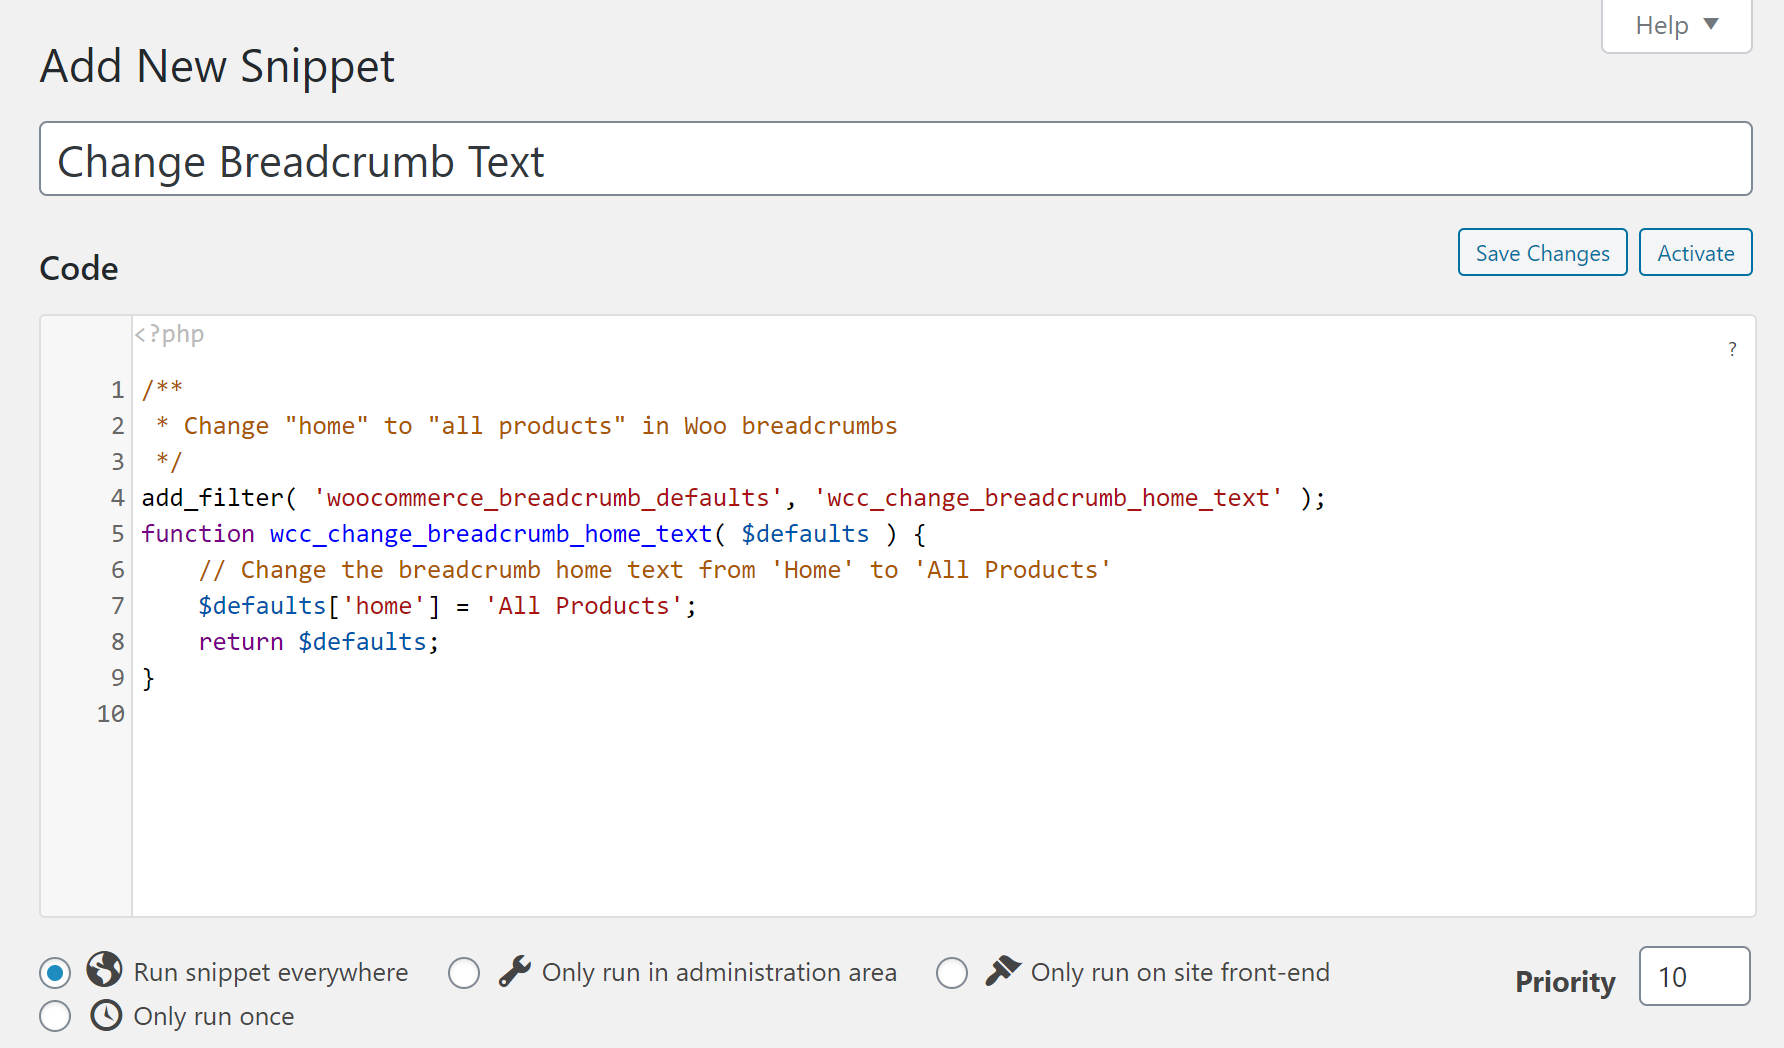
And voila – you’ve changed the breadcrumb text:
Bonus video #1: How to remove content from the Single Product Page
Business Bloomer have a number of videos available as part of the CustomizeWoo course which walk you through the process of hooks so you can easily follow along. Rodolfo has kindly given us two exclusive free videos, just for CommerceGurus readers.
The first shows you how to remove content from the single product page.
Bonus video #2: How to edit Checkout Fields
The second exclusive video shows you how to edit the fields displayed on your checkout without needing any additional plugins.
Get Started With WooCommerce Hooks Today
If you want to be able to easily modify your WooCommerce store without directly editing your theme’s template files, learning how to use WooCommerce hooks is a great way to make your life easier.
For the easiest way to get started, I recommend checking out the aforementioned Visual Hooks guide at Business Bloomer, as it makes it a lot easier to understand how the abstract hooks actually appear on the front-end WooCommerce content pages.
Then, you can use Code Snippets or your child theme’s functions.php file to start adding your own WooCommerce hooks.
Do you have any additional questions about how WooCommerce hooks work? Leave a comment and let us know.


 4 Great Customer Service Ideas
 Customizing WooCommerce Checkout Fields
 What we’ve been up to – plus WordCamp 2016
 WordPress 4.0 is released. Captiva customers are ok to update
Great article!!! Do you know how to add a back link or a back button to the woocommerce before single product area? I need a back link on the top left of each single product page.