In this guide, we’ll be covering how to install WooCommerce from scratch. It assumes that you are already running WordPress and are logged into the dashboard.
Install WooCommerce Automatically
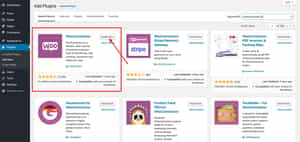
It’s more straight forward to install the WooCommerce plugin automatically, rather than manually uploading a zip file. Go to Plugins and Add New.

Next, search for WooCommerce and click the Install Now button to add the plugin. It can take a few seconds for the plugin to download and install. Once complete, make you to press the Activate button to enable it.
The WooCommerce Setup Wizard
The plugin should automatically initialize the WooCommerce setup wizard. This is not essential to complete but we’d suggest following it. You can always go back and change the details later. WooCommerce is a very flexible eCommerce platform and has a lot of settings you can customize so this makes it a lot easier to get started.
Store setup
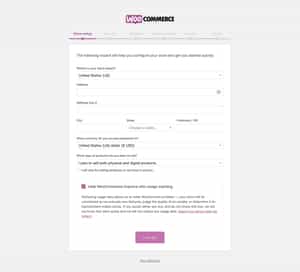
The first step will ask you the following questions.
- The location and primary currency of your online shop.
- The kind of goods you’re planning on selling; physical, digital, or both.
- Whether you’ll be selling products or services in person.
You can also choose to turn off usage tracking. You can click the link to find out what kind of data is collected and if you’d prefer to opt out.
Payment
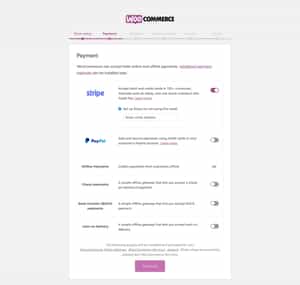
On the second step – the payment screen – you’re given a number of options depending on what you previously selected as a location and currency. If you did not tick that you’ll be selling in person you’ll see options for only Stripe and PayPal.
You can choose to enable any payment option by clicking the button to the right into the on position.
- Stripe supports over 32 countries around the world and you can use it to process automatic payments using the WooCommerce Subscriptions plugin. For more information on setting up Stripe for WooCommerce see this article within the documentation.
- PayPal is supported in over 200+ countries and with over 250 million active PayPal accounts it’s an easy way to facilitate speedy payments from your customers. PayPal credit is an option for US customers, should you wish to enable this. It allows customers to split the cost into multiple payments, but you will still get paid the full amount. For more information on PayPal for WooCommerce see this article.
If you did tick that you’ll be selling in person, you’ll see additional payment gateways depending on where your store is located.
- Square will be added if you live in the US, Canada, Australia, Japan or the UK.
- Klarna if you reside in Austria, Denmark, Finland, Germany, the Netherlands, Norway, Sweden, or the UK.
- eWAY if you live in Australia or New Zealand.
- Payfast if you are located in South Africa.
You can also choose if you want to accept offline payments by clicking on the arrow which toggles a slide down list of options.
Shipping
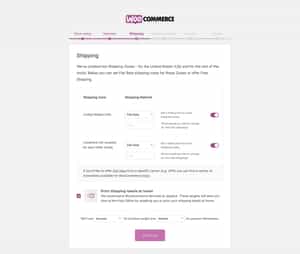
On the shipping step, the wizard will automatically create two shipping zones for you. One, for the country your store is based in. And one for the rest of the world. You can create other zones later, e.g. one for Europe, or exclude certain countries if dispatching items to that particular region is too problematic or expensive.
If you’re based in the US you’ll have the option to tick the Print shipping labels at home checkbox. You can also choose the unit of measurement for weight and dimensions.
Recommended
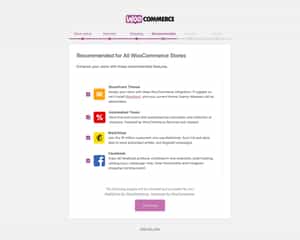
This section can change depending on where your store is located and what theme you currently have active. Options you can select include:
- Storefront Theme – this installs the default theme from WooCommerce. Even if you’re planning on using a different theme (hopefully our Shoptimizer WooCommerce theme 🙂 ) it can be useful to add it as a method to test plugins or features.
- Automated Taxes – using the Jetpack plugin, this feature can automatically calculate taxes at the checkout depending on where your customer is located.
- Mailchimp – Installs the Mailchimp for WordPress plugin. As you can see from the poor ratings I’d suggest unticking this. The Mailchimp for WP plugin from Ibericode is superior.
- Facebook – This will add the Facebook for WooCommerce plugin. Again, I’d avoid this – the forums reveal multiple issues with it.
Activate
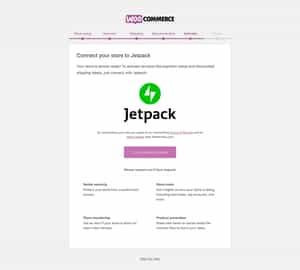
If you’ve made certain decisions during the setup wizard which requires additional functionality you will likely get the Activate step which will install the Jetpack plugin. Jetpack is a plugin from Automattic which has a free plan tier and then paid versions.
I’d recommend sticking with the free plan. It has all you need to get started. Features which are useful for store owners include:
- Store statistics – keep track of how many visitors a day you’re getting and what are the most popular pages and products.
- Store monitoring – sends you an alert if your site goes down for any length of time.
- Security – increases the protection around your login area, helping better prevent brute-force attacks.
- Lazy loading images – makes your site faster by not loading images until your visitors have scrolled to them.
- Content CDN – Delivers your images via their high performance servers and automatically resizes large images to make them smaller and faster to load.
Ready
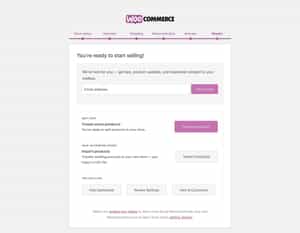
On the final Ready step, WooCommerce has been installed and you will be given several options.
- You can sign up for the WooCommerce newsletter. This is useful and will provide you with information of new updates when they are available.
- An option to begin creating products right away.
- You can import existing products if you have a csv file. If you’d like to populate your empty store with some demo items to see how everything looks you can download a test csv file from WooCommerce here.
- Review Settings to see how everything in WooCommerce is setup. You can also access that via WooCommerce > Settings.
- View & Customize will launch your site, with the customizer open.
- Watch guided tour videos on how to use WooCommerce – a good resource for beginners.
- Access the getting started guides within WooCommerce’s main documentation.
Resuming the Wizard later
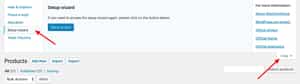
If you’ve have not completed the wizard, skipped it, or want to resume it you can do so. Simply go to Products and click on the Help link on the top righthand side. A bar will slide down and within the vertical tabs on the left side click on Setup Wizard. You will see a button to resume the wizard.
WooCommerce Pages
After completing your install, WooCommerce will add certain pages to your site which are crucial for everything to work correctly. These are: Shop, Cart, Checkout, My Account, and Terms and Conditions.
It is important to check if these have been added are are assigned correctly.
You can do so by going to WooCommerce > Status – and scrolling down to WooCommerce pages.
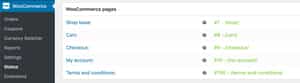
If everything is correct – you’ll see the page titles next to each and they will be in green. If a page is missing, you’ll see it in red.
What happens if you’re missing a page?
Don’t worry 🙂 You can add any missing pages easily. Still within WooCommerce > Status – click on the Tools tab at the top and scroll down. You’ll see a button to add any missing pages there.

How will I know if everything is setup correctly?
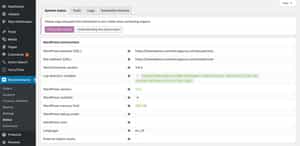
After installing WooCommerce it’s useful to check if everything has been set up correctly. There is a useful System Status report available within WooCommerce > Status. Anything in green is correct, items highlighted in red are issues of concern. Not everything in red is a problem but it’s worth noting certain things which could lead to problems running your store.
Things to look out for includes the PHP Version, the PHP Post Max Size, the PHP Time Limit and the PHP Max Input Vars.
If any of these are highlighted in red, you should raise a ticket with your web host and ask them to investigate. Your hosting may not be optimized to run WooCommerce which will lead to issues when you begin to take orders.
You can also click on the Get system report button to easily copy and paste all of this data into an email.
Switching to an older version of WooCommerce
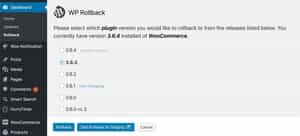
If you are encountering issues having updated to the latest version of WooCommerce you may wish to roll back to the previous iteration of the plugin. The simplest way to do this is by using the WP Rollback plugin. You can install it by searching for WP Rollback within ‘Plugins’.
Now, when you go to your Plugins section you’ll see a new Rollback link underneath each title. If you click on it for WooCommerce it will display the installed version and the most immediate previous releases. Simply click on an older version and then the Rollback button at the bottom to revert to that.
How to Uninstall WooCommerce
If you disable and delete the WooCommerce plugin this does not remove any of your data. Your WordPress database will still contain your orders, products, customer data, settings etc. You can however remove everything by adding a line to your wp-config.php file.
define( 'WC_REMOVE_ALL_DATA', true);With this line included, when you disable and delete the WooCommerce plugin – everything will be removed.
Any Questions?
Now, I’d like to hear from you. Have you come across an issue while installing WooCommerce you’d like me to cover in this guide? Let me know by leaving a comment below right now.


