The CommerceKit Waitlist module lets customers sign up to be notified when an out-of-stock product comes back in stock.
When stock is restored, CommerceKit automatically sends notification emails to everyone on the list – ideal to remind customers of a product they had their eye on and to increase sales.
Enabling the Waitlist
- Go to
CommerceKit → Waitlist. - Toggle Enable Waitlist on.
- Save settings.
A signup form will appear on product pages when a product (or variation) is out of stock.
Form settings
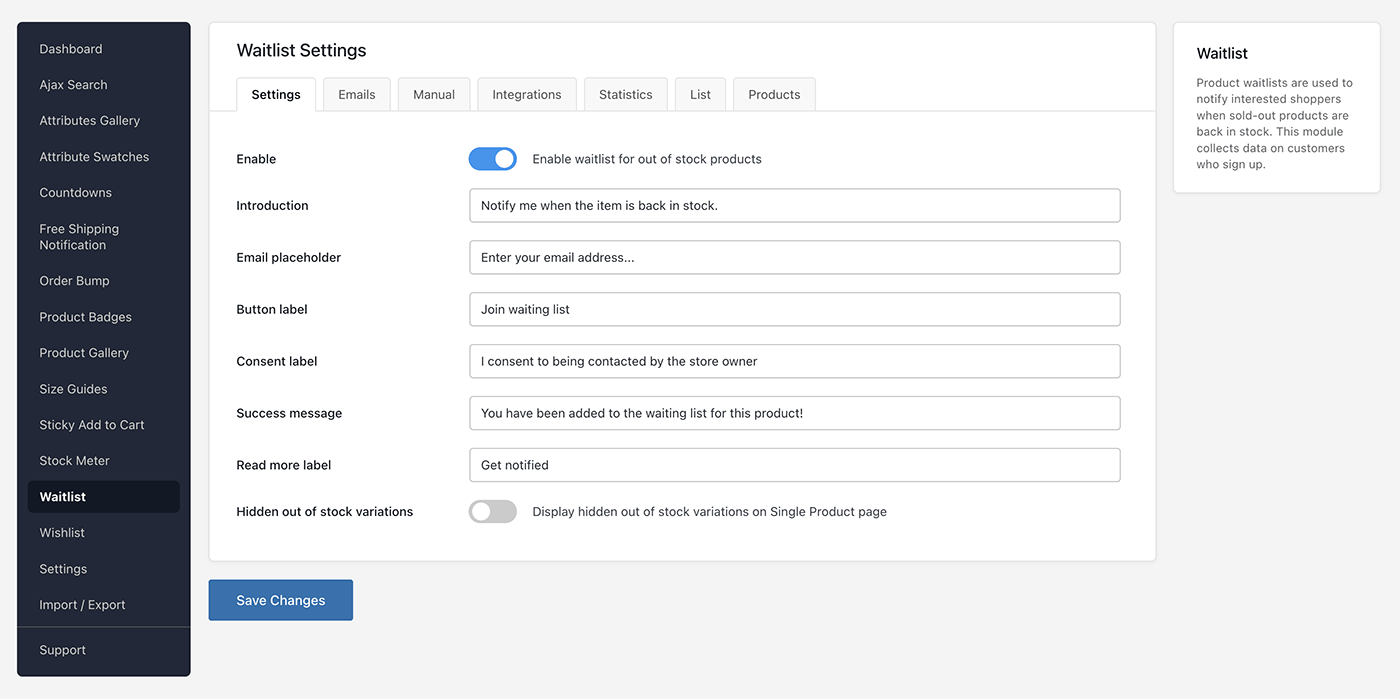
You can customise all text that appears in the waitlist form:
- Introduction text — shown above the email field
- Email field placeholder
- Button label (e.g. “Notify me when available”)
- Success message — shown after a successful signup
- Consent checkbox label — optional GDPR consent text shown alongside the signup form
To require customers to check a consent box before joining the waitlist, add your consent text to the Consent checkbox field in settings.
Email notifications

CommerceKit sends emails at three points:
| Trigger | Optional? | |
|---|---|---|
| Admin notification | Customer signs up | Yes |
| Customer confirmation | Customer signs up | Yes |
| Restock notification | Product returns to stock | Yes (but recommended on) |
All three email types can be enabled or disabled independently.
Each has its own subject line and body template, configurable from CommerceKit → Waitlist → Emails.
Email placeholders
Use these placeholders in your subject lines and email body templates:
| Placeholder | Output |
|---|---|
| {site_name} | Your site name |
| {site_url} | Your site URL |
| {product_title} | Product name |
| {product_sku} | Product SKU |
| {product_link} | Product URL |
| {product_image} | Product featured image |
| {customer_email} | Customer’s email address |
| {optin_link} | Double opt-in confirmation link (double opt-in only) |
Double opt-in
Enable Double Opt-In to require customers to confirm their email address before being added to the waitlist. When enabled, customers receive a confirmation email after signing up and are only added to the active list once they click the confirmation link.
This is recommended if you want to ensure list quality or if required by your local email marketing regulations, e.g. in the European Union.
Sender settings
By default, restock notifications are sent from your WordPress site’s default email address. You can override this:
- From name — the sender name that appears in the customer’s inbox
- From email — the sender email address
- Reply-To — set to either the customer’s email or your admin email
Viewing and managing the waitlist
Go to CommerceKit → Waitlist → List to view all current waitlist entries.
You can filter by product and by whether the restock email has been sent. From this page you can also bulk-delete entries or export the list.
To view which products have active waitlist subscribers, go to CommerceKit → Waitlist → Products. This shows the product name, number of subscribers, stock status, and variation count.
Sending emails manually
Go to CommerceKit → Waitlist → Manual to send restock notification emails outside of the automatic flow.
You can optionally filter to only notify subscribers who signed up before a certain date.
Waitlist statistics
Go to CommerceKit → Waitlist → Statistics to see:
- Number of products with active waitlist subscribers
- Total revenue attributed to waitlist conversions
- Number of additional sales driven by waitlist notifications
- Overall conversion rate
Integrations
The Waitlist module integrates with Klaviyo and Omnisend if you prefer to manage restock notifications through those platforms.
Configure the integration under CommerceKit → Waitlist → Integrations