Order Bumps let you offer a complementary product to customers at checkout or in the mini cart. When a customer adds the bump product, it is added to their order with a single click — no separate product page visit needed.
Enabling Order Bumps
- Go to
CommerceKit → Order Bumps. - Toggle on Enable Order Bumps for the checkout page, the mini cart, or both.
- Save settings.
Creating an order bump
Each order bump is configured as an individual item with its own product, messaging, and display conditions.
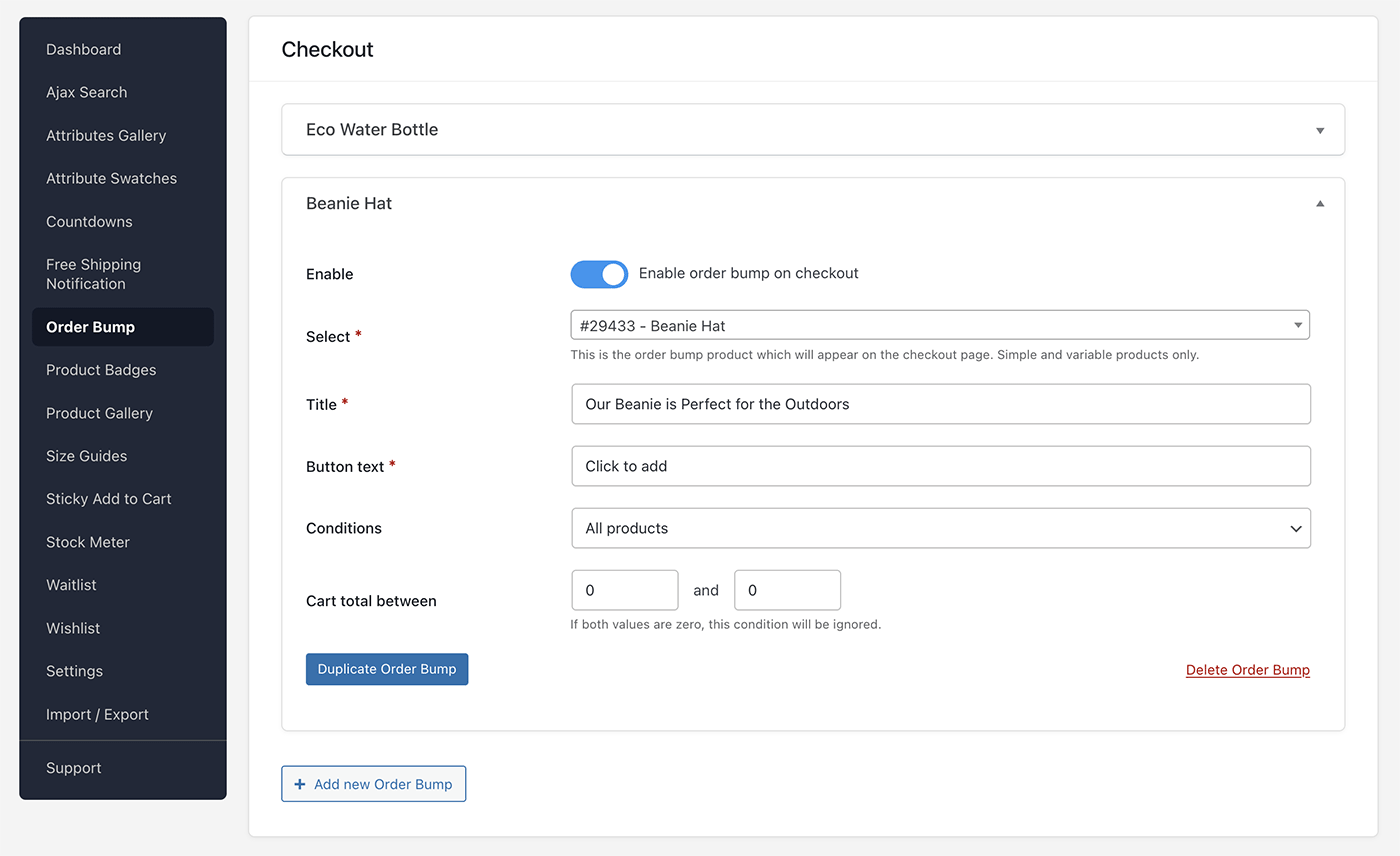
To add a bump:
- Under the Checkout or Mini Cart section, click Add Order Bump.
- Search for and select the product you want to offer. Simple and variable products are supported.
- Set the button text (e.g. “Yes, add this to my order!”).
- Optionally add a custom title for the bump.
- Set the display conditions (see below).
- Toggle the bump active.
- Save settings.
Display conditions
Each bump can be set to show for all products, or limited by:
| Condition | Description |
|---|---|
| All products | Always shown |
| Specific products | Only when a matching product is in the cart |
| Exclude products | Shown for everyone except when a matching product is in the cart |
| Specific categories | Only when a product from a matching category is in the cart |
| Exclude categories | Shown unless a matching category is in the cart |
| Specific tags | Only when a matching tagged product is in the cart |
| Exclude tags | Shown unless a matching tagged product is in the cart |
You can also set a minimum and/or maximum cart total to further restrict when a bump appears.
Variable product bumps
When the selected bump product is a variable product, a variation selector is shown inside the order bump so the customer can choose a variation before adding it to their order.
Multiple order bumps
You can create multiple order bumps and they will each have their own display conditions.
Enable Allow multiple order bumps to show more than one bump at a time, and optionally set a heading label that appears above the group.
Bumps are evaluated in the order they are listed — simply drag to reorder them.
Placement
- Checkout: The bump appears above the “Place Order” button by default.
- Mini cart: The bump appears inside the mini cart panel when a customer opens it.
If you are using a page builder such as Elementor Pro for your checkout page, enable Shortcode mode within the settings and place the [commercekit_orderbump] shortcode where you want the bump to appear.
Order Bump statistics
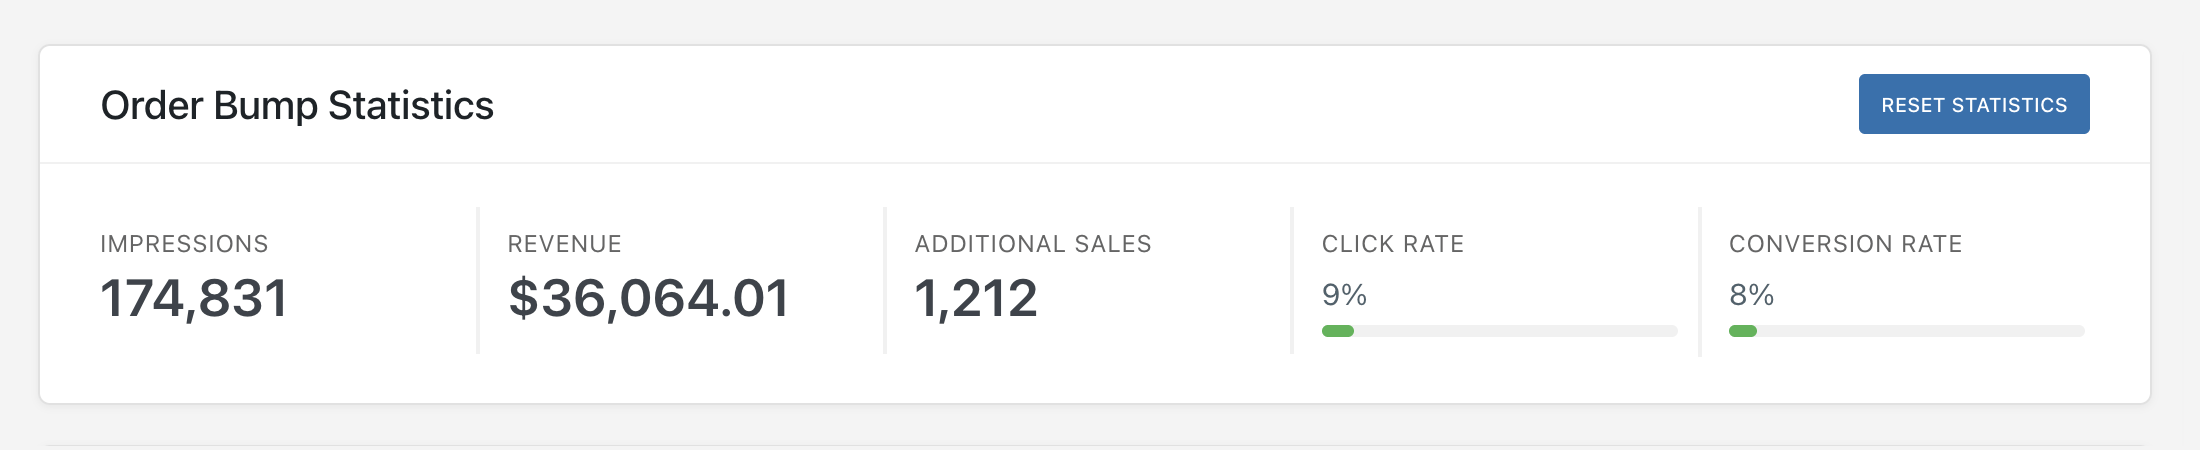
Go to CommerceKit → Dashboard. The Order Bump Statistics section appears near the top.
CommerceKit tracks performance data for your order bumps and displays it in the admin dashboard. This lets you measure how effectively your bumps are converting.
Metrics explained
| Metric | Definition |
|---|---|
| Impressions | Total number of times an order bump was displayed to a customer |
| Clicks | Total number of times a customer clicked the bump’s add-to-cart button |
| Sales | Total number of bump products added to orders and purchased |
| Revenue | Total revenue generated from order bump purchases |
| Click rate | Clicks ÷ Impressions × 100 — the percentage of displayed bumps that received a click |
| Conversion rate | Sales ÷ Clicks × 100 — the percentage of bump clicks that resulted in a completed purchase |
Click rate tells you how compelling your bump offer and copy is. Conversion rate tells you how many customers followed through to complete the purchase after clicking.
How tracking works
- Impressions are recorded when a bump is displayed to a customer.
- Clicks are recorded when a customer clicks the add-to-cart button on a bump.
- Sales and revenue are recorded when an order containing a bump product is completed.
Tracking is handled automatically in the background — no setup is required.
Resetting statistics
To clear all order bump statistics and start afresh:
- Go to CommerceKit → Dashboard.
- Scroll to the Order Bump Statistics section.
- Click Reset Statistics.
This action cannot be undone. All historical impression, click, sale, and revenue data will be permanently deleted.